All posts by dtAdmin

Outcomes Configuration

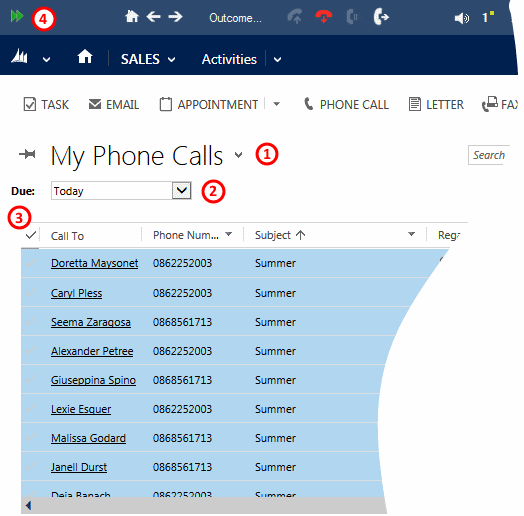
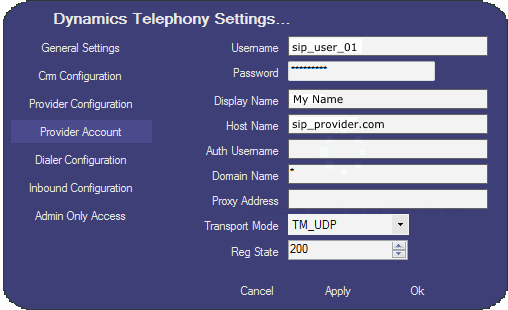
The Call Outcomes can be configured as follows.

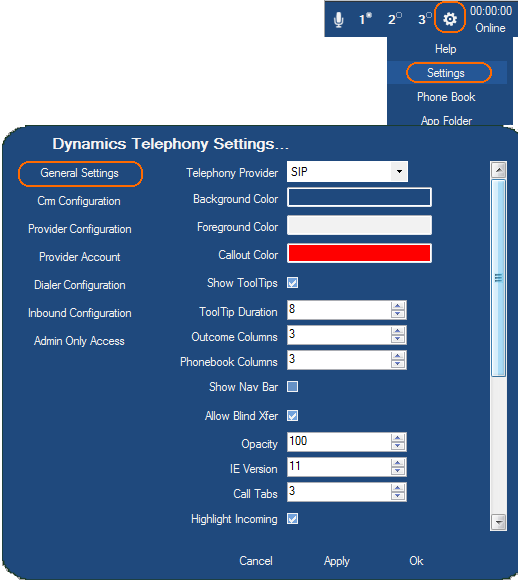
  1. To set the number of columns in the Outcomes menu, see Settings > General Settings > Outome columns
  2. Go to dashboard: Dynamics Telephony – Call Outcomes to set the outcome buttons.
    NOTE: If you do not see all the records so click “See the records associated with this view”
    Fields:

    1. Index: This determines the position of the button.
    2. Name: this is the text displayed on the button.
    3. Description: This is for your own use.
    4. isCallEnd: If “True” then clicking the button will also hang up the phone call. You can use this on all outcomes and train agents to set the outcome as they hang up the call. Definitely use it on outcomes such as “Fax”.
    5. isClose: If “True” then clicking the button will mean this phone call is not attempted again in the Progressive Dialer AND the associated Phone Call in CRM is closed. Use this for Outcomes such as “Wrong Number”, “Yes” or “No”.
    6. isDefault: If “True” then this outcome is applied to the phone call in the Progressive Dialer if no other outcome is chosen.
    7. isWrap: If “True” then Wrap time will be applied once the call is released. Use this for outcomes that should have a defined Wrap time.
    8. isCallback: If “True”, the agent will get a popup to set the callback date and time. this date and time will be saved in the phonecall activity as “Due”, and possible sent to DTI (if installed)
    9. isConnectXorAbort. Only for handling Contact Center outbound calls with DTI. See here.
    10. reqConnect: If “True”, this outcome cannot be chosen unless the call has been answered by the customer.
    11. retryMax:  After this number of retry attempts, if this outcome is chosen, the phone call is NOT tried again by Progressive Dialer. For example, you might choose to only try 3 times if the customer is “Busy”. If the value is 0, then choosing this outcome means the phone call is NOT tried again by Progressive Dialer
    12. retryTime: The number of minutes to bring this phone call back in the Progressive Dialer. For example, you might set Busy at 10 minutes.
  3. See here for other settings such as preview time, no-answer treatment and wrap time.

TIPS

For an outcome you would select while previewing a call – when you decide you don’t want to make the call ever, use settings like: Name: Hoax, reqConnect:false, isWrap:false, isCallEnd:true, isClose:true

Load Phone Calls into the Progressive Dialer

Anywhere you have a set of phone calls, you can add them to the Progressive Dialer to make calling them 50% more efficient.

This screen snap shows the first steps where you 1) Display your phone calls, 2) Choose the due date for the calls, 3) select all calls or just some of them and 4) click the Dynamics Telephony Dialer button to import the phone calls to the progressive dialer

dialer_select_phone_calls

Once loaded, the Progressive Dialer will start immediately to dial the first phone call with a screen pop of it. See here for the Dialer controls and here for the Dialer settings.

First Client Install

The FIRST time you install a client requires special procedures. Follow the instructions below.

What you will need:
  • Telephony Registration Details (e.g. for SIP you need the SIP server/host, username and password)
  • URL to your CRM instance. 
  • The Service User details. See here for more. This user is referred to as dt_user below. 
  • Once you have the above, the install will take less than 10 minutes.
Steps
  1. Install the CRM Solution from the link sent to you.
  2. Client install. Go to the link sent to you in your contract email and click Install to download the  click-once installer (setup.exe). You can do this in parallel with step 1 above but pause at step 6 below until the solution import is completed OK.
  3. You may be prompted to install Visual C++ Runtime before the main install of Dynamics Telephony, if it is not already present on your PC.
  4. Run the installer, and follow on-screen instructions. It takes less than a minute. Depending on your virus checker and environment, you may have to click to trust the publisher a few times.
  5. Dynamics Telephony starts automatically.
  6. Enter the base CRM URL determined in “What you will need” above in the screen shown
    enter_crm_uri
  7. Only for first time install of the first client, you need to enter username and password as shown below. Pick Auth Type OAuth or Client Secret. Microsoft no longer support Office 365 for this type of user.


    NOTE: If this step has been done before, then all the fields in the screen above will auto-fill once you enter the CRM URL and click/tab out of that field.

  8. This part can take a minute or 2 (only for the first client)
  9. From within Dynamics Telephony, logon to Dynamics CRM as a normal user, (not the “dt_user”, although this is allowed).
  10. Go to Menu > Settings, in the default (General Settings) tab, select the type of telephony provider you want to use.
    settings_general
  11. Then click the Provider Account tab. Fill in your own Specific telephony settings as highlighted below. 
    settings_provider_account
  12. If you have Windows Firewall running, you may be presented with an “Allow Access” dialog. You must allow this access for Dynamics Telephony to run.
  13. Make a test call by clicking on a phone number in CRM


Vonage Settings

You need to add a Softphone Device to your Vonage Extension. Vonage allow up to 3 devices on an Extension. See here for details of how to do this.

The following table highlights the specific settings you should apply in Dynamics Telephony:

Dynamics Telephony Tab Dynamics Telephony Setting Value Comment
Provider
Configuration
DTMF Mode DM_Outband This is RFC 2833
Expires 1800
Provider
Account
Username e.g. VH123456 SIP/Authorization ID
Password SIP Password
Host Name E.g. sip-1234.accounts.vocalocity.com Registrar
Domain Name * A single asterisk ‘ * ‘
Transport Mode TM_UDP


Evolve IP Settings

The following table highlights the specific settings you should apply in Dynamics Telephony:

Dynamics Telephony Tab Dynamics Telephony Setting Value Comment
Provider
Configuration
DTMF Mode DM_Outband This is RFC 2833
Expires 1800
Provider
Account
Username e.g. 6107654321 SIP Authorization ID. You can arrange with Evolve IP for a “Shared Call Appearance” if you like
Password SIP Password
Host Name voip.evolveip.net Evolve IP Domain or Realm. If this does not work use the Evolve IP proxy Address (could be voip-b.evolveip.net)
Domain Name * A single asterisk ‘ * ‘
Proxy Address Blank.
Transport Mode TM_UDP


ShoreTel On Site Settings

The following table highlights the specific settings you should apply in Dynamics Telephony:

Dynamics Telephony Tab Dynamics Telephony Setting Value Comment
Provider
Configuration
DTMF Mode DM_Outband This is RFC 2833
Expires 1800
Provider
Account
Username e.g. 7788 Extension number on ShoreTel system.
Password SIP User Password
Host Name E.g.10.11.12.13 IP address of the SIP Domain or Realm.
Domain Name * A single asterisk ‘ * ‘
Proxy Address Leave blank
Transport Mode TM_UDP


RingCentral settings

The following table highlights the specific settings you should apply in Dynamics Telephony for RingCentral:

Go to RingCentral document on getting settings HERE

Dynamics Telephony Tab Dynamics Telephony Setting Value Comment
Provider
Configuration
DTMF Mode DM_Outband This is RFC 2833
Expires 3600
Provider
Account
Username e.g. 16147788991 Usually users phone number
Password SIP Password
Host Name sip.ringcentral.com SIP Domain from RingCentral
Domain Name * A single asterisk ‘ * ‘
Proxy Address  e.g. sip10.ringcentral.com:5090

or

199.255.120.176:5090

 Outbound Proxy from RingCentral. NOTE you might need to use the ip address for this instead – so PING it and get the ip address
Auth Username  e.g. 210987654321 Authorization ID from RingCentral
Transport Mode TM_UDP


If inbound calls are not working, try turning off ringing of the RingCentral Desktop and Mobile App, per this screenshot

ringCentralDesktopFwdOff


Avaya Aura Contact Center (AACC)

GET A TRIAL GOING IN 20 MINUTES !
– NO SERVER REQUIRED.

YOU ARE RISKING BEING FIRED, if you have Avaya Aura Contact Center and Dynamics 365, and you do not try out Dynamics Telephony.

Check it out on Microsoft AppSource HERE.

Dynamics Telephony for Avaya Aura Contact Center provides the perfect Unified Agent Desktop for Dynamics 365 and Avaya Aura Contact Center agents – out-of-the-box.

Related: Microsoft Omnichannel & Avaya AACC Blended

Dynamics Telephony provides real agent efficiencies, saving time on every inbound and outbound call. All through a beautifully simple and seamless integration between CRM and AACC.

All calls logged in CRM automatically. This means your customer records in CRM have a full trace of all inbound and outbound conversations.

Agents have all the Contact Center controls they need: Login/ Logout, Ready / Not Ready, Not Ready Reasons, accept / reject calls, hold transfer and conference.

avaya_cct_nrdy

Inbound screen pop means the handling time of every call is reduced. Dynamics Telephony retrieves the callers number from Avaya Aura and uses it to find the callers record in CRM. This can be CRM lead, opportunity, case, contact or account

Skillset support means the skillset called is passed to your CRM page to be logged in CRM, and to influence the data displayed to the agent so they can deal with the call correctly.

Inbound Dialed Number or DNIS support means that agents can see which phone line, or DNIS, the call is coming in on. This can be via name and logo, like this..

incomingCallTabPopup

Also, the DNIS can cause the popped CRM page to be populated based on DNIS. For example, to select the Marketing Campaign or Source of the call.

IVR Data can be used for the screen pop (e.g. an order number), or to show IVR choices made (e.g. the caller wants to make a purchase), or to show the caller has been pre-authenticated by the IVR.

Avaya Outbound contacts can be processed by Dynamics Telephony. This means that contacts presented to an agent by Avaya Outbound will pop the related record in CRM and will be processed by the Dynamics Telephony progressive dialer algorithm. See HERE for more details

CRM Dashboards showing unified CRM & Telephony data are provided. You can adjust these for your own needs using standard CRM tools, as all data is stored in CRM. See HERE for more.

Dynamics Telephony is specifically designed to be flexible to meet many advanced need – out-of-the-box. But in addition, it is designed to be extensible to meet your specific needs easily. See the full list of Dynamics Telephony features HERE


Compatibility: CCT version 6 (Nortel) and greater. Knowledge worker or Contact Center Agent

Citrix: Yes, Dynamics Telephony is Citrix compliant

Hot Desking: Yes, Dynamics Telephony supports Avaya CCT based hot desking.

Avaya Aura Agent Desktop: Yes, Dynamics Telephony can work at the same time as AAAD on an agents PC.

Settings: CCT User, password, CCT Server, port number. You can use one user for all or dedicated users. See these settings:

avaya_cct_settings_1

avaya_cct_settings_2

Single Sign On (SSO):  Yes Dynamics Telephony supports Windows single sign on. Simply leave the CCT username blank and DT will use the current windows user to sign on to CCT

Architecture Diagram: avaya_architecture

Please contact us for a personal demonstration of Dynamics Telephony for Avaya Aura Contact Center

GET A TRIAL GOING IN 20 MINUTES !
– NO SERVER REQUIRED.

btn_FreeTrial btn_MainSite


Transferring Calls

You can use Dynamics Telephony to transfer any call to any destination. For example, you might use Dynamics Telephony to transfer callers to another department or person.

Refer to this screen snap and the descriptions below.

phonebook

Transfer using Dial Box

With a call active on a Call Tab, move your mouse over the Phone Book icon and then down to the Dial Box. Enter the phone number to call and either press Enter or click on the Call button beside the Dial Box. The caller is put on hold automatically.

When the third party answers, click Complete Transfer to complete transferring the first caller to the third party.

If you decide not to complete the transfer, you can go back to the caller by clicking on their Call Tab and then clicking the Hold / Resume icon on the toolbar.

Transfer using Phone Book

With a call active on a Call Tab, move your mouse over the Phone Book icon and then down to a contact and click. The caller is put on hold automatically.

When the contact answers, click Complete Transfer to complete transferring the first caller to the third party.

If you decide not to complete the transfer, you can go back to the caller by clicking on their Call Tab and then clicking the Hold / Resume icon on the toolbar.

Blind Transfer

In the previous examples, if you first check Blind Transfer then, when you initiate the call to the third party, the caller is transferred to that third party without further action.

NOTE: You only see the Blind Transfer checkbox if Blind Transfer is allowed under Settings > General Settings > Allow Blind Xfer


Inbound call features

Dynamics Telephony will automatically display the name of the caller when they call in to your phone.

incomingCallTabPopup


Click on the Call Tab to automatically answer the call and see a full pop of the callers Account / Contact / Lead record or a Phone Call activity for the caller. The callers record will also get a Phone Call activity so you can see the full call history

inOutCallLog


If the callers number is in multiple accounts / contacts / leads then you get a list of all the matches to choose from.