All posts by dtAdmin

Load a set of leads into Dynamics Telephony Progressive Dialer

This process simply involves accessing the list of leads you want to phone and running the Quick Campaign Wizard

  1. Access a list of leads you want to phone.
  2. Select all the leads you want to phone.
  3. From the menu, select Quick Campaign (sse screen-snap below).
    • You get sub-options to select all on current page, or all on all pages, or just the select ones.
  4. Go through the Quick Campaign wizard.
  5. All you need to be careful of is to select activity type of Phone Call and the Subject must be filled out. this should be the reason for the call – e.g. Spring Conference Event.
  6. When done, you see a list of Phone Calls in your Activities that you import into Dynamics Telephony Progressive Dialer in the usual way – see here.

leads2quickCampaign

Dialer settings

The Dialer Configuration settings determine the behavior of Dynamics Telephony when dialing outbound calls in the Progressive Dialer.

setting_dialer_config


  • Preview Time – When a Dialer call starts, there is a countdown of this number of seconds before the call is actually dialed. This time is to allow you prepare for the call. You can click the FFWD control to skip this countdown.
  • Wrap Time – When a Dialer call is released, there is a countdown of this number of seconds, after which the next Phone Call is loaded and dialed.
  • No Answer Time – When a Dialer call has been ringing for this number of seconds it automatically gets the outcome “No Answer” and Dynamics Dialer moves on to the next phone call, and automatically and dials it.
  • No Answer Retry – Dialer calls who’s Outcome is “No Answer” are tried again this number of minutes later.
  • Max No Answers – Dialer calls that have this number of “No Answer” outcomes are removed from the Dialer and not dialed again.
  • Use Dial Prefix – When checked, all outbound calls are prefixed with some digits, as defined in the next section. This applies to Dialer, Dial Box, Phone Book and Click-to-dial calls. In addition, see a discussion of a prefix Dynamics CRM may apply to click-to-dial calls here
  • External Dial Prefix – This is the prefix described in the previous section. It can be for getting an outside line, or selecting a carrier, or both.
  • Internal Ext. Length – Insert the correct length of your internal phone numbers here to prevent the above prefix being applied for internal calls made using Dynamics Telephony


Click to dial

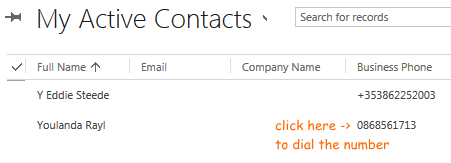
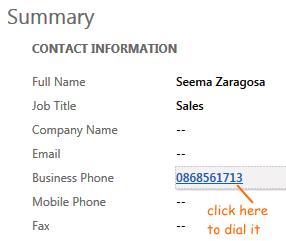
Dynamics Telephony allows you to easily dial phone numbers that are in Dynamics CRM. Anywhere you see a phone number you can click on it and Dynamics Telephony will dial the call. Here are two examples of where you can use this feature: a contact and a list of contacts.

If you are on a contact, the Add Phone Call activity opens automatically for you to note details of the call and save a call log.

click_list_to_dial

click_ph_to_dial

Enabling in CRM

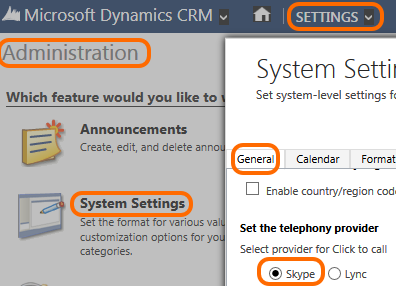
Enable in Settings > Administration > system Settings > General per this screen shot:

enable_click_to_dial_in_crm


Phone Number Prefix

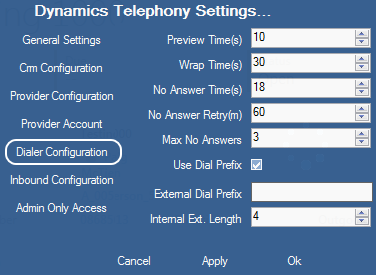
This feature will interact with the settings in Dynamics CRM for “Country/region code prefixing”. If you have enabled a prefix for the user or organisation in Dynamics CRM, then Dynamics Telephony will use the prefix too. In addition, Dynamics Telephony can add another prefix for getting an outside line. See here for outside line prefix set in Dynamics Telephony

Dynamics CRM Country/region code prefixing
For click-to-dial the phone numbers must be stored in a valid number format: . However, while entering data in Dynamics CRM, users may not specify the number in the correct format. To solve this, you can enable country/region code prefixing, and Dynamics CRM will prefix the code to the number that you are trying to call. This prefixing can be done at two levels, organization-level and user-level. The user settings override the organization level settings. NOTE: if the value in a phone number field does not start with a number, the prefix specified is not used.

To enable country/region code prefixing at the organization level

  1. In the Navigation Pane, click Settings.
  2. Under System, click Administration, and then click System Settings.
  3. On the General tab, in the Set the default country/region code section, select the Enable country/region code prefixing check box, and then in the Country/Region Code Prefix, specify the country/region code, such as +1.
  4. Click OK.

To enable country/region code prefixing at a user level

  1. On the CRM Settings Cog ( File menu in CRM 2011), click Options.
  2. On the General tab, in the Set the default country/region code section, select the Enable country/region code prefixing check box, and then in the Country/Region Code Prefix, specify the country/region code, such as +1.
  3. Click OK.

Toolbar Controls

The Dynamics Telephony Toolbar shows at the top of the Dynamics CRM window. It contains the following controls, which are described beneath the screen shot.

toolbar_controls

SUGGESTION: For best understanding, read about the Call Tabs below first.

  • Dialer – Loads the currently select Phone Calls into Dynamics Dialer and starts to dial them using the current Call Tab. Hold your mose over the progress bar to see campaign progress.
  • Stop – Marks the current Call Tab as available. If you were dialing a list of Phone Calls, they are unloaded from the Dialer.
  • Pause – Pause the Dialer. Click again to resume. You might pause to make a click-to-dial call from another Call Tab. the Dialer will automatically pause if you take an inbound call.
  • FFwd – When working in the Dialer, skip to end of Preview time and dial the call, or skip to end of Wrap time and load the next Phone Call.
  • Browser – Home. back and forward controls for the current Call Tab’s browser.
  • Outcome – Select the result or outcome of this call. Outcome examples are Yes, No, Busy, Defer. These make most sense for outbound calls, but it can be used for inbound too. The outcomes are fully configurable
  • Answer – Answer the currently ringing call.
  • Release – Release the call on the active Call Tab.
  • Hold – resume – Put the call on the active Call Tab on hold. The caller hears whatever music on hold your phone system provides. Click again to resume talking.
  • Audio – select speaker and microphone to use, as well as the levels.
  • Call / transfer / Phone Book – Click to see a personal Phone Book of contacts to call or transfer to. For transfer, it can be blind transfer or consult transfer. You can edit the contacts in this list using Phone Book on the Menu.
  • Caller – Callers name (if in your CRM) and number.
  • Copy – For contacts not in your CRM, use this to COPY the callers phone number to the clipboard.
  • Call Tabs – There are 4 Call Tabs. Each one is like a line key on a phone. But it also has an associated Browser with it. So, as you click on a Call Tab, you will see the associated Browser becomes active below it. For example, you might be working a Dialer session, dialing a list of calls in Call Tab 1 when a call arrives incoming on Call Tab 2. If you then click on Call Tab 2 it will answer that call and display the callers Contact record in the associated browser. The current Call Tab has a green light. Flashing green means the Call Tab is not active and there is a phone call on it. Orange means the Call Tab is not active but in use. Grey means it is available for use for a new call.
  • Menu – Menu to access Settings, edit Phone Book, Help, etc.
  • Timer – Timer to count down Preview time or Wrap time. The timer counts up talk time or idle time.
  • Pin – Show / hide the toolbar. When hidden, you can still get to the toolbar by moving your mouse to the top edge of the CRM display. Dynamics Telephony will remember the setting.
  • SIP – Status of your phone line. Green when Dynamics Telephony can control your phone line correctly.

VOIP on Terminal Services

See also: TMCnet blog

VOIP is supported on a Terminal Services session. The audio (microphone and speaker) of the local PC is used via redirection from the remote session. You need Windows Server 2008 RDS or later.

However, you do need to make sure you have sufficient bandwith (especially from server to PC as this has to carry video and audio now) and that the Terminal Server itself can handle the load.

Bandwidth requirement for a Terminal Services session is around 30kbps and a VOIP session would usually be 16kbps or 24kbps, but could be as high as 64kbps if the G.711 codec is used. So check which codec you use for VOIP.

Fonality Settings

The following table highlights the specific setting you should apply in Dynamics Telephony

Dynamics Telephony
Tab
Dynamics Telephony
Setting
Value Comment
Provider
Configuration
DTMF Mode DM_Outband This is RFC 2833
Expires 1800
Provider
Account
Username SOFTPHONEXXX All CAPS
Password SIP Password
Host Name sNNNNNN.tribox.fonality.com
or
sNNNNNN.pbxtra.fonality.com
Where NNNNNN is the 6-digit system ID
Auth Username Leave blank when the same as username
Domain Name * A single asterisk ‘ * ‘
Transport Mode TM_UDP

See also: Fonality help