Tag Archives: toolbar

Transferring Calls

You can use Dynamics Telephony to transfer any call to any destination. For example, you might use Dynamics Telephony to transfer callers to another department or person.

Refer to this screen snap and the descriptions below.

phonebook

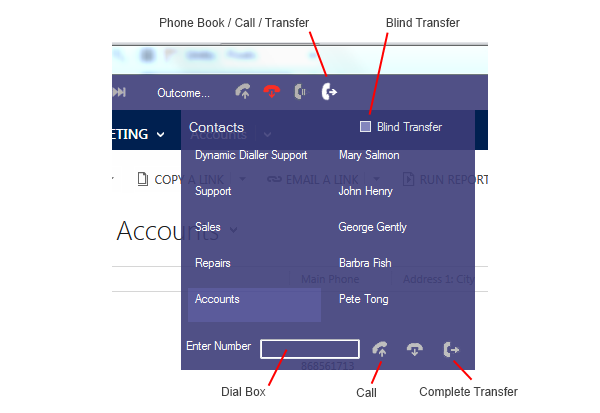
Transfer using Dial Box

With a call active on a Call Tab, move your mouse over the Phone Book icon and then down to the Dial Box. Enter the phone number to call and either press Enter or click on the Call button beside the Dial Box. The caller is put on hold automatically.

When the third party answers, click Complete Transfer to complete transferring the first caller to the third party.

If you decide not to complete the transfer, you can go back to the caller by clicking on their Call Tab and then clicking the Hold / Resume icon on the toolbar.

Transfer using Phone Book

With a call active on a Call Tab, move your mouse over the Phone Book icon and then down to a contact and click. The caller is put on hold automatically.

When the contact answers, click Complete Transfer to complete transferring the first caller to the third party.

If you decide not to complete the transfer, you can go back to the caller by clicking on their Call Tab and then clicking the Hold / Resume icon on the toolbar.

Blind Transfer

In the previous examples, if you first check Blind Transfer then, when you initiate the call to the third party, the caller is transferred to that third party without further action.

NOTE: You only see the Blind Transfer checkbox if Blind Transfer is allowed under Settings > General Settings > Allow Blind Xfer

Toolbar Controls

The Dynamics Telephony Toolbar shows at the top of the Dynamics CRM window. It contains the following controls, which are described beneath the screen shot.

toolbar_controls

SUGGESTION: For best understanding, read about the Call Tabs below first.

  • Dialer – Loads the currently select Phone Calls into Dynamics Dialer and starts to dial them using the current Call Tab. Hold your mose over the progress bar to see campaign progress.
  • Stop – Marks the current Call Tab as available. If you were dialing a list of Phone Calls, they are unloaded from the Dialer.
  • Pause – Pause the Dialer. Click again to resume. You might pause to make a click-to-dial call from another Call Tab. the Dialer will automatically pause if you take an inbound call.
  • FFwd – When working in the Dialer, skip to end of Preview time and dial the call, or skip to end of Wrap time and load the next Phone Call.
  • Browser – Home. back and forward controls for the current Call Tab’s browser.
  • Outcome – Select the result or outcome of this call. Outcome examples are Yes, No, Busy, Defer. These make most sense for outbound calls, but it can be used for inbound too. The outcomes are fully configurable
  • Answer – Answer the currently ringing call.
  • Release – Release the call on the active Call Tab.
  • Hold – resume – Put the call on the active Call Tab on hold. The caller hears whatever music on hold your phone system provides. Click again to resume talking.
  • Audio – select speaker and microphone to use, as well as the levels.
  • Call / transfer / Phone Book – Click to see a personal Phone Book of contacts to call or transfer to. For transfer, it can be blind transfer or consult transfer. You can edit the contacts in this list using Phone Book on the Menu.
  • Caller – Callers name (if in your CRM) and number.
  • Copy – For contacts not in your CRM, use this to COPY the callers phone number to the clipboard.
  • Call Tabs – There are 4 Call Tabs. Each one is like a line key on a phone. But it also has an associated Browser with it. So, as you click on a Call Tab, you will see the associated Browser becomes active below it. For example, you might be working a Dialer session, dialing a list of calls in Call Tab 1 when a call arrives incoming on Call Tab 2. If you then click on Call Tab 2 it will answer that call and display the callers Contact record in the associated browser. The current Call Tab has a green light. Flashing green means the Call Tab is not active and there is a phone call on it. Orange means the Call Tab is not active but in use. Grey means it is available for use for a new call.
  • Menu – Menu to access Settings, edit Phone Book, Help, etc.
  • Timer – Timer to count down Preview time or Wrap time. The timer counts up talk time or idle time.
  • Pin – Show / hide the toolbar. When hidden, you can still get to the toolbar by moving your mouse to the top edge of the CRM display. Dynamics Telephony will remember the setting.
  • SIP – Status of your phone line. Green when Dynamics Telephony can control your phone line correctly.