Category Archives: Telephony

Troubleshooting: EoD

If you get EoD when trying to make a call, here are the possible causes.

EoD means Error On Dial – so there was an issue making the call. Normally, this is due to an undialable number. So the first thing to check is that the number being dialled is valid.

If you are not properly connected to the phone system, you will get EoD on every call. So, try a number you know exists – like another extension or the voicemail system. If you cannot get to those, then you need to check your connection to the phone system.

If you need a prefix – like 9 or 0 – to access an outside line, check that is being inserted.

If you open the log file and search up from the bottom for “dial(” you will see the actual number being dialled. Make sure that is correct.

FreePBX Integration to Dynamics 365 CRM

Dynamics Telephony for FreePBX is a comprehensive integration yielding agent productivity improvements and customer service enhancements enabled by seamless integration between CRM and FreePBX, on both the agent desktop and server-side (e.g. IVR).

freePBX_plus_CRM

OUT OF THE BOX DYNAMICS 365 INTEGRATION
  • Unify FreePbx and Dynamics 365 in a single simple user interface for users
  • Embedded call controls in Microsoft Dynamics 365, unifying the desktop for your sales & service staff
  • Simplify your sales and service team’s workflow, reducing clicks, screens, and searches for up to 50% efficiency improvements
  • Pop relevant customer information at the moment of interaction for your staff on every call
  • Speed through outbound calling campaigns with the fully integrated progressive dialer
  • Capture call statistics, callbacks, next steps, call dispositions, automated follow ups & more within Dynamics 365
  • Auto-create links to call recordings in Dynamics 365 for easy access or connectivity to Microsoft Call Intelligence
  • Callers who abandon your queues captured in CRM for easy callback.
  • Callers who request a callback in your queue (IVR) captured in CRM for easy callback management.
  • Realtime dashboard of agents in CRM – Easy to listen-in to calls, whisper to agent or join the call
  • Centralised admin and simple install options
  • Comprehensive support options
UNIQUE FEATURES CREATED BY CLOSE INTEGRATION
  • Call recording playback in CRM of FreePbx call recordings
  • Per phone-call: click to listen to recording; queue, duration, agent, customer, transfers, outcome, IVR data,
  • Outbound Calling numbers based on CRM data
  • Use CRM data to route VIP callers to top of queue, or straight to their account manager
  • CRM data available for your IVR scripts.
  • Realtime display in CRM of calls with CRM data
  • Missed / abandoned calls – click in CRM to call them back
  • In-queue callback requests actioned in CRM.
  • Queue controls
RELATED POSTS

For full information on Dynamics Telephony, see https://dynamicstelephony.co.uk


Click-to-call for any phone.

This is a standalone feature that does not require the Dynamics Telephony Client.

This feature allows you to click on any phone number in a Dynamics 365 CRM entity, and the call is automatically dialed for you and ALSO logged in CRM for you automatically.

The system first rings your own phone (mobile, landline, smartphone app, anything). When you answer that, the system will bridge in the number you clicked on. So, no special integration or settings are required to get going. Simply provide your own phone number and you are ready to go.

CIF_C2D_01

Feature Highlights
  • Works on phone numbers within the following records: Contacts,  Accounts,  Phonecall activities,  Leads,  Opportunities, and Cases.
  • You can set your “Calling Number” to any phone number that you own.
  • Logs each call in CRM
  • Pops a quick-form for adding a note to the call.
  • Quick-form includes a Mark Complete button to save the note and complete the phonecall activity
  • Enable just on the CRM User Roles you want
  • Enable just on the CRM Apps you want.
User Guide
  1. You will know this feature is enabled for you by the presence of an expand-button  ( < ) just under your name – top right of the CRM page.
  2. When you click on the phone icon beside a phone number, the system will dial it.
  3. A panel will open on the right, to allow you change the call log. You can change the subject or notes (Description) of the call
  4. Click Mark Complete in the side panel when done to save the call log. the panel will close (hide).


Omnichannel & Avaya AACC Blended

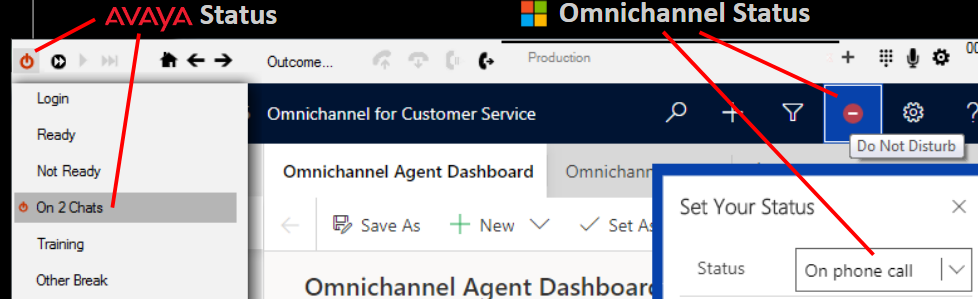
Currently, users on Avaya AACC and Microsoft Dynamics 365 Omnichannel, have to manually keep themselves in the right status on each system. So, when they are on a voice call in Avaya, they have to manually set themselves to Do Not Disturb in Omnichannel. And when they are too busy on Omnichannel, they have to manually go Not Ready in Avaya AACC.

Furthermore, the real-time displays and reporting on each of the two systems is completely unaware of the other system. So, a supervisor might think a user is simply “Not Ready”, when in fact they are very busy on chats with customers.

These are major pains and leads to lack of adoption of one system or the other.

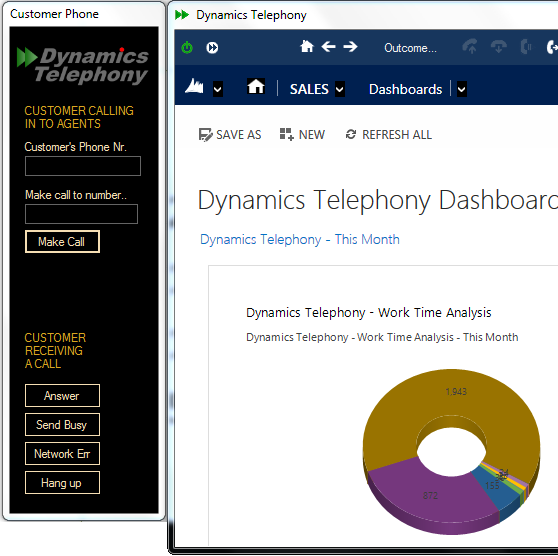
Now, Dynamics Telephony does the synchronization automatically for you. When you are on a voice call, your status in Omnichannel will show “On Phone Call”, and you will not be sent any chats. When you are busy on chats in Omnichannel, your status in AACC will be “Not Ready – On 2 Chats” and AACC will not send you any voice calls. NOTE these features are in addition to our other AACC Features

omnichannel_status

This is a major innovation allowing users to seamlessly work on Omnichannel and Avaya AACC in the one blended environment.

See a short presentation of this feature on YouTube here.

How It works

Because Dynamics Telephony has access to both Avaya AACC status and Omnichannel status, it can monitor and control both systems. Using this capability, it implements 2 rules:

  1. When you are on N chats in Omnichannel, it will auto-select a status (e.g. Not Ready – On 2 Chats) for you in Avaya AACC. When you are back on <N chats, it reverts you to Ready in AACC.
  2. When you are on a voice call in AACC, it will select a particular presence (e.g. Do Not Disturb – On Phone Call) for you in Omnichannel. When you end the voice call, it will make you available in Omnichannel again. You need to define a custom presence in Omnichannel Admin of type Do Not Disturb with a label such as “On Phone Call”.
Reports & Realtime Displays

Because Dynamics Telephony is keeping your status in each system correctly synchronized, your reports and real-time displays in each system can show the full picture. So, your Omnichannel report can include the number of times and duration of the “On Phone Call” presence. Similarly, your data in Avaya AACC can include the number and duration of “On 2 Chats”.

Settings

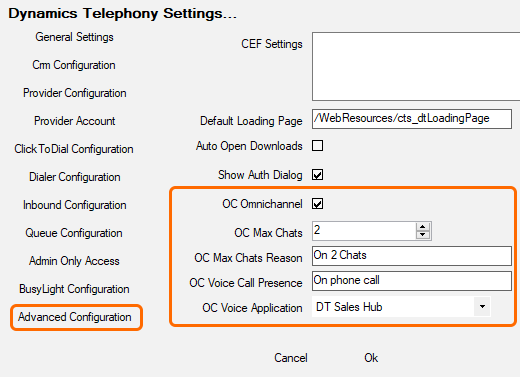
The following settings control how the blending works.

OC Omnichannel – Check this box to enable the Omnichannel (OC) blending features.

OC Max Chats and OC Max Chats Reason – When the number of chats being handled by the user in Omnichannel gets to OC Max Chats, then the Not Ready reason in AACC is automatically selected. The reason selected is the one with label defined in OC Max Chats Reason (case sensitive)

OC Voice Call Presence – When the user is on a voice call in AACC, this presence is automatically selected in Omnichannel. Case sensitive. Leave blank to disable this feature.

OC Voice Application – From the list, select the Dynamics 365 Application to use for Avaya AACC voice calls. It is very unlikely you will want to use the Omnichannel Application with voice calls.

omnichannel_config


Jive Settings

You need to get your username and password for Jive. The username is a long cryptic string like 4rty56wedkjfh74kf47ASdffd65855QER

The following table highlights the specific settings you should apply in Dynamics Telephony:

Dynamics Telephony Tab Dynamics Telephony Setting Value Comment
Provider
Configuration
DTMF Mode DM_Inband
Expires 180
Stun Server e.g. stun.soho66.com A public STUN server
Provider
Account
Username e.g. 4rty56wedkjfh74kf47ASdffd65855QER SIP/Authorization ID
Password SIP Password
Host Name E.g. reg.jiveip.net SIP Registrar
Auth Username e.g.
4rty56wedkjfh74kf47ASdffd65855QER
Same as username above
Domain Name * A single
asterisk ‘ * ‘
Proxy address e.g.
your_domain.jive.rtcfront.net
Proxy for outbound on Jive. Your domain is the domain your company registered with Jive
Transport Mode TM_UDP


Gamma Horizon Hosted Phone System

Dynamics Telephony is verified as compatible with Gamma Horizon Hosted Phone System.

logo_gamma_horizon

Dynamics Telephony interfaces to Gamma Horizon using their TAPI interface. You need to contact your Gamma Horizon provider to send you the TAPI Driver for your system. You can preview the installation guide HERE

Notes

  • You will need to log onto the PC as Administrator to do the install
  • You will need the Horizon Client username and password for each PC. You may get these in your email with the install link.
  • If you use network port blocking, other than Windows Firewall, you may have to open 127.0.0.1 over port 21050
  • You can skip “Step 1 – Options” in the install guide above and go to Step 2 – Username and password.

You can test the install using the Windows Dialer application that is on every PC. More details in the install guide referenced above.


Asterisk Queues

Dynamics Telephony brings Dynamics CRM and Asterisk Queues together, providing features such as:
– Login / logout
– Set your availability status – auto-join your queues
– Join / leave an Asterisk Queue from within Dynamics Telephony
– See real-time statistics for a queue in dynamics Telephony
– See number of calls waiting per queue
– Supports multiple Asterisk Queues
– Configure different queue visibility for different teams.

agent_asterisk_queues

Real-time statistics

The following can be shown to the agent, per queue:
<<Queue>> The queue number as configured in Asterisk
<<Name>> Name for the queue based on matching in setting file
<<Available>> Number of agents in the queue but not on a call
<<Callers>> Number of callers in the queue waiting for an agent
<<HoldTime>> Average hold (queueing) time for callers
<<LongestHoldTime>> Age of the oldest call in the queue still waiting for an agent
<<TalkTime>> Average talk time for this queue
<<LoggedIn>> Number of agents part of this queue

Use the <<placeholders>> shown when configuring the display. For example, in the display above, the configured string is: <<Name>>|  AGTs:<<LoggedIn>> CWT(s) <<Callers>>(<<LongestHoldTime>>)

How it works

Our integration of Dynamics CRM and Asterisk Queues uses a single connection to your Asterisk Server. This connection ensures minimal load on your asterisk while providing a reliable and auto-reconnecting link for the Dynamics Telephony clients.

This is an optional module for Dynamics Telephony. A Windows server is required for this proxied connection – VMs are supported. The real-time statistics are updated ever 10 seconds – configurable.

DT Clients can be running on local network, or remote through a firewall. Remote Desktop, Terminal Services and Citrix are also supported.


3CX Settings

You can use SIP (phonecalls are via PC headset) or TAPI (phonecalls are via deskphone) on 3CX with Dynamics Telephony inbound and outbound dialer on Microsoft Dynamics 365.

For TAPI, follow these steps

1. Get the 3CX plugins from here
https://www.3cx.com/blog/releases/crm-plugins/

2. Run the setup and pick TAPI from the list of components to install

3. Restart the PC

4. Start Dynamics Telephony and launch Settings from the menu
– Pick TAPI from the Telephony Provider list
– In Provider Account set TAPI Version to 2.1

You should now be controlling your desktop phone

Troubleshooting:
– Try running Dialer from Start Menu > Run
– Select menu “Connect Using” and make sure 3CX driver in list
– If you have more than one address controlled by TAPI, you will need to specify it in:
Dynamics Telephony Cog > Settings > Provider Account > DN


ShoreTel TAPI

Simply select TAPI from the Telephony Provider list in Settings General Settings

If you have your TAPI set up to only have one line per TAPI user, then you are done!

If you have multiple lines, then you can enter the line to use in the DN box, in Settings > Provider Account


Demonstration Mode

Demonstration mode is for when you want to test or demonstrate Dynamics Telephony without the complication of connecting it to a telephone system. You can test all Dynamics Telephony features using this mode.

In demonstration mode, a second window is shown called “Customer Phone” – see it on the left in this screen shot

sim_cust_phone

Using this “Customer Phone”, you can simulate a customer calling in to Dynamics Telephony using the “Make Call” button. Fill in their phone number first and you will see their record pop in Dynamics Telephony. Use the “Make call to number..” box to simulate DNIS calls.

Similarly, when you make a call from Dynamics Telephony, using click-to-dial or the Progressive Dialer, you can simulate the customer answering by clicking the Answer button

Setting up demonstration mode

Once Dynamics Telephony is installed, go to the
Cog Menu > Settings

In there, pick General Settings

The first item on the list is Telephony Provider – pick Simulator from the list.