All posts by dtAdmin

Troubleshooting: EoD

If you get EoD when trying to make a call, here are the possible causes.

EoD means Error On Dial – so there was an issue making the call. Normally, this is due to an undialable number. So the first thing to check is that the number being dialled is valid.

If you are not properly connected to the phone system, you will get EoD on every call. So, try a number you know exists – like another extension or the voicemail system. If you cannot get to those, then you need to check your connection to the phone system.

If you need a prefix – like 9 or 0 – to access an outside line, check that is being inserted.

If you open the log file and search up from the bottom for “dial(” you will see the actual number being dialled. Make sure that is correct.

Dialer Import Wizard

Use the Dialer Import Wizard to import a set of lead, account, contact, incident (case) or phonecall records into the auto-dialer.

The Wizard will create a phonecall and queueitem for each imported record. The auto-dialer will then pop those records to the members of the queue and auto-dial them.

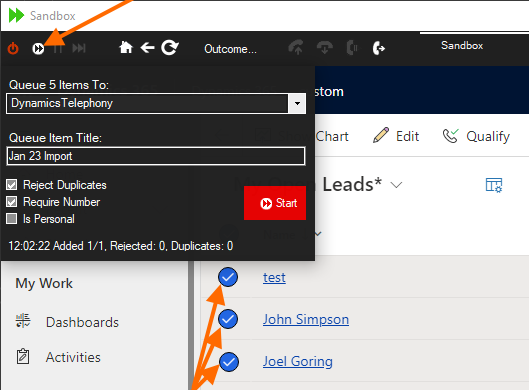
To use the Wizard, in the DT Client, go to a list of records you would like to use and select some or all of them. then move your mouse as shown below to see the Wizard. If the button is missing, you need to enable it in DT Menu > Settings : Queue Configuration > Show Dialer Wizard.

Queue Items To – Pick the queue for the items. Use the built-in queue called DynamicsTelephony for the simplest operation.

Queue Item Title – A title for each phonecall. Including a date code or some unique reference is a good idea so you can find these phonecalls later. E.g. Leads 9Feb2023. You can use the placeholders <<name>> and <<type>>, e.g. <<name>> (<<type>>) – 9Feb2023 would result in a title like John Simpson (lead) 9Feb2023

NOTE: If the record has a “subject” (e.g. Topic for lead), that will be used instead as the Subject of the phonecall.

Reject Duplicates – Select to not import a record that is already in the selected queue.

Require Number – Select to only import records that have a phone number. Unless you have specified custom phone numbers for the import record, the phone number fields checked on the import record are, in order:
– telephone1 (Business Phone)
– telephone2 (Home Phone)
– telephone3 (Other Phone)
– mobilephone (Mobile Phone)
The first one found is the one that will be used for the auto-dial calls.

Is Personal – The auto-dialer will pop these records only to you, even if there are other members of the queue available.

Click Start to start the import. You will see the number of leads imported, rejected and duplicates.

Create a Dialer Campaign

Use this procedure to add a set of accounts, leads or contacts to a queue for Dynamics Telephony to autodial them. You should already have a shared queue prepared – e.g. Priority Leads, or you can use the users personal queues, e.g. <John Smith>

NOTE use the original Advanced Find available in Advanced Settings. Otherwise, you will not get the extra phonecall fields indicated below. If you do not get the extra fields, then you can bulk edit the phonecalls created to add the extra field values. These field values allow your views to find campaign calls easily.

Steps:

  • Advanced Find the records (Leads, Contacts, Accounts) you want to add to the campaign.
  • Click Create Quick Campaign
  • Enter a name of the campaign
  • Select activity type as Phone Call
  • Check “Add created activities to a queue
  • Select the queue you want to use
  • NEXT
  • Enter a Subject for the phonecalls
  • Enter 1 as the Attempt for the phonecalls
  • For Queue, select the same queue as above.
  • Select YES for Dynamics Telephony Call
  • NEXT
  • Create

SCA – Troubleshooting Guide

You may see a message in the Sales Call Accelerator (SCA) panel. Here is help for each of these messages

For advanced troubleshooting, you can open the browser console. You can filter messages in the console using the text DT. Here is a sample of a good startup and call showing notifications are disabled in the browser by the user.

20:09:44 DT : Handle registered successfully.
20:09:44 DT : Notification Permission Denied. Upcoming call notifications are disabled.
20:09:44 DT : _cParams : dtps-dtps-sh.dynamicstelephony.com enableFollowUp:true
20:10:47 DT : clickToActHandler:Param : {“value”:”5550101″,”name”:”telephone1″,”format”:”Phone”,”entityLogicalName”:”contact”,”entityId”:”dcb1b095-a17e-ec11-8d21-000d3a6599ad”,”recordTitle”:”John Smith”}
20:10:47 DT : Call(0768561713, 075550101)
20:10:47 DT : Inside Call() channel:0768561713, number:075550101
20:10:48 DT : clicked page environment : {“appid”:”0468e89e-ae44-ea11-a813-000d3a654590″,”etn”:”contact”,”id”:”dcb1b095-a17e-ec11-8d21-000d3a6599ad”,”pagetype”:”entityrecord”,”clientUrl”:”https://your_company.crm11.dynamics.com”,”appUrl”:”https://your_company.crm11.dynamics.com/main.aspx?appid=0468e89e-ae44-ea11-a813-000d3a654590″,”orgLcid”:1033,”orgUniqueName”:”org55d82660″,”orgId”:”470dbc79-bb81-4946-ab66-3e1b2241b628″,”userId”:”{AAEB5C64-FB48-EA11-A813-000D3AB4F1B4}”,”userLcid”:1033,”username”:”# Patrick Jones”,”crmVersion”:”9.2.22103.00194″,”cifVersion”:”9.1.0.549″,”isDirty”:false,”customParams”:”{\”f\” : true, \”a\”: \”user@customer.com\”, \”b\”: \”qW23E1as90frt-der\”, \”c\”: \”dtps-dtps-sh.dynamicstelephony.com\”, \”d\”: \”wd3\”}”}
20:10:48 DT : NOT in Quote so leaving entity as contact
20:10:48 DT : createCallActivity()
20:10:48 DT : getEntityData() OK. callattempt:null
20:10:51 DT : createCallActivity() – record created successfully, activity id:70ea2ec0-a16a-ed11-9561-0022489bd91f
20:10:58 DT : call request done:ok

Sales Call Accelerator – Welcome

You have just installed Sales Call Accelerator (SCA) from Microsoft AppSource. Here are your next steps

Summary of next steps
1. Read about your SCA trial period.
2. Set which Unified Apps and Users can use SCA
3. Set the phone number of the users that will use SCA
4. Make your first test call – get “Welcome” announcement
5. More test calls – get connected to your customers

IMPORTANT: For now, we have a firewall protecting this service. In order for your app to work correctly, you need to send us your public IP address. Simply Google “Whats my ip” to get it. Please email this to us now and we will add it to our firewall

1. Your Sales Call Accelerator Trial

During your free trial period of 14 days, you will be able to make up to 30 calls for free. After that, you can get a further trial period by simply contacting us to extend the trial.

When you are happy with the trial, we will set you up with a permanent licence – free – no monthly charge or anything. You just pay a competitive rate for the calls you make. If you make no calls in a month, you pay nothing for that month! How fair is that?


2. Configure SCA

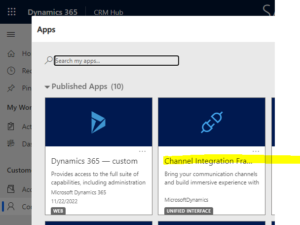
Select the Unified Interface app called Channel Integration Framework

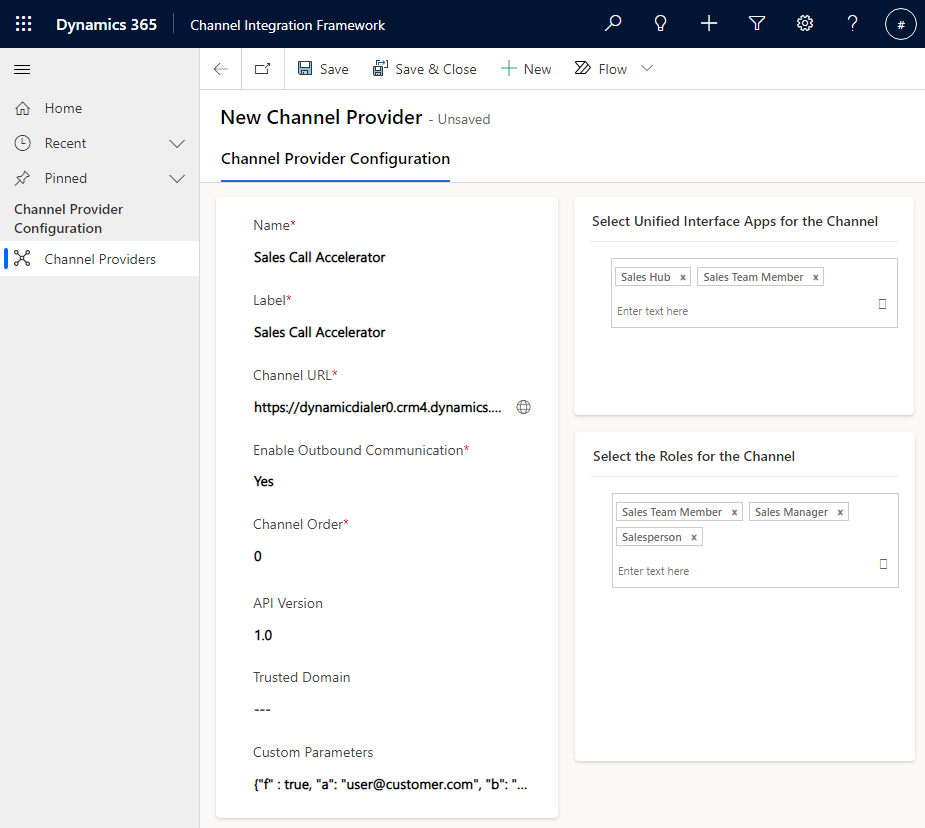
In the app, click New on the toolbar. See instructions under this image for filling the fields

Name: Sales Call Accelerator
Label: Sales Call Accelerator
Channel URL: Substitute your Dynamics 365 URL in the following example: https://your_company.crm11.dynamics.com//WebResources/cts_layout.html
Enable Outbound Communication: Yes
Channel Order: 0
API Version: 1.0
Custom Parameters: enter exactly as shown here – do not change anything… {“f” : true, “a”: “user@customer.com”, “b”: “qW23E1as90frt-der”, “c”: “dtps-dtps-sh.dynamicstelephony.com”, “d”: “wd3”}

3. Set Dynamics 365 User Phone Number

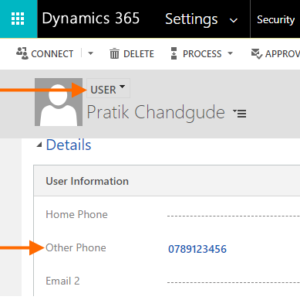
When SCA makes a call, it first calls your own phone. So, you need to tell SCA what your own phone number is. You do this by setting it in Other Phone (address1_telephone2) in the User record in Dynamics 365.

You need to do this for each user that will use SCA

4. Make Your First Test Call

Logon to Dynamics 365 as a user with the Unified App and Security Role configured in step 1 above.

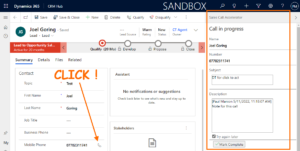
Go to a lead, contact, account, opportunity or quote that has a phone number field. Click on the phone icon beside that field.

The Sales Call Accelerator side-panel will open. A few seconds later, your phone (as configured in the previous step will ring). Answer your phone. You will hear the welcome announcement.

Add any notes you want and click Mark Complete. For the full user guide, see here.

Your trial has begun. Your next test calls are described in the next section.

5. Make More Test Calls

Calls after the first test call (previous section) will connect you with the phone number you clicked.

The procedure is the same. Click a phone number in Dynamics 365, answer your phone, you hear the call progressing and you can talk to your customer when they answer.

Check out the quick User Guide for full details.

Check out the Troubleshooting Guide if you have issues

Application (Client ID) and Client Secret

NOTE this user will expire every 2 years so you will need to renew in 2 years.

Steps in Microsoft Azure

  1. Navigate to portal.azure.com and login. ( This link might work: https://portal.azure.com/#view/Microsoft_AAD_IAM/ActiveDirectoryMenuBlade/~/RegisteredApps )
  2. Navigate to Azure Active Directory > App Registrations > New Registration
  3. Register your Application.
    1. Enter an Application name. e.g. DT_Service
    2. Select which account types you wish to access this API.
    3. Click Register.
  4. Copy the Application (client) ID and note it for later use.
  5. Create a new Client Secret for the Application.
    1. Select Certificates & secrets > New Client Secret
    2. Enter a description, select an expiry duration and click Add.
  6. Copy the client secret and note it for later use. Make sure to copy the Value field.
  7. Grant Microsoft Dynamics permissions.
    1. Select API Permissions > Add a Permission > Dynamics CRM
    2. Select the checkbox for user_impersonation.
    3. Click Add permissions.

Steps in Microsoft Dynamics 365

  1. Login to your Dynamics 365 instance.
  2. Under Settings, select Security > Users. Change the view to Application Users (see below if view missing) and click New.
  3. Enter the Application user’s information.
    1. Paste the application ID previously noted in the Azure component into the Application ID field.
    2. Enter the user’s full name.
    3. Enter the Primary Email and click Save (User Name field should be automatically populated based on the primary email).
  4. Assign administrator permissions to the application user.
    1. Select the user and click Manage Roles > System Administrator > OK

IF VIEW IS MISSING…
Navigate to https://admin.powerplatform.microsoft.com/ and click Environments.
Open the Respective Environment where you want to create Application user.
Once Opened –> Click Settings.
Once Settings page Opened –> Click Users + permissions –> then Click Application Users.
Click Application User and add a new Application User
…RETURN TO STEP 3 ABOVE…

Phonecall Data Details

Dynamics Telephony will create a phonecall record for every inbound and outbound call it handles, and write detailed call data to it. The fields used are a mixture of standard and custom (those beginning with cts_) fields, as follows

  • Items marked with * are only available when server-side integration is enabled.

Activity Status (statecode) The phonecall could be open (e.g. a callback or a queued dialer call), completed, or cancelled (* e.g. an abandon callback that was cancelled due to the customer calling in again).

Actual End (actualend) Date and time the call ended at, after any wrap time.

Actual Start (actualstart) Date and time the call started at, i.e. started to be offered to the user.

Alerting Time (cts_incomingtime) The number of seconds the inbound call was ringing the users phone before it was answered.

Arrival Time * (cts_arrivaltime) The date and time the inbound call first arrived into the phone system. From this time, the call will probably have queued before being presented to the user.

Attempt (cts_attempt) For repeated attempts to contact a customer, via automatic (e.g. No Answer) or user initiated callbacks.

Call From (from) Lookup to the customer (inbound calls) or user (outbound calls) that started the call.

Call Outcome (cts_outcome) The outcome of the call. It might be an automatic outcome (e.g. No Answer), or a user chosen outcome (e.g. Callback, Not Interested, etc.)

Call Tag (cts_calltag) This is not used by the DT Client. You can use it to tag the call.

Call To (to) Lookup to the customer (outbound calls) or user (inbound calls) that was called.

Created By (createdby) The user or process owner that created this call.

Created On (createdon) For inbound and click-to-dial calls, the date and time the call was started. For dialer calls, the date and time the call was created – usually some time before it was presented to the agent for dialing.

Description (description) The notes for the call. Part of the note can be auto-created by Dynamics Telephony Client.

Direction (directioncode) Inbound, or outbound for click-to-dial and dialer calls.

DNIS (cts_dnis) The DNIS (number the caller called for inbound calls) or queue or skillset for inbound calls.

Due (scheduledend) The time a callback should be made at. This is filled by the DT Client depending on the Call Outcome. For dialer calls, the process creating the call might fill this too.

Duration (actualdurationminutes) The total duration of the call in minutes, including any wrap time.

Dynamics Telephony Call (cts_is_dt_call) A boolean indicating this phonecall was created by DT Client, or a process that wants to set this to true.

Hold Time (cts_holdtime) The number of seconds this call was put on hold by the user. If the call was put on hold multiple times, these are summed here.

Inbound Queue * (cts_inboundqueue) The name (or number if no name) of the queue the inbound call arrived on.

Last On Hold Time (lastonholdtime) Time and date the call was last put on hold by the user.

Left Voice Mail (leftvoicemail) If the user selects an outcome for the call, that is configured to “Tag as voicemail”, then this boolean field will be set.

Modified By (modifiedby)

Modified On (modifiedon)

Offer Time (cts_offertime) For dialer calls, the number of seconds the call was offering to the user before they clicked accept, and entered the Preview state.

Original Phone Call (cts_originalphonecall) A lookup to the first call in a chain of call attempts to contact a customer.

Outbound Route (cts_outboundroute) The name of the outbound CLI (Calling Number) used by this outbound call.

Owner (ownerid)

Pause Time (cts_pasuetime) For dialer calls, the number of seconds the user had the call in Pause state. Pause is when the Preview or Wrap timers are paused.

Phone Number (phonenumber) The callers phone number (inbound), or the phone number a user called (outbound)

Preview Time (cts_previewtime) For dialer calls, the number of seconds spent previewing the customer record before the dialer auto-dialed the call.

Previous Phone Call (cts_previousphonecall) A lookup to the previous call in a chain of call attempts to contact a customer.

Queue (cts_queue) For dialer calls, a lookup to the CRM Queue that holds (or held) the queueitem linked to this phonecall.

Recording URL (cts_recordingurl) A URL link to the audio recording of this call. Display it on a CRM form in URL format and you will be able to cick it to follow it.

Regarding (regardingobjectid) Lookup to the customer record.

Ringing Time (cts_ringingtime) For outbound calls, the number of seconds the call was ringing before the customer answered, or the user hung up the call.

Status Reason (statuscode) Open or received (the call was completed).

Subject (subject) The subject text of the call. Often this is filled automatically by the DT Client.

Talk Time (cts_talktime) The number of seconds the user spent actually talking. Excludes, for example, hold time, wrap time etc.

Total Time (cts_totaltime) The number of seconds for the call, from the moment it was offered/presented to the end of Wrap Time

Wait Time * (cts_waittime) The number of seconds the inbound call was waiting in the inbound queue on the phone system, before it was presented to a user.

Wrap Time (cts_wraptime) The number of seconds the call was in Wrap state. Wrap, when configured, starts when the call is hung up. Wrap time is after call time for making notes etc.
System outcomes

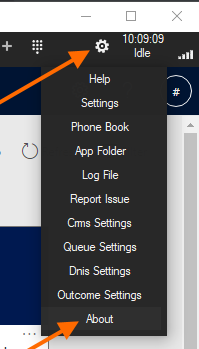
Dynamics Telephony can automatically apply outcomes to a call, such as No Answer or Busy. You can see the configuration of most of these outcomes in the Outcome Settings. If you want to change one, click + (as if to add a new outcome), and select the outcome from the list at the top.

Here is the complete list of system outcomes:

noanswer. Outbound queues dialer. The called phone did not answer within the time limit – usually around 22 seconds (configurable). NOTE if you create an outcome called No Answer, it will supersede this system definition. You might do this so the users see No Answer, instead of noanswer, which is more user friendly.

Busy: Outbound. The call received busy signal. the called phone is busy or the network is congested.

EoD: Outbound. Error On dial. the call received an error. It is most likely a bad phone number. It can also happen when the users phone is not working correctly and cannot make calls.

None. Inbound or outbound. The user did not specify an outcome and no default defined for this call. Normally the user is prompted to enter an outcome if there is no default, and they have not chosen one by the end of the call. In this case, the user can choose to “Force End” the call and then “none” is the outcome logged.

Deflect. Inbound. The user clicked Reject when offered an inbound call. It can also happen if the user goes Not Ready / Unavailable during offer of an inbound call. The call bounced to another user.

Reject: Outbound queues dialer. The user clicked Reject when offered an outbound queues dialer call. It can also happen if the user goes Not Ready / Unavailable during offer of an outbound queues dialler call.

MissedCall: Inbound. The user missed a call. The call actually rang on the users phone, but the user did not answer the call before the call stopped ringing. It may be due to the call bouncing to another user after the ringing timeout, or due to the caller hanging up (see abandon).

Queued. Inbound queue calls. The caller joined a call queue on the phone system.

Abandoned. Inbound queue calls. The caller hung up while in the queue.

Default. Inbound or outbound. No outcome specified by the user. Normally this outcome is disabled, and other defaults with names such as “Inbound” or “Click-to-call” are specified instead as default for inbound or click-to-dial calls respectively.

NewdiallerCall. Applied to a newly created queues dialer call, when created by the Dialer Wizard in the DT Client.

transferTarget. Inbound or outbound. The call was transferred to this user, and no other outcome was specified by this user.

transferSource. Inbound or outbound. The call was transferred to another user. The final outcome of the call will be logged by the second user.