All posts by dtAdmin

Dynamics Telephony for Service Cases

Dynamics Telephony is perfect for a Service environment, where it can pop Cases (if there are any open for the caller) or pop the callers Contact record. Furthermore, the phonecall activities are logged against the cases as appropriate.

Even better, you can use the Dynamics Telephony Queues feature to auto-feed cases to users for processing, including calling the customer.

How to get Dynamics Telephony to pop a case (incident) based on the callers phone number

  1. In Dynamics 365, Cases have no phone numbers by default. So you need to add one for Dynamics Telephony to search for. It doe not need to be put on the cases form itself.

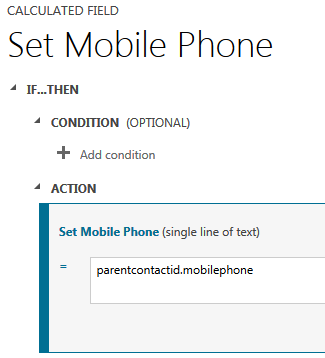
    Add a custom field to the Case entity. Set it as a calculated field based on the related contact phone number

    TIP: Set a condition that the Case must be open (status=active) for the phone number to be populated. In this way, only open cases will match and pop.

  2. In the custom entity dialerKVtable, add an entry for each custom field created above..

    type: phone
    Value: cts_businessphone name of custom field
    scope: global
    Parent: <blank>
    Name: incomingLookup_incident
    Key: 1 the order of lookup in this entity

  3. Also in dialerKVtable entity, add another two entries as follows for the primary text to display

    Key: incident
    Name: entityPrimaryNames
    Parent: AppSettings
    Scope: global
    Type: string
    Value: title

    Key: title
    Name: incomingLookup_incident
    Parent: <blank>
    Scope: global
    Type: name
    Value: title

    NOTE: The above will display the Title of the case. You might prefer to create another custom field on the case that combines customer name and Title. This will be useful for multi-match. It must be a string custom field. Replace title above with your custom field name (3 places)

  4. In Dynamics Telephony settings > Inbound set..

    Lookup entities: incident

    TIP: If you set above to “incident,contact” then Dynamics Telephony will pop the contact if there are no open incidents. However, if there is one open incident you will get a multi-match to choose between the incident and the contact.

How to add phone number fields to Opportunity

To call a customer from an Opportunity Form means you have to open the associated Contact and make the call from there. This also means that the phonecall record created in CRM is associated with the Contact in general, rather than the specific Opportunity.

Follow this procedure to add Phone Number fields to your Opportunity form.

In summary, the process is to add a calculated, custom field (of format “Phone”) to the Opportunity form.

  1. Go to Settings > Customizations > Customize the system
  2. Go to Entities > Opportunity > Fields and click NEW
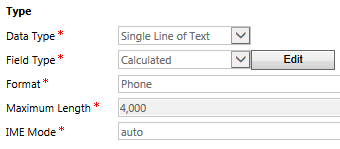
  3. Set the field properties per this snap
    cust_ph_nr_field
  4. Click EDIT to set the calculated field properties per this snapcalc_ph_nr_field
  5. Close and save everything and Publish All Customizations

Now you just have to add the above created field to your Opportunity Form. It will be a clickable phone number that you can use with Dynamics Telephony click-to-dial, or Skype/Lync click-to-dial

Publish all customizations again.

Dashboards

Realtime

Agent RTD. See here

Historical

There are several standard dashboards in CRM for Dynamics Telephony. You access them in Sales > Dashboards, or Marketing > Dashboards

Dynamics Telephony Dashboards

Today, this week, this month or this year: Dashboards filtered by time over the various periods

Work Time Analysis: Totals based on the individual call records for each agent, covering time-in-state for Talk, Hold, Idle, Pause, Ringing, Wrap, etc.

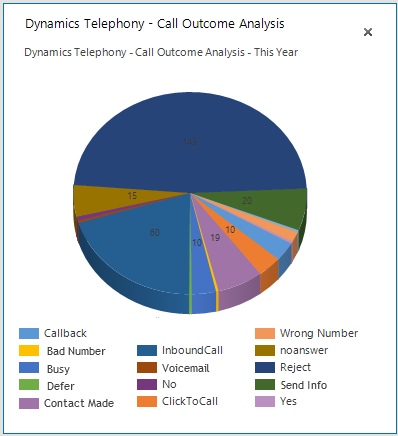
Call Outcome Analysis: totals based on the individual call records for each agent. Outcomes include inbound, outbound, click-to-dial, No Answer, Busy, Voicemail, Bad numbers, Yes, No, Defer etc.

Plus, any custom outcomes you add to Dynamics Telephony are automatically included in this dashboard.

dashboard_outcomes

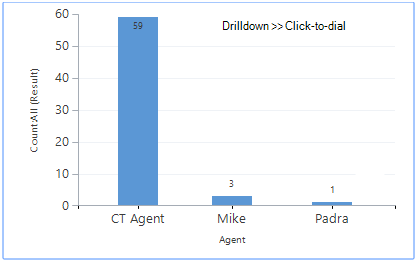
You can drill down on the dashboard to, for example, see a result by agent for the day/week/month/year…

dashboardDrillDown

Customizing a dashboard

You could make a copy of a standard dashboard to display only the data you want.

First, you need to make a new View to based the new dashboard on:
1. View a dashboard – say Dynamics Telephony – Today
2. Above the legend for the chart, click “View the records…”
3. On the right of the titles bar of the grid that opens, click “Filter”
– Now you can define Custom Filters for any of the columns
4. In the drop-down above the grid, select “Save filters as new view”

Second, make a custom version of our dashboard and link it to the view created above

  1. When viewing the standard dashboard, click Save As in the ribbon.
  2. Now view the newly saved dashboard copy, and you have “Edit” in the ribbon
  3. Click on the chart you want to associate with the new view from above, and click “Edit Component”
  4. In the popout window, set the “Default View” to your new view from above


Table Overviews

Dynamics Telephony stores all its statistical and realtime data in CRM. For an overview of the tables used, see here

Call-by-call

The call-by-call view in CRM shows every inbound and outbound call. Click on the image for full view.

callByCall

10 ways to add phonecalls to Dynamics Telephony Progressive Dialer

Well, might not be 10 yet, but will be as soon as I can get around to completing this post.

You can add for one agent to process (Personal CRM Queues) or(for multiple agents to process (Shared or Team CRM Queues).

Source Description
1 Scheduled callback from website Allow customers to request a scheduled callback on your website. A phonecall is sent to a CRM Queue and Dynamics Telephony pops it to an agent for Progressive Dialing. MORE
2 General Enquiry from website Allow a customer to make a general enquiry on your website. It gets added as a phonecall in a CRM Queue and Dynamics Telephony pops it to an agent for Progressive Dialing. MORE
3 Support request from website Customers can submit a Support request on your website. It gets sent to a CRM Queue as a phonecall and related Case. Dynamics Telephony pops it to an agent for Progressive Dialing. MORE
4 Advanced Find Use Advanced Find in CRM to generate a list of contacts, accounts, leads etc. Then related phonecalls are added to CRM Queues for Dynamics Telephony Progressive Dialer. MORE
5 CSV File Start with a CSV file and have a phonecall added to CRM Queue for each record in the file. Then Dynamics Telephony pops the records to agents for Progressive Dialing. MORE
6 View Select Contacts, Accounts or Leads from a view and have them added to a Queue. then Dynamics Telephony pops them to the agent for Progressive Dialer processing. MORE
7 Outcome based Depending on the Outcome an agent chooses in Dynamics Telephony, the item can be sent to another CRM Queue for a different agent or team to process using Dynamice Telephony Progressive Dialer. MORE
8 Marketing Automation tools like Click Dimensions  Marketing Automation tools like Click Dimensions can pass leads into different CRM Queues. then Dynamics Telephony pops them to agents or teams to process them using Progressive Dialer. MORE
9  Reload an old campaign
10 Filter on old campaign

CRM Advanced Find can add items to Dynamics Telephony Progressive Dialer

Our Progressive Dialer will allow you to process a large amount of phone-calls in the most efficient way. The calls can be processed by one or multiple agents, using Dynamics Telephony queues-based Progressive Dialer

This is the procedure for starting with a CRM Advanced Find, of contacts, accounts or leads, and adding them to a CRM Queue which Dynamics Telephony is monitoring and feeding to agents, for them to process and dial using Progressive Dialer

A. Create a new queue in CRM
1. CRM: Settings > Business Management > Queues
2. NEW Queue
– Give it a name
– Choose “Public” (any user can see), or Private (only assigned users can see it)
– Save and Close

B. Configure Dynamics Telephony to monitor the queue
1. DT: Cog > Queue Settings
2. Add a new queue using the ” + ” at the bottom
3. Select the queue you made in A above.

C. Add items to the queue ( repeat this section as often as you like )
1. Run Advanced Find to find your required Contacts, Accounts or Leads
2. Select All and, on the ribbon, click “Quick Campaign” > “For all records on all pages
– Give the Quick Campaign a name. Click NEXT
– Set “Phone Call” as activity type
– Checkbox “Add the created activities to a queue”
– Select the queue. Click NEXT
– You just need to fill in “Subject”.
NOTE This “subject” is reported in the Dynamics Telephony statistics. I usually use something like “Widget A renewals Jan 2016”

Now go “Ready” in DT and the items should come through. Of course, there may well be other items in other queues first so test with care.

Agent RTD

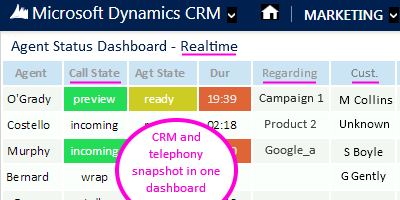
The Realtime Display Dashboard in CRM allows you to see the real-time status of every agent using Dynamics Telephony in your Call Center. This can be a combination of telephony status (ready, not ready, talking etc.) and CRM data (customer name, lead topic, dialer campaign name, CRM queue name, etc.)

RTD_twitter

Features

  • Realtime status of every agent using Dynamics Telephony
  • Shows telephony state (e.g. talking) and CRM state (e.g. customer name) in one snapshot
  • Shows duration and the time the state was entered.
  • Shows Outcome of last call, e.g. SALE!
  • No server required – data stored in CRM
  • Full screen mode – perfect for Wallboard in Call Center
  • Auto-refresh in realtime
  • Can be filtered down per agent group
  • Configurable thresholds highlight if an agent is too long in a state
  • Threshold actions: change color, blink, send email

Using The RTD

  • To access RTD, simply go to Dashboards > Dynamics Telephony Dashboard – Agent RTD
  • The display auto-refreshes every 10s (by default). You can update now by clicking the update countdown timer.
  • For full screen use the direct URL (e.g. https://yourcrm.dynamics.com/webresources/cts_dtagentRTD.htm) in a browser and press F11

Customizable

  • Add your own custom field to our RTD. E.g. to show how much CRM work done today
  • Calculated fields
  •  Add / remove / reorder columns
  • Add / remove agents. E.g. individual RTD per group
  • Set sorting field
  • Trigger a workflow

Full Field List

You can use these fields, or calculations (in JavaScript format) of these fields. In the RTD table there is one record per user, with these fields:

AGENT
AGENTSTATE
CALL_TIME_HOLD  – – – – – – – > – – – following fields are for the current call
CALL_TIME_IDLE  – – -> the time the agent was idle after the last call/startup/login
CALL_TIME_PAUSE
CALL_TIME_PREVIEW
CALL_TIME_RING
CALL_TIME_TALK
CALL_TIME_TOTAL
CALL_TIME_WRAP
CALLSTATE
DATA TYPE  – – – > Daily / RealTime (‘Daily’ represents backup of that particulat day whereas ‘RealTime’ is the realtime data of the current day)
DIRECTION
DNIS
DNISNAME
DURATION
INBOUND QUEUES  – – -> name of all the queues the agent is serving for inbound calls
MODIFIED ON
CREATED ON
OTHERPARTY
OUTCOME
PHONE
REGARDING
RESET_TIME_RTD  – – -> the last time of the RTD reset
SYSTEMUSERID  – – – – – – > user’s CRM GUID for linking other data
TEAM
TEAMS
TIME
TIME_AVAILABLE – – ->the time agent was available after last call/login/startup
TIME_LAST_UPDATED  – – -> the last time the DiallerUser has been updated
TIME_UNAVAILABLE  – – -> the time agent was unavailable after last call/login/startup
TOTAL_ACCEPTS  – – – – > – –  Following are totals for today
TOTAL_BUSYS
TOTAL_CALLS
TOTAL_CLOSE_OUTCOMES
TOTAL_CONNECTS
TOTAL_DEFLECTS
TOTAL_MISS
TOTAL_NOANSWERS
TOTAL_REJECTS
TOTAL_RETRYS
TOTAL_RINGS
TOTAL_TIME_AVAILABLE  – – -> the total time the agent was available for the day
TOTAL_TIME_HOLD
TOTAL_TIME_IDLE  – – -> the total time the agent was idle
TOTAL_TIME_PAUSE
TOTAL_TIME_PREVIEW
TOTAL_TIME_RING
TOTAL_TIME_TALK
TOTAL_TIME_TOTAL
TOTAL_TIME_UNAVAILABLE  – – -> the total time the agent was unavailable for the day
TOTAL_TIME_WRAP

Customer Enquiry to Agent Callback – Standard

In today’s competitive market, exceptional customer service and customer engagement is about delivering more personalized experiences which will separate your company from the competition. With Dynamics Telephony we can bring the customer straight to you with the minimum of fuss for them and for you. Never miss a lead or an opportunity again with this simple solution.

This blog shows you how – through the use of a web page and a workflow – potential customers can submit their details and receive a personal phone call within a matter of seconds.

How does it work?

Before we go into the technical details we’ll firstly look at a broad overview of how this solution works.

We start by creating a webpage which is where the potential customer will submit their details.
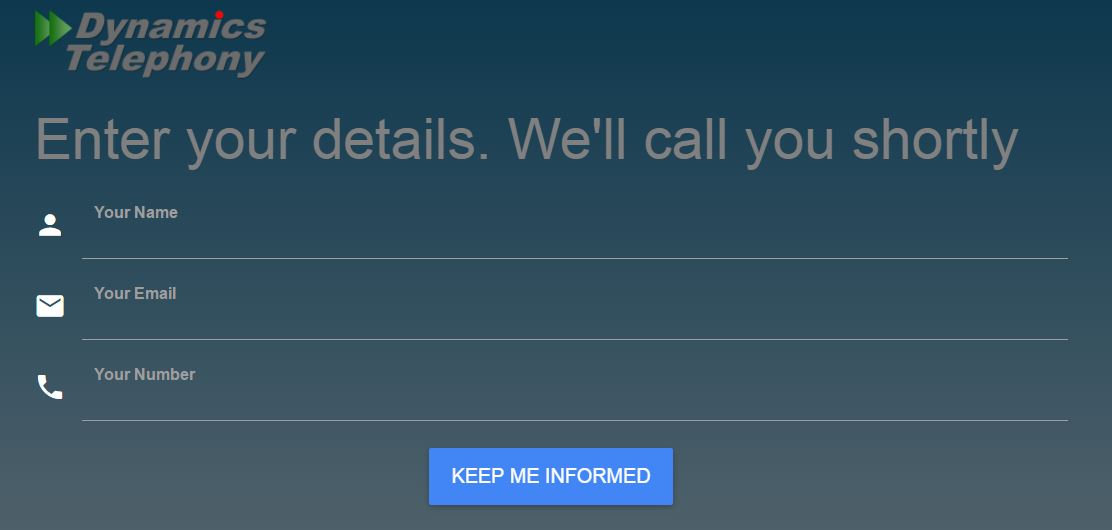
Standard Enquiry WebpageFigure 1 – Webpage

Once the customer has filled in the form and submitted, an email is created which will show up in CRM with the potential customer’s details.

Standard Enquiry Email ExampleFigure 2 – Email in CRM

A workflow then kicks off which uses this email to create a new lead.
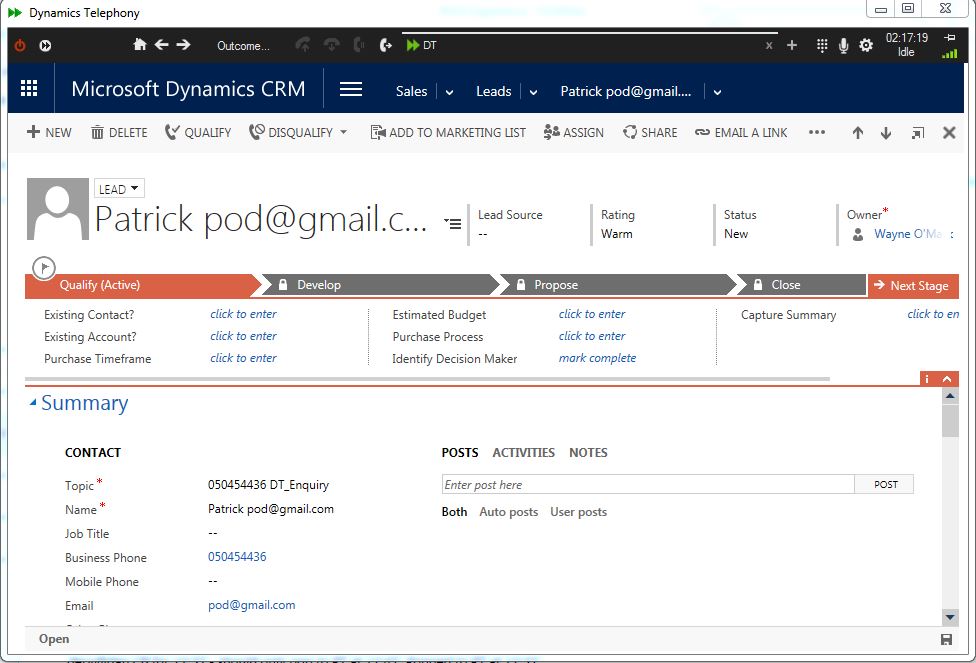
Standard Enquiry Lead ExampleFigure 3 – Lead created from email

A new phone call to the lead is created by the workflow which is entered onto a queue as a queue item. This queue item then automatically  pops to an agent that is using Dynamics Telephony, presenting all the data entered by the new lead to them.
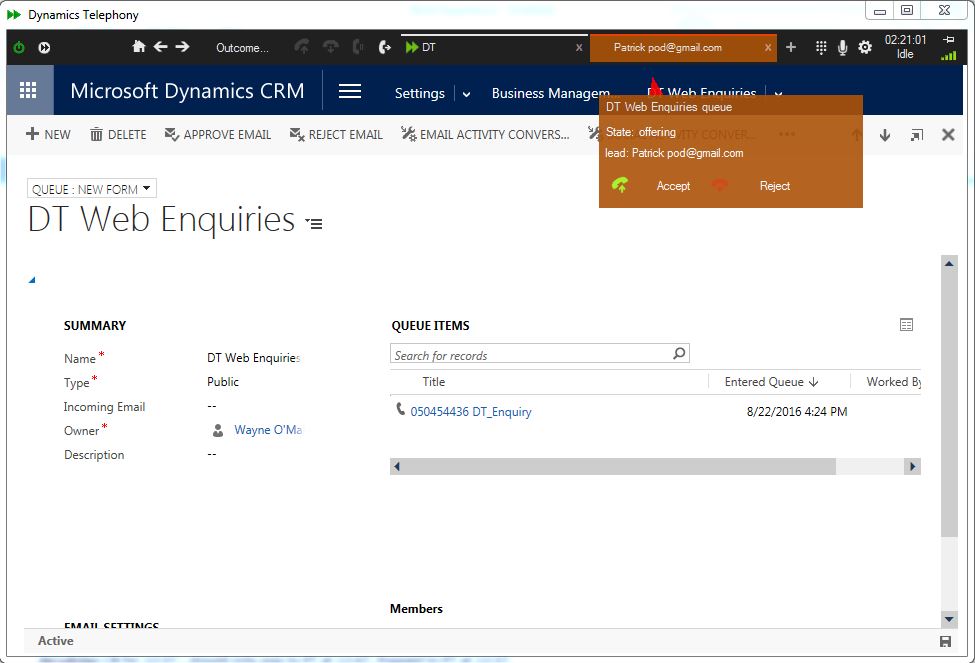
Standard Enquiry Queue Item ExampleFigure 4 – Lead being popped to agent as queue item

How to create it?

Webpages

The first step is the creation of a webpage. As can be seen in figure 1, a simple webpage to capture a name, email address, and a phone number is required. The sample page shown can be viewed here.

The webpage is accompanied by a PHP file which captures the details and sends them as an email. The PHP file code can be viewed here.

The webpage and PHP files are just for reference – your company website administrator should be able to create these without difficulty.

Email

The next step is to ensure that the inbox that you’ve selected is correctly synchronized with CRM. We show you here how to sync a yahoo email address with CRM.

In CRM go to Settings > Email Configuration > Email Server Profiles. Click the new dropdown and select POP3-SMTP Profile.
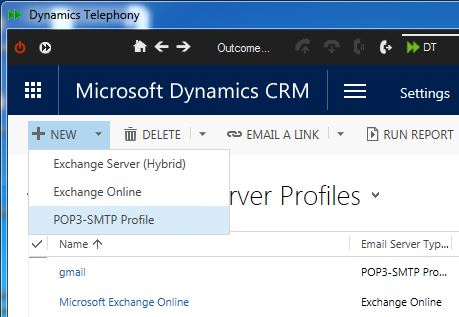
Standard Enquiry Server Profile setup 1Figure 5 – New email server profile

Now fill out the general section as shown.
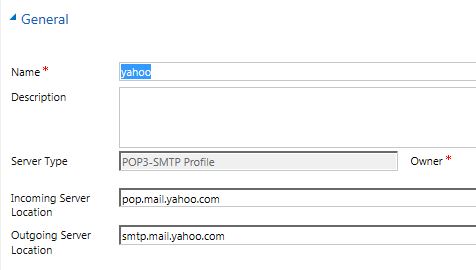
Standard Enquiry Server Profile setup 2Figure 6 – Yahoo server profile, general

Credentials.
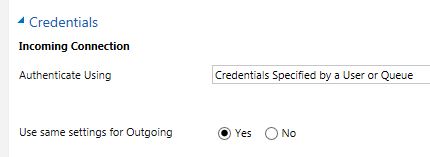
Standard Enquiry Server Profile setup 3Figure 7 – Yahoo server profile, credentials

Advanced. The time and date seen are the dates of creation.

Standard Enquiry Server Profile setup 4Figure 8 – Yahoo server profile, advanced

Save and close the new email server profile. This will now be used as part of setting up your yahoo mailbox in CRM.

Navigate to Settings > Email Configuration > Mailboxes. The owner and regarding fields are yourself. Give the mailbox a suitable name and enter the email address that you wish to use (remember that it must be a Yahoo email address).

Also ensure that “Is Forward Mailbox” is set to No.

Standard Enquiry Server Profile setup 5Figure 9 – Mailbox, general

The next sections to fill out are Credentials and Synchronization Method. Enter your email user name and password for your Yahoo email. Select yahoo as your Server Profile. The other configurations are shown in figure 10.

Standard Enquiry Server Profile setup 6Figure 10 – Mailbox, Credentials and Synchronization Method

The final steps to configuring the mailbox are to Test & Enable Mailbox and Approve Email, shown below in figure 11.

Standard Enquiry Server Profile setup 7Figure 11 – Mailbox. Test, Enable, and Approve

Click Test & Enable Mailbox and click OK without checking any boxes. Click Approve Email and click OK again.

In your alerts there should be three messages informing you of successful configuration for incoming and outgoing email. There may also be a message about Appointments, contacts and tasks can’t be synchronized, that’s fine.

Standard Enquiry Server Profile setup 8Figure 12 – Email configuration alerts

Workflow

Nearly there!

The final step is to create the workflow.

Begin by going to Settings > Processes. Click New and give your Workflow an appropriate Process name. The Category is Workflow and the Entity is Email.
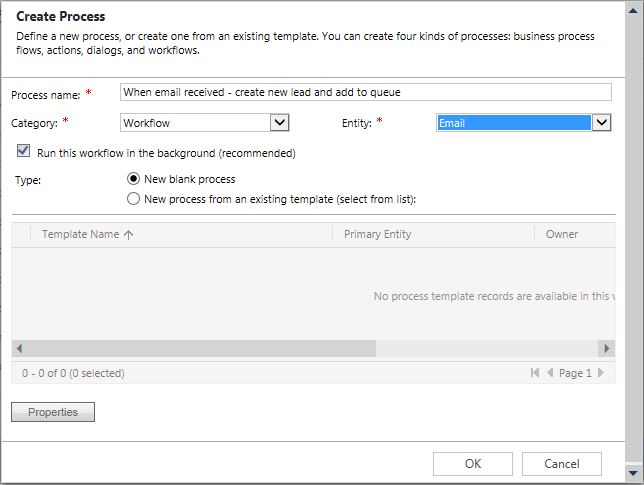
Standard Enquiry workflow setup 1Figure 13 – Workflow setup

Fill out the general information as shown in figure 14. We want the scope to be the organization. The Start When is Record is created (when CRM receives a new email it is treated as a new activity).
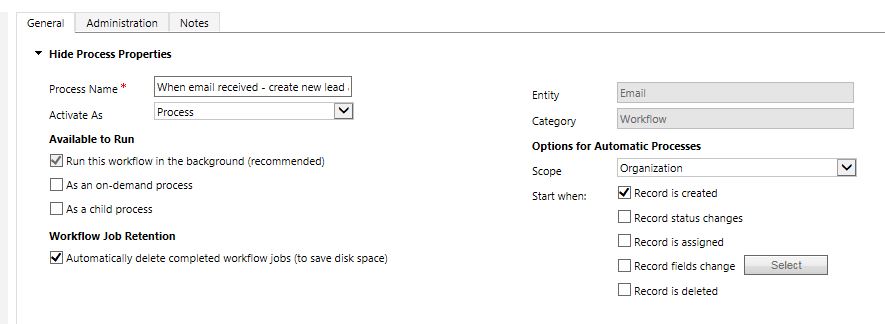
Standard Enquiry workflow setup 2Figure 14 – Workflow setup, general

Now we move onto adding steps. The first step is a check condition. We use a check condition to check whether or not the new email activity contains a certain subject.

Standard Enquiry workflow setup 4Figure 15 – Workflow setup, check condition
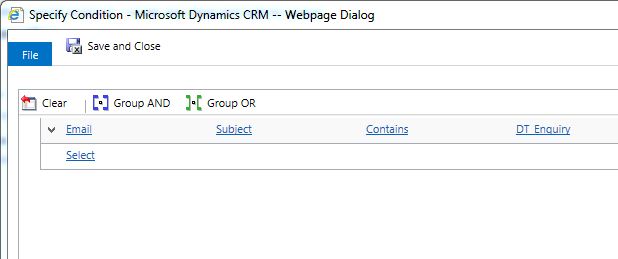
Standard Enquiry workflow setup 3Figure 16 – Workflow setup, check condition

In figure 16, we are checking to see if the new email activity contains “DT_Enquiry”. This text was configured as part of the PHP file – your website administrator can tailor this to your own needs.

Save and close this window. Highlight Select this row and click Add Step to create the lead.
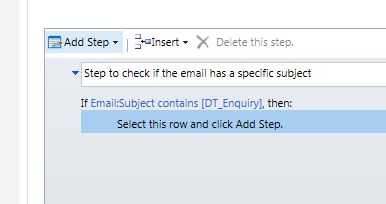
Standard Enquiry workflow setup 5Figure 17 – Workflow setup, create the lead

Click Create Record. Enter a description, select Lead from the dropdown and click Set Properties.
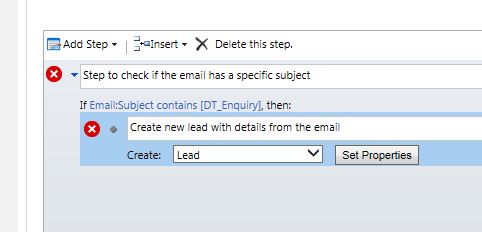
Standard Enquiry workflow setup 6Figure 18 – Workflow setup, lead configuration

The configurations for the new lead are shown in figures 19 and 20.
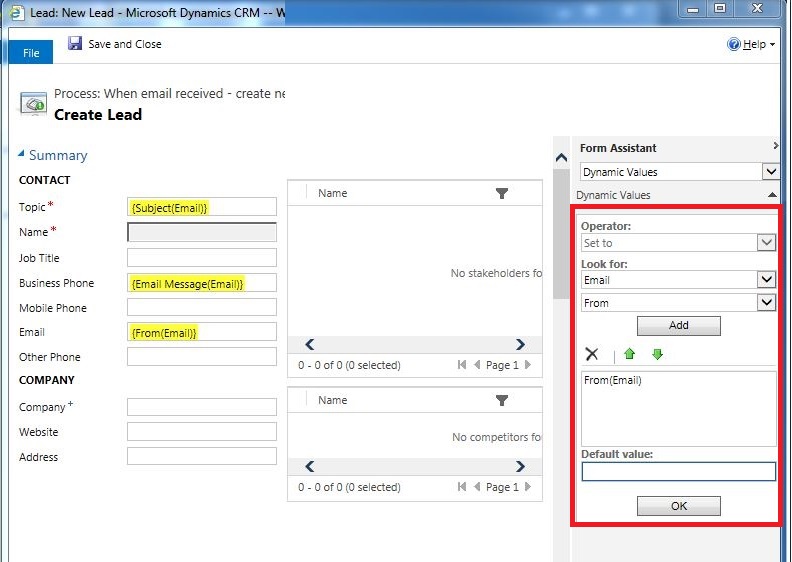
Standard Enquiry workflow setup 7Figure 19 – Workflow setup, lead configuration

The highlighted area in red is where the field inputs are selected from.

Standard Enquiry workflow setup 8Figure 20 – Workflow setup, lead configuration

A potential customer may or may not enter their full name – we use their email as a last name for the moment. The lead’s details can be amended for more accuracy afterwards.

Next, we create a new phonecall activity. Click Add Step and Create Record. Enter a description and select Phone Call.
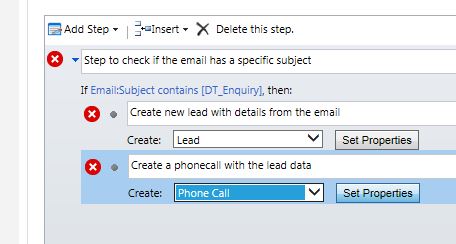
Standard Enquiry workflow setup 9Figure 21 – Workflow setup, Phone Call configuration

Click Set Properties and enter the details as shown in figure 22.
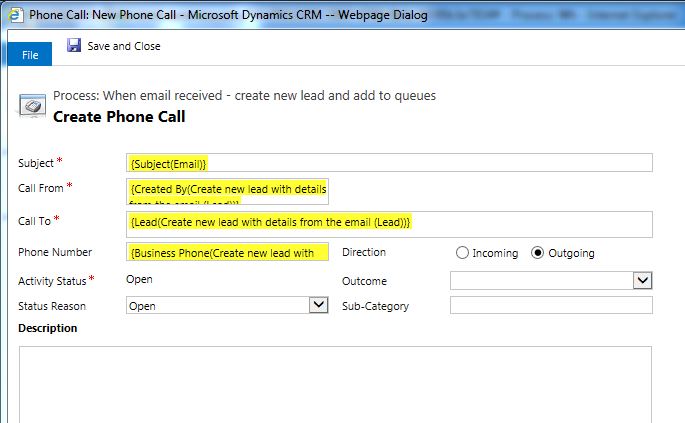
Standard Enquiry workflow setup 10Figure 22 – Workflow setup, Phone Call configuration

The only tricky part here is that for Call From, Call To, and Phone Number, instead of selecting Email in the look for section, scroll down to Local Values in the dropdown and select the description you entered for the new lead created (workflow shown has Create new lead with details from the email).

Final step – click Add Step and Create Record once more. This time we are creating a Queue Item.
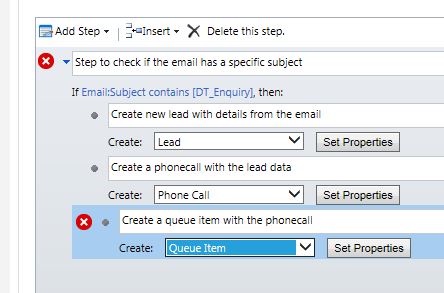
Standard Enquiry workflow setup 11Figure 23 – Workflow setup, Queue Item configuration

Click Set Properties and enter the details as shown in figure 24.
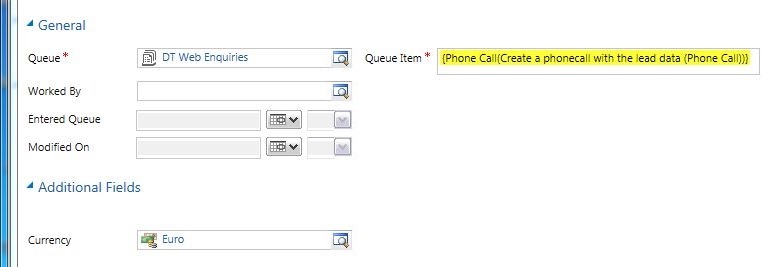
Standard Enquiry workflow setup 12Figure 24 – Workflow setup, Queue Item configuration

The Queue in this case is whatever queue you decide to store these potential customers.

And that’s it! The workflow is now complete. Don’t forget to activate your workflow when it is complete.
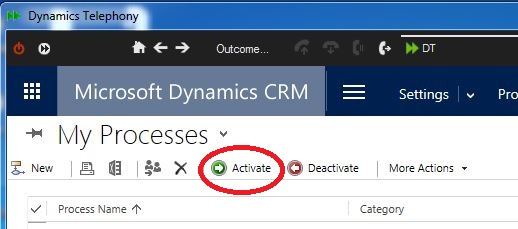
Standard Enquiry workflow setup 13Figure 25 – Workflow activation

Please ensure that emails are coming to your own yahoo inbox as well as your CRM email activities. Leads will then start popping to your agents without them lifting a finger.

Standard Enquiry workflow setup 14Figure 26 – Web leads converted to queue items
Troubleshooting Client Install

For troubleshooting, you may need to access the log file. It is on the DT Menu in the DT Client. Alternatively, the last 30 days of logs are in folder: C:\Users\Aidan\AppData\Roaming\CT Solutions\DynamicsTelephony

1. Getting message “Cannot connect to CRM…” AND logfile has “..An unsecured or incorrectly secured fault was received from the other party..”
Solution 1: Check client PC and server properly synced to a time server. Check Microsoft KBs for updates related to time / DST for your country.
Solution 2: The Service User (background user) must not use 2-factor authentication. Make a special Service User, with a very strong password,  for Dynamics Telephony to use, that does not use 2-factor authentication. See here.


2. Application won’t start
Solution 1: Check .NET 4.6.2 is installed. If not, you can use this link to install it: https://www.microsoft.com/en-ie/download/details.aspx?id=42642

Solution 2: Check Visual C Runtime 2015 installed. If not, install the 32-Bit (X86) version from https://learn.microsoft.com/en-US/cpp/windows/latest-supported-vc-redist


3. Application won’t start
Solution: Full reinstall client, including deleting folder CONTENTS of C:\Users\user_name\AppData\Local\Apps\2.0  and  C:\Users\user_name\AppData\Roaming\CT Solutions


4. Error message “..entry point ucrtbase.terminate …not be located …api-ms-win-crt-runtime…”
Solution: Try installing the X86 Visual C++ runtime from https://learn.microsoft.com/en-US/cpp/windows/latest-supported-vc-redist
IMPORTANT: For both 64-bit and 32-bit systems, you need the 32-bit (X86) version of the install.


5. SIP settings not saving and Log file says: “Unable to load DLL ‘pjsipDll.dll‘: The specified module could not be found.”
Solution: Try installing VC 2015 Redistributables: https://learn.microsoft.com/en-US/cpp/windows/latest-supported-vc-redist
IMPORTANT: For both 64-bit and 32-bit systems, you need the 32-bit (X86) version of the install.


6. There is no log file in same directory as DynamicsTelephony.exe
Solution: Make the parent folder read-write for All Users


7. Cannot logon. Logfile has “…a reference that cannot be resolved: ‘https:…” when connecting to a CRM with Certificate issues.
Solution: Fix the certificate issue. Temporarily try entering the “Organization Url” in settings. You get this from CRM at Settings > Customization > Developer Resources – Organization Service.


8. Getting message “Invalid URL
Solution: Append main.aspx to the URL. e.g. https://mycrmfullurl/main.aspx


9. Getting message “User is not a System Administrator” on non-English CRM
Solution: Make sure the role the user is assigned is exactly named System Administrator


10. Getting message “Cannot connect to CRM…”.
Solution: Check CRM connection in a browser. If it is OK, then run DynamicsTelephony.exe /admin and re-enter the Service User credentials..see here
IMPORTANT: ONLY do this if ALL users are having this EXACT issue. Otherwise, Dynamics Telephony may stop for ALL USERS. This issue usually only arises during first client installs.

11. Log file has message “The located assembly’s manifest definition does not match the assembly reference“. This problem is found with MSI based installations.
Solution Make sure the file DynamicsTelephony.exe.config in the application folder has these lines near the bottom.
<dependentAssembly>
<assemblyIdentity name=”Newtonsoft.Json” publicKeyToken=”30ad4fe6b2a6aeed” culture=”neutral” />
<bindingRedirect oldVersion=”0.0.0.0-12.0.0.0″ newVersion=”12.0.0.0″ />
</dependentAssembly>
<dependentAssembly>
<assemblyIdentity name=”Microsoft.Xrm.Sdk” publicKeyToken=”31bf3856ad364e35″ culture=”neutral” />
<bindingRedirect oldVersion=”0.0.0.0-9.0.0.0″ newVersion=”9.0.0.0″ />
</dependentAssembly>

ShoreTel TAPI

Simply select TAPI from the Telephony Provider list in Settings General Settings

If you have your TAPI set up to only have one line per TAPI user, then you are done!

If you have multiple lines, then you can enter the line to use in the DN box, in Settings > Provider Account


Seriously SMOOTH phone-call Campaigns for Dynamics CRM

By seriously SMOOTH, I mean multiple campaigns, easy to setup, total control and seamless in Dynamics CRM. This is what our Dynamics CRM Queues-based Progressive Dialer offers you when running your phone-call campaigns in Dynamics CRM

  • Outbound phone-call campaigns via our Progressive Dialer seamless in CRM
  • Integrates with CRM Queues for controlled distribution of phone-calls to agents
  • Use standard CRM tools for lists: Advanced Find, Marketing Lists, file import, Quick Campaign, ad-hoc or workflows
  • Use standard CRM tools to add create, monitor and manage the dialer campaign and users
  • Your data never leaves CRM – no more export/import with a dialer – excellent data security.
  • Automatically manage no-answers, callbacks, bad numbers etc.
  • Configurable outcome buttons. Use them for reporting, controlling callbacks or triggering workflows
Flexible list processing modes

There are two broad ways you might like to operate your list processing – one list per agent or shared lists between groups of agents. Dynamics Telephony can operate in both of thee modes. For one list per agent, simply use the built-in “Private Queue” feature of Dynamics CRM and Dynamics Telephony will distribute that list to the agent to process in the Dynamics Telephony Progressive Dialer. Alternatively, for shared lists, you add the list to a Dynamics CRM Queue, and assign agents as members of the queue, and Dynamics Telephony will feed the queue items to the member agents, to process using the Progressive Dialer.

Easy list creating within CRM

Because the dialler is IN your CRM, there is no transfer of data to/from dialer required. You can use any kind of CRM data list with the dialer. Maybe you like Quick Campaigns. Maybe you like to start with an Advanced Find. Perhaps you use imported lists. Or generate Marketing Lists. Whatever your list source, you simply add it to a Dynamics CRM Queue and Dynamics Telephony will process the list through its Progressive Dialer

Use your existing CRM features, training & expertise

The system will feel very familiar to you as it leverages a set of standard Dynamics CRM features into one seamless phone-call campaign solution, for seriously smooth campaigns. For building your calling lists in the first place, you can use Advanced Find, Campaigns, Quick Campaigns, Marketing Lists, file import, ad-hoc or workflow. For assigning lists to agents, or groups of agents, use the standard features of Dynamics CRM Queues. Then for managing and monitoring the campaigns you can use the features of CRM Queues to turn on/off lists, or move agents between Queues. And as usual, if the standard features are not enough, you can use the customisation features of CRM, such as Workflows and Dialogs, to further enhance the system.

Easy & secure data management

Your data never leaves CRM. So for zero data management pain, and data security, Dynamics Telephony is your preferred telephony option. Dynamics Telephony and its Progressive Dialer is built right in to Dynamics CRM. This means that your customer data never has to be exported to the dialer, be it cloud based or on premises. Dynamics Telephony simply accesses the data in CRM and save outcomes and statistics in CRM too.

Any number of configurable outcome buttons

Once the call is over, the agent will select an outcome from the set of outcomes you have configured. The chosen outcome allows you to report on the many outcomes you are interested in. So you can set up the outcomes to capture the data you need. As well as that, the chosen outcome is configured to mark the call as completed, or automatically schedule a follow up. For more advanced scenarios, you can set up a workflow to trigger off the outcome. this might, for example, send a guide to a prospect and schedule a follow up call in 3 days.

Experience to help you

We’ve been supplying Progressive Dialers for nearly 20 years, so we know a thing or two about the features that are important to users. You will find them all in Dynamics Telephony Progressive Dialer. Features such as no-answer and busy retry, callback management, scheduled callbacks, configurable outcome buttons, wrap time, preview time, pause dialer, statistics and much more are all available out-of-the-box.

btn_FreeTrial btn_MainSite