All posts by dtAdmin

Workflow to add phonecall for contacts to a specific queue

This workflow will be available to a contact, or a set of selected contacts. It will create a phonecall for each contact and put it in a queue of your choice. Now, with Dynamics Telephony Queues enabled, you can process each contact using the progressive dialer.

How it is used

Filter down to the contacts you want to add to progressive dialing. Select all and run the workflow per the screenshot below.
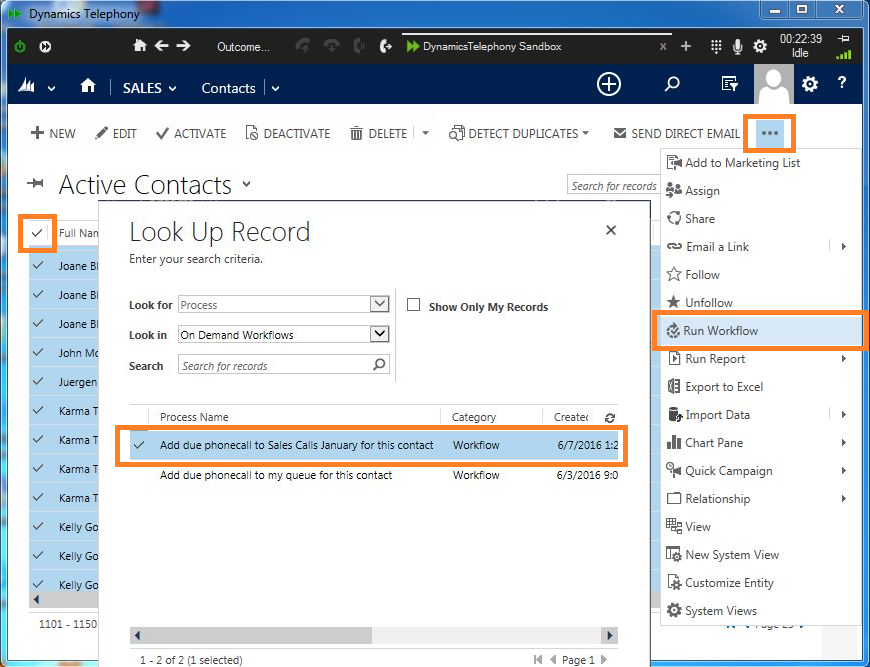
Run workflow with lookup record

A more specific search can also be done using Advanced Find to get the leads that you need. Start by opening the Advanced Find window.

Advanced Find button

Next, make the selections needed in order to get the desired results. In this case, the search is for Contacts that have an Full Name which Equals the text Mary.

Advanced Find make selection Contacts

Click Results to bring back all the contacts which fit the search, then run the workflow.

How to make the workflow

Two workflows are required for this to work correctly. An on-demand workflow as well as a child workflow must be created. The reason for this is to access the current user.

First, create the child workflow as per the screenshot below.

Capture


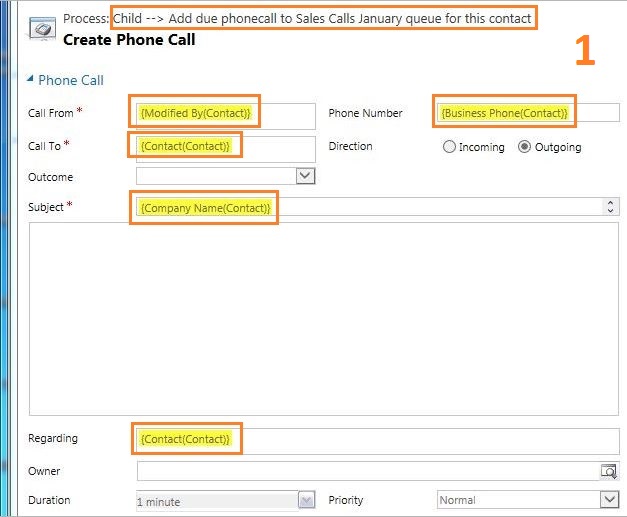
Step 1 is to click Add Step and select Create Record. Enter a short description of the step and select Phone Call from the dropdown menu. Click Set Properties and enter the fields as per the screenshot below.

Phone call set properties child workflow

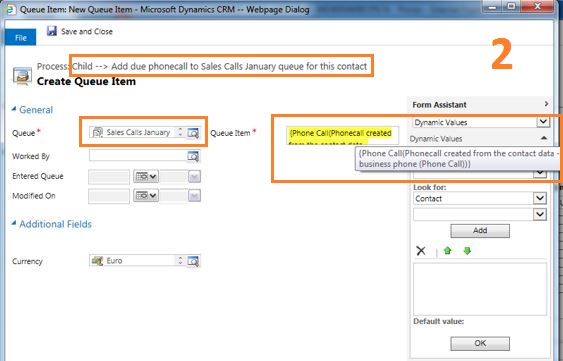
Step 2 is to create another record. Enter a description again and select Queue Item from the dropdown. Click Set Properties and enter the fields as per the screenshot below.

In the queue field, lookup and select the name of the queue where you want the queue item to go.

Queue item set properties child workflow

Now that the child workflow has been created and saved, the next task is to create the on-demand process which will call the child process.

Create a new workflow as per the screenshot below. This workflow is on-demand and uses entity contact.

Main workflow sales calls january

Step 1 is to update the contact so the “Modified By” user gets set to the current user. In this way, the next step can get the current user. This is a well known trick to access the current user.

Main workflow update contact

Step 2 is Start Child Workflow. Select Contact from the dropdown to see the child processes on a contact entity. Then select the child process for the next selection by clicking the lookup.

See the screenshot below.

Main workflow start child workflow

Once complete, ensure to activate both workflows.

Queue member management

Queue item flow can be controlled in standard CRM, and in Dynamics Telephony. The controls achieve different results explained below

CRM queue control

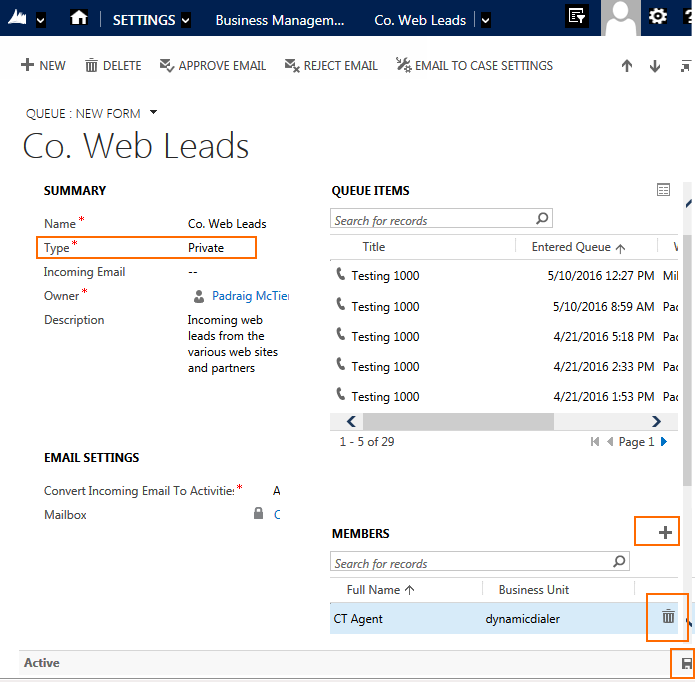
In Dynamics CRM, a queue can have members who are the only people that will receive queue items via Dynamics Telephony. You can add individual members, or you can add a team. You can easily remove individuals or teams from the queue too.

In this screen snap note the queue must be private in order to be able to specify queue members. Note how you can add or delete members. And remember to save at the end.

Access this form at Settings > Business Management > Queues and click on the queue you want.

crm_queue_member_control

Dynamics Telephony queue control

When you turn off a queue in Dynamics Telephony, it turns it off for all users.


Workflow to add phonecall for leads to my queue

This workflow will be available to a lead, or set of selected leads. It will create a phonecall for each lead and put it in your personal queue. Now, with Dynamics Telephony Queues enabled, you can process each lead using the progressive dialer.

How it is used

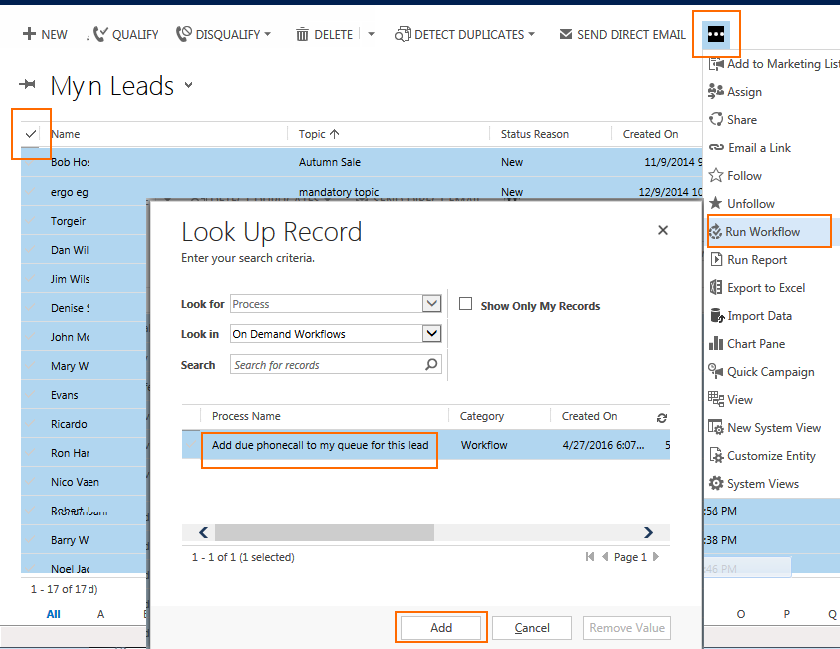
Filter down to the leads you want to add to progressive dialing. Select all and run the workflow per this screen shot.

add_due_phonecall_for_this_lead_to_my_queue_5

A more specific search can also be done using Advanced Find to get the leads that you need. Start by opening the Advanced Find window.

Advanced Find button

Next, make the selections needed in order to get the desired results. In this case, the search is for Leads that have an Address 1: County which Contains the text Tipp.

Advanced Find make selection

Click Results to bring back all the leads which fit the search, then run the workflow.

How to make the workflow

Two workflows are required for this to work correctly. An on-demand workflow as well as a child workflow must be created. The reason for this is to access the current user.

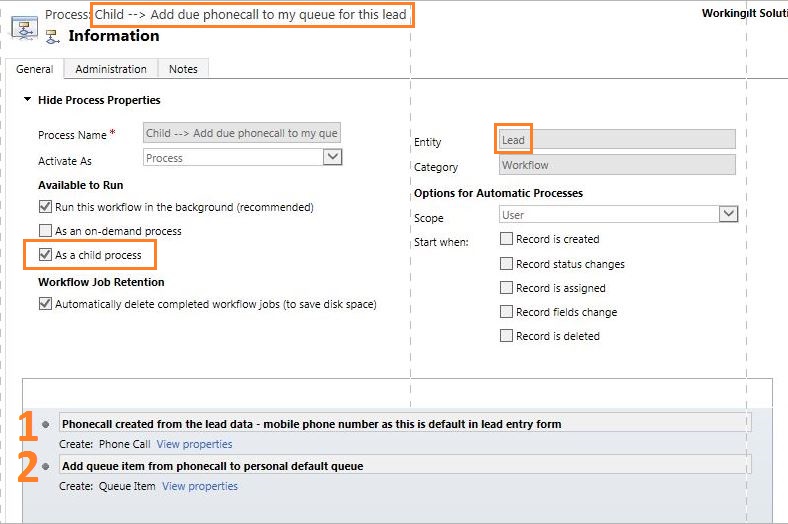
First, create the child workflow as per the screenshot below.

Lead to default queue - child workflow

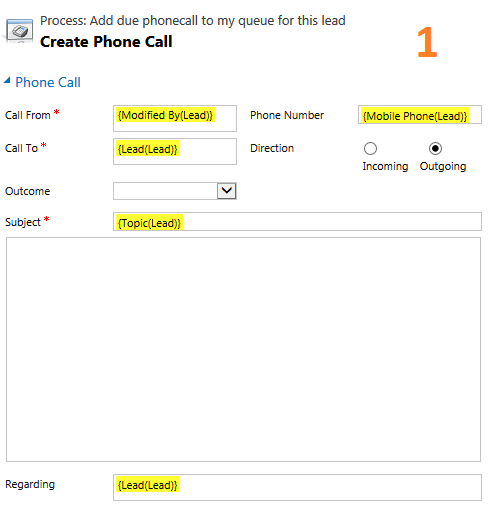
Step 1 creates the phonecall setting the various fields as shown

add_due_phonecall_for_this_lead_to_my_queue_3

Step 2 create the queue item specifying the current users queue

add_due_phonecall_for_this_lead_to_my_queue_4

Now that the child workflow has been created and saved, the next task is to create the on-demand process which will call the child process.

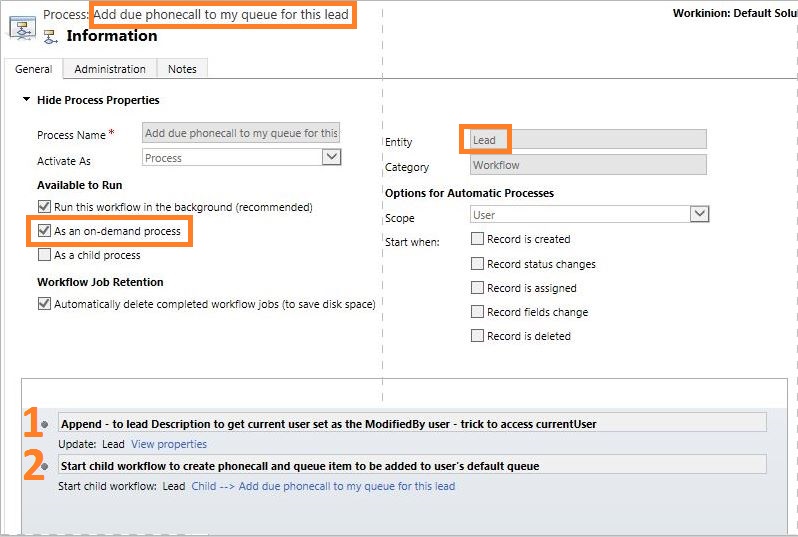
Create a new workflow as per the screenshot below. This workflow is on-demand and uses entity lead.

Lead to default queue - main workflow

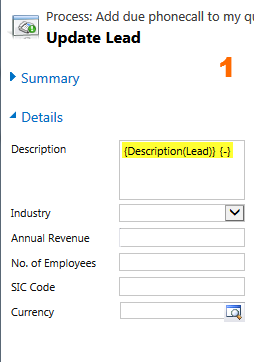
Step 1 is to update the lead so the “Modified By” user gets set to the current user. In this way, the next step can get the current user. This is a well known trick to access the current user.add_due_phonecall_for_this_lead_to_my_queue_2


Step 2 is Start Child Workflow. Select Lead from the dropdown to see the child processes on a lead entity. Then select the child process for the next selection by clicking the lookup.

Lead to default queue - child workflow properties

Once complete, ensure to activate both workflows.

Demonstration Mode

Demonstration mode is for when you want to test or demonstrate Dynamics Telephony without the complication of connecting it to a telephone system. You can test all Dynamics Telephony features using this mode.

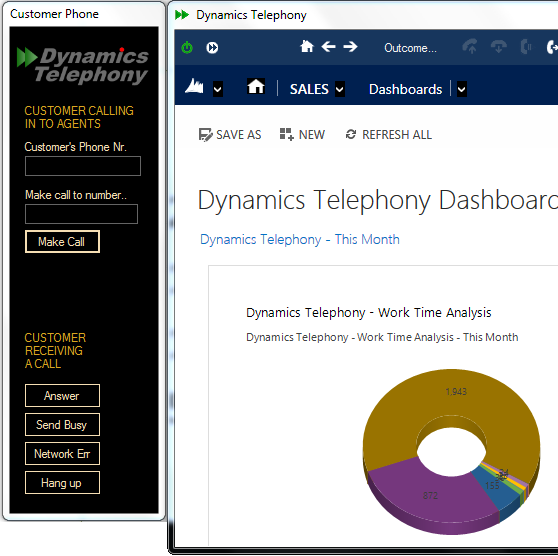
In demonstration mode, a second window is shown called “Customer Phone” – see it on the left in this screen shot

sim_cust_phone

Using this “Customer Phone”, you can simulate a customer calling in to Dynamics Telephony using the “Make Call” button. Fill in their phone number first and you will see their record pop in Dynamics Telephony. Use the “Make call to number..” box to simulate DNIS calls.

Similarly, when you make a call from Dynamics Telephony, using click-to-dial or the Progressive Dialer, you can simulate the customer answering by clicking the Answer button

Setting up demonstration mode

Once Dynamics Telephony is installed, go to the
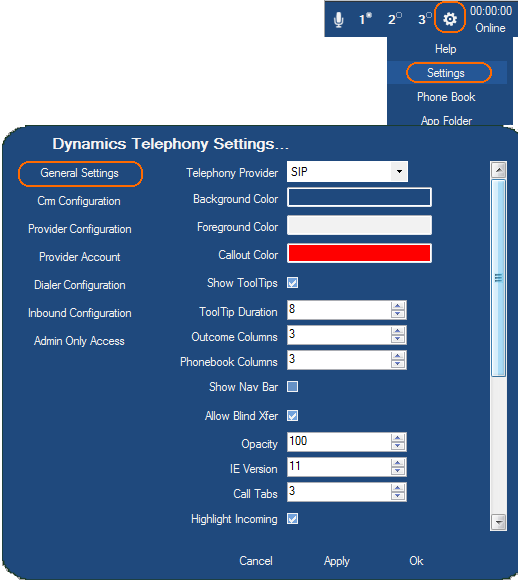
Cog Menu > Settings

In there, pick General Settings

The first item on the list is Telephony Provider – pick Simulator from the list.


Application Directories / Uninstall Client

Application Cache

Default settings, dialer queue cache:
%AppData%\CT Solutions\DynamicsTelephony

NOTE: files in this folder are preserved through upgrades. The Config.crm file in this folder is the connection to CRM so it can be pushed out to users (from a working client), so that new users do not have to enter connection info.

If you want to clear the cache, delete all files and folders, in this folder except Config.crm (the connection to CRM)

Also, these might exist…they are cache and can be deleted to clear cache:
C:\Users\user_name\AppData\Local\VirtualStore\Program Files (x86)\Dynamics Telephony
and
C:\Users\user_name\AppData\Local\Dynamics_Telephony

New log file location (V3+):
%AppData%\CT Solutions\DynamicsTelephony

User settings like initial size and position, and initial Application in any folder like
C:\Users\user_name\AppData\Local\Apps\2.0\Data\7X1XODNL.P6J\16BDL8WP.16B\dyna..tion_0000000000000000_0003.0000_cfc039bd3cf200e1

Client Uninstall

Uninstall is from the Programs And Features Control Panel

For complete uninstall, you should also clear the cache mentioned above and the following directories.

ClickOnce Application:
C:\Users\user_name\AppData\Local\Apps\2.0\24K624J6.1JJ\C96BM7WW.MRL\dyna..tion_8855e60ab9a52988_0002.0000_9c0f5092a33ef22f

System Uninstall

To uninstall all entities from CRM, you use the Uninstall System on the Dynamics Telephony COG Menu.

NOTE: You will not see this item unless your CRM user has a Role called “Dynamics Telephony Uninstall” – the role does not need any special permissions.
ALSO, you need to have it allowed under Admin Only Access in the Dynamics Telephony settings

Files for making your own MSI/Setup

Some sites have had success simply copying the application files to the users PC and running from a shortcut. Others make a setup or MSI. In all cases, here are the files you will need.

  1. Install from ClickOnce URL as normal
  2. Run DT Client at least once and quit it
  3. Run DT Client again and select App Folder from the DT menu
  4. Select all files and folders and copy to your MSI/Setup source directory.
  5. Delete .manifest and .cdf-ms files…EXCEPT dynamicstelephony.exe.manifest from your MSI/Setup source directory

Use the above files for your MSI/Setup

The shortcut you make should refer to dynamicstelephony.exe and should run the application in the same folder as dynamicstelephony.exe

If you include %AppData%\CT Solutions\DynamicsTelephony\config.crm in the MSI (copy from a working DT Client), then the user will not be prompted for the CRM URL when they first start the DT Client.

Norstar BCM 50/450 TAPI

1. Check you have “LAN CTE” licences on your BCM.

Open the Business Element Manager from:
Start > Programs > Avaya ( or Nortel ) > Business Communication manager > Business Element Manager.

In Network Elements, select the IP address of your BCM, enter credentials and click Connect.

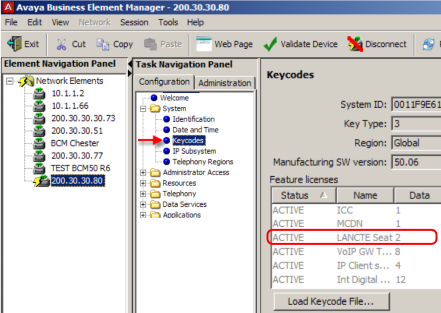
In the Task Navigation Panel, expand the System folder and select Keycodes. Check the LAN CTE feature is active and has sufficient seats (in the Data column)

bcm_keycodes

For more information on keycodes, see this document from Avaya.

2. Install & Configure LAN CTE

LAN CTE is the interface between your PC and your BCM Telephone system. LAN CTE includes a TAPI Driver that Dynamics Telephony uses to monitor and control your BCM telephone.

Follow the comprehensive instructions in this document from Avaya. These are for BCM R6, but should be similar for other versions.

Dynamics Telephony supports one TAPI DN (BCM extension phone number). Make a note of the DN for the next step.

3. Configure Dynamics Telepony for TAPI

Finally, in Dynamics Telephony
> Settings > General: set provider to TAPI
> Settings > Provider Account: Set the DN to your extension number


Cisco CUCM TAPI

This is an overview of the installation and testing of TAPI for Cisco Call Manager sites. This is required on each agent PC.

Detailed Instructions are in the Cisco TAPI Developer Guide here

See here to find out if your environment is supported by Cisco

btn_FreeTrial btn_MainSite

The list of supported Cisco devices is here

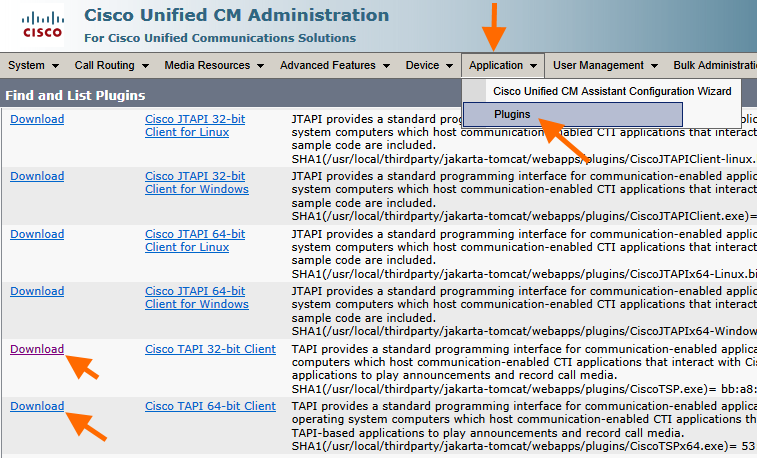
1. Download the software from CUCM Admin

tsp_install_1a

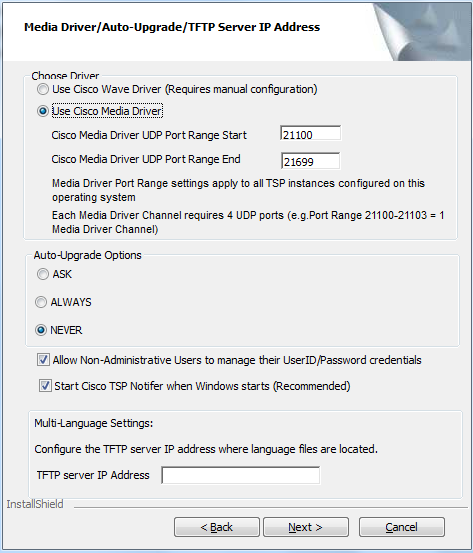
2. Run the installation. Here are some relevant screen shots

tsp_install_2


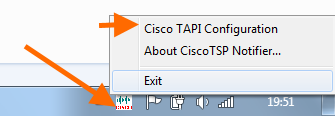
3. Once installed, access the configuration from Start Menu or the System Tray Icon shown below

tsp_install_3

4. Configure user on CUCM for CTI
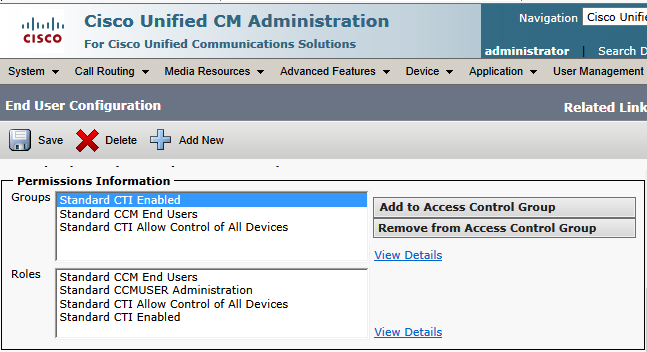
a) Check the “Enable CTI Control” checkbox for the user.
b) Set the Access Control Group for the user to CTI Enabled etc. Read the CUCM help.

cucm_cti_user_config_1


NOTE: Check this config if you see (later):

tsp_install_7


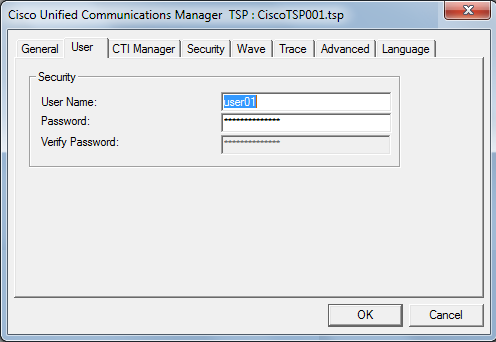
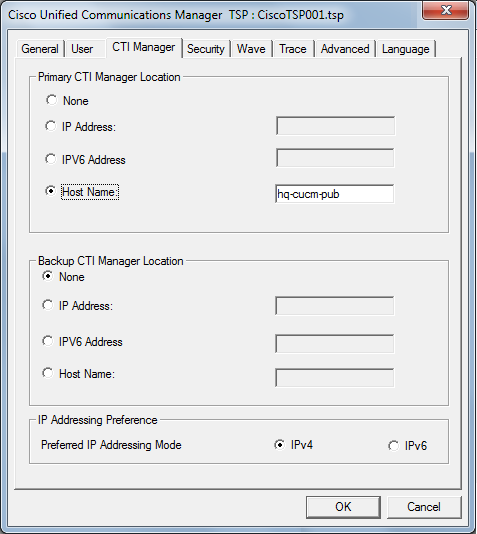
5. Configure user and server per these screens

tsp_install_4


tsp_install_5


YOU MUST RESTART YOUR PC AFTER EVERY CHANGE ON THE CLIENT – e.g. even if you re-enter the password.

Log file: see: C:/Temp/cisco folders


6. To test, you can use Microsoft Dialer which is on every PC

Run > Dialer.exe

Menu: Tools > Connect using
– Choose Cisco from the list
– Make a call

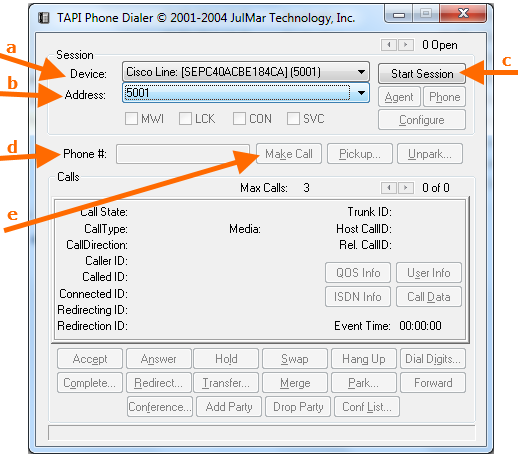
7. For advanced debug you can use Julmar Phone from here

Run phone.exe from the download above and test per this screen and instructions below it

tsp_install_6

a. Pick your phone from the list
b. Pick your line
c. Click Start Session
d. Enter a phone number
e. Click Make Call

7. Configure Dynamics Telepony for TAPI

Finally, in Dynamics Telephony
> Settings >    – General: set provider to TAPI
> Provider Account: Set the DN to your extension number

General Settings

All General Settings are stored per user, and they are stored in CRM so users can have their setting follow them if they use a new PC.

The General Settings can also be controlled globally. Please ask your engineer.

settings_general

Most settings are easy to understand. Here are some extra notes

These settings control the DT Toolbar colors, tooltip duration and opacity, number of columns in the outcomes selector or phone book, and number of Call Tabs

Telephony Provider. The default is SIP. If you change it other settings need to be changed too so change with care.

IE Version You can set this from 7 to 11


Agent efficiencies guaranteed by embedded progressive dialer

Dynamics Telephony Dialer is a progressive dialer embedded in Microsoft Dynamics CRM. This results in efficiency gains available with no other dialer. The gains are like getting an extra agent for every three you already have. Imagine all the extra sales that could mean!

one_free_for_three_twitter

Management Efficiency Gains

  1. Part of Dynamics CRM, yielding fastest agent training.
  2. No need for data export/import with and external dialer.
  3. Integrated reports in CRM – less time to create.
  4. Realtime results in CRM dashboard
  5. Sure of Ofcom or FCC compliance.

Agent Efficiency Gains

  1. Automatic selection of the next customer to call
  2. Automatic dialing
  3. Automatic rescheduling of no-answers and busies
  4. Automatic move-on to next call at end of previous call
  5. Automatic tagging of outbound call attempts in CRM
  6. Automatic tagging of outcome in CRM
  7. Ability to auto-run workflow per outcome
  8. Automatic management of callbacks
  9. Controlled Wait, Wrap and Preview times
  10. Higher agent morale through less boring/repetitive tasks
btn_FreeTrial btn_MainSite

Avaya IP Office and TAPI

Avaya IP Office connects to Dynamics Telephony using TAPI ( or CCT if you are using AACC). No extra licences needs to be purchased from Avaya for TAPI. Please see the document linked below for getting your Avaya IP Office TAPI installed and configured:
http://www.ipofficeinfo.com/pdf/CTI_Link_Installation_Manual.pdf
and
http://install.dynamicstelephony.com/Files/ip-office-tapi-link-installation-guide-12a.pdf

NOTES FOR THE INSTALLATION
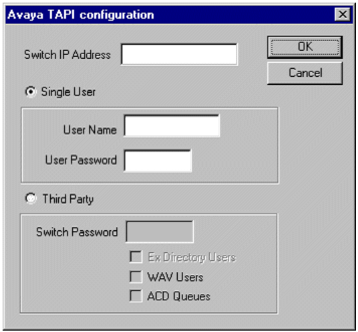
 – You only need the licence-free  TAPILink Lite. It is the same installer as Pro, but you use “Single User Mode”, NOT “Third Party Mode”.
 – Dynamics Telephony uses TAPI2
 – It IS NOT necessary to install the WAV driver as well (see chapter 2 in above document)
 – The user and password is the username you use to logon to Avaya softphone.
 – DevLink is not required.
 – NOTE: Generally, you need to restart Windows for any TAPI configuration change, including simple password changes.
NOTE: you should configure all users that will be controlled as an off-hook station. This will cause the user’s phone to return to the idle state when a call is hung up using TAPI. Without this option set, the phone will remain in a disconnected state until the phone is hung up manually. The off-hook station check box can be found on the Telephony tab of the User’s setting in Manager.
You can configure the TAPI Driver in the Advanced tab of the Phone & Modem control panel.
avaya_ip_offic_tapi_1
To verify the installation, you can use the Dialer application that is part of Windows. Run > Dialer. In the Tools menu, select Connect Using.. and find your line
Finally, in Dynamics Telephony > Settings >
   – General: set provider to TAPI
   – Provider Account: Set the DN to your extension number. NOTE you can leave this blank if there is only one TAPI line available on your machine.