All posts by dtAdmin

Simple API example – walk-through

This simple example will popup a window that displays the DT events as they happen. It works in conjunction with a phonecall form.

IMPORTANT: You MUST call RegisterForEvents() first, to be able to use any of the Dynamics Telephony functions, and get the events.

1.  Make a file with Notepad called dt_SimpleEG.js and paste in the following code:

var wndEvents = null; // A variable to hold the popup window reference.
var fnDTEventHandler = function (ev) { //Our DynamicsTelephony Event Handler.
 try {
 if (wndEvents == null) {
 //first time per call, wndEvents will be null, and the popup window will need to be re-created
 wndEvents = window.open('', 'dtEventsWindow', 'menubar=1,resizable=1,status=1,width=750,height=250');
 wndEvents.document.body.innerHTML = '<h1>Dynamics Telephony Events</h1>';
 }
 // add this event to the list...
 wndEvents.document.body.innerHTML += '<div>' + ev.dtEventArgs.toString() + '</div>';
 } catch (e) { }
};
// Register for Events with DynamicsTelephony using our Handler 'fnDTEventHandler'.
DynamicsTelephony.RegisterForEvents(fnDTEventHandler);

2.  Go to CRM > Settings > Customizations > Customize the system and add the above file as a Webresource, per this snap:

simple_api_new_ws

3. Add the above javascript library, and the core DT javascript library to the phonecall form, per this snap:

simple_api_form_libraries

4. Publish all customizations

5. Run DT and do a click-to-dial or take an inbound call or an outbound campaigncall. NOTE these need to be configured to pop the phonecall form for the javascript to run.

simple_api_dt_events_page

Gamma Horizon Hosted Phone System

Dynamics Telephony is verified as compatible with Gamma Horizon Hosted Phone System.

logo_gamma_horizon

Dynamics Telephony interfaces to Gamma Horizon using their TAPI interface. You need to contact your Gamma Horizon provider to send you the TAPI Driver for your system. You can preview the installation guide HERE

Notes

  • You will need to log onto the PC as Administrator to do the install
  • You will need the Horizon Client username and password for each PC. You may get these in your email with the install link.
  • If you use network port blocking, other than Windows Firewall, you may have to open 127.0.0.1 over port 21050
  • You can skip “Step 1 – Options” in the install guide above and go to Step 2 – Username and password.

You can test the install using the Windows Dialer application that is on every PC. More details in the install guide referenced above.

Release Notes – Jul 2017

New or changed features this version. Version 2.1.6357

New Dynamic Outcomes. Now you can have a different set of outcomes depending on various factors. See here

New Busylight is a physical lamp that shows the agent status. See here.

New Report an Issue feature gives users an easy way to send screenshot and logs for a CRM or DT issue to support. See here.

For security reasons, log files now do not contain details of DTMF sent to IVRs by users

Inbound Missed Calls can be recorded in CRM as phonecall activities with “Missed Call”

Enhanced Phonebook with your contacts and 7 days of Call History. See here.

Handy phonebook with Call History

Dynamics Telephony contains a very convenient Phonebook panel, complete with Call History.

phone_book_search

All your internal and external contacts can be listed here. Simply start typing the name in the Search Box and the list is instantly filtered to match.

Click on a contact to call them. If you have a call in progress already, clicking on a contact will Transfer the call to them. Quick and easy.

Or enter a number in the Dial Box for contacts not in your phonebook.

See here for how to set up your phonebook, for individual users or teams.

Call History

The Phonebook panel also contains your Call History for the last 7 days (or to the limit of records set by your system administrator).

phone_book_history

Here you can see you recent Missed Calls, as well as your recent inbound and outbound calls.

Move your mouse over an item to reveal three buttons:
– Dial the contact
– Navigate to the entity in CRM
– Navigate to the phonecall activity in CRM

Release Notes – Aug 2017

New or changed features this month. Version at the start of this month was 2.1.6422

New General Setting: “Validate Internal” – controls whether internal calls must have all mandatory fields filled in on the popped form. Only comes in to play when General Setting “Validate Form” is ON. Internal calls are where callers number EQUALS Provider Configuration setting “Extension Length”

New General Setting: “Internal Phonecalls” – determines if a phonecall activity is automatically created by DT for an internal call.

New General Setting: “Daylight Saving Adjust” controls whether DST is taken into account on datetimes that DT writes to CRM. Adjust this depending on whether DST is enabled on your CRM server.

DT now takes into account the users and the server’s timezone when writing datetimes to CRM. You need this version if your datetimes are incorrect. For example, in phonecall start and end times. For this feature to work best, you need Crm Configuration setting “Impersonate User” ON, and to specify the Organization Uri in Crm Configuration.

Internal calls and Missed Calls are now included in the Call History panel on the DT Toolbar

The Call History is now retained for 7 days. The Call History is stored in CRM so that agents see in no matter where they use DT.


Voice Drop – automated voicemails

One hour every day, for every agent, can be spent leaving voicemails for customers. That is not good use of an agent’s time, and it is boring and repetitive.

Voice Drop from Dynamics Telephony can recover all that time for you by automatically leaving a voicemail, while freeing the agent to make another call to another customer.

How to use Voice Drop

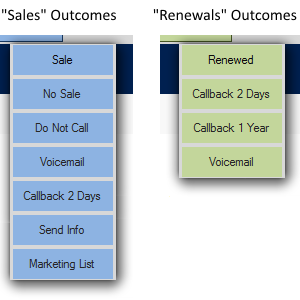
When you encounter a customer’s voicemail, select the message you would like to leave for the customer from the Outcomes list. The call will be transferred from your phone to the automated Voice Drop service, and you will be free to make your next call.

voice_drop_outcomes


You should click on the Voice Drop button just as you hear the start of the “beep”.

How Voice Drop works

When you click a Voice Drop outcome, the customer’s voicemail is transferred to a Voice Drop service. There are two choices for the Voice Drop service.

1. The service can run on an Asterisk based platform – probably on your premises. Scripting in Asterisk will answer the call and play a pre-configured audio clip into the customer’s voicemail. This option can eliminate the per call cost and gives you more granular control. This requires some Asterisk scripting expertise on your side.

2. You can use our cloud-based service. Uploading audio clips to the service is simple. No particular expertise is required on your side.

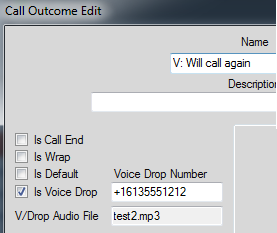
How to configure Voice Drop – Cloud based

In this mode, you use the same Voice Drop number for every outcome, but you upload a different audio file for each outcome.

1. Contact your Dynamics Telephony representative for your Voice Drop number. Enter it in the Voice Drop number box

2. Make your audio file using any mp3 recorder. There are many free ones online. Be sure to use only mp3 format. More instructions here

3. Click in the audio file box to be prompted for the audio file to upload.
IMPORTANT: wait a few seconds after upload and confirm your file name is in the Audio File box

voice_drop_cloud

How to configure Voice Drop – Asterisk based

In this mode, you need to set up one extension number in Asterisk for each Voice Drop Outcome button. The script for the extension will simply answer the call and play a specified audio file. For example:

exten => 2002,1,Answer(500)
exten => 2002,n,Playback(vm_msg_we_will_call_you_back)
exten => 2002,n,Hangup()

Specify the extension number against the Outcome button like this:

voice_drop_asterisk

DO NOT specify any Audio file in the Outcome configuration. Instead, you have to load the audio file onto your asterisk.

Configuration Tips

If you use per-agent queues with Dynamics Telephony Progressive Outbound, then you can have per-agent Voice Drop buttons. This means each agent can leave messages in their own voice. See here for how to configure Outcomes per agent queue.

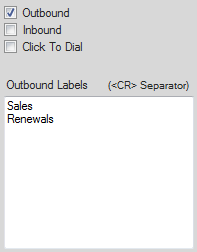
If you have different teams or campaigns using Voice Drop, then you can have different Voice Drop buttons per team. See here for how to configure Outcomes per queue

Voice Drop works with click-to-dial. However, click-to-dial Outcome buttons cannot be defined per agent or agent-group.

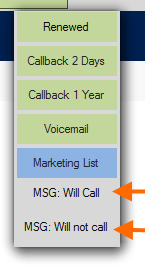
Use a different colors for Voice Drop buttons to distinguish them as Voice Drop or to group them for a user, for example.

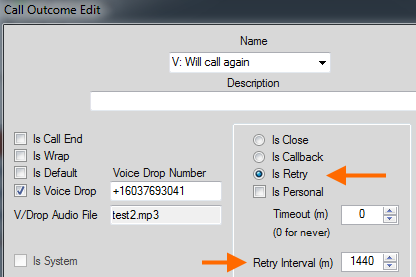
You can combine Voice Drop and other Outcome attributes. For example, in this screen shot, the Voice Drop button will also set up a retry in 24 hours (1440 minutes)

voice_drop_and_retry

Be sure to use long and meaningful names for your audio files to aid organization. Maybe the name could include the name of the person who made the recording and a summary of the content: e.g. JOHN_we_will_call_you_back.mp3

You can check the audio file for a Voice Drop outcome by viewing the CRM Dashboard called “Dynamics Telephony – Call Outcomes”. Double-click on the outcome you want to see and in the form that opens, the audio file is in the Notes section.

Per campaign Outcome Buttons

When using Dynamics Telephony for outbound calling, the agent will usually complete the call by selecting an Outcome from a list of configured Outcomes. This list of Outcomes can be defined by department, group of agents, queue or campaign. In this way, the agent always only sees a list of Outcomes that are relevant to the call. This speeds up the call and makes sure only the correct Outcome is selected.
dynamicsOutcomesRemember, Outcomes can trigger Business Workflows in CRM. This means simply clicking on an Outcome can do things like:
– Assign a lead to a another sales person or group
– Setup a callback this time next year
– Mark the contact for Marketing Materials, send out some info via email now AND set up a callback for 2 days time.


How to set it up

In Dynamics CRM, set up a queue (or queues) for the department, agent-group or campaign.

Now, when you define an Outcome in Dynamics Telephony, you will see a box called “Outbound Labels”. Add the queue names to this box that you would like to use this outcome.

dynamicsOutcomes_config

NOTES:
1. Queues that are not defined against at least one Outcome, will get all outcomes.
2. Once you have a queue name listed against any outcome in Labels, you have to have the same queue name in the Labels box of all outcomes you require for that queue.


Efficiency from Click-to-dial

Your CRM users time is their most precious resource. Anything that can save them time will translate to your bottom line. Click-to-dial will save users time on every call. Anyone who is making more than 20 calls a day will see a positive return on an investment in click-to-dial

6 reasons to invest in click-to-dial

Click-to-dial means you simply click on a phone-number in CRM to immediately connect a voice call to the customer. Here are 6 reasons to invest in Dynamics Telephony to provide you with click-to-dial in CRM

Save time on every call – Click-to-dial is instant. The time that used to be spent focusing on a phone number, and dialing manually is reduced to zero. Further, time can also be saved when you need to transfer or conference the call.

Auto-log every call – if it’s not in CRM, it didn’t happen. Users cannot be relied on to log every call in CRM. So auto-logging of all calls will help to keep your CRM data accurate and complete. And will save maybe 30s per call.

Recent call list – when you use click-to-dial, all your recent calls are made available in a handy list. This means you can quickly call back a dropped call, or redial a call you tried before lunch.

Call history – because every call is automatically logged in CRM, users will see a full call history before they make the call. This gives them a full view of the results of previous conversations with the customer.

More focus for users – users no longer have to focus on a phone number, and dialing it correctly. Instead, they keep their focus on the customer and how they are going to handle the conversation with the customer.

A first step to more savings with auto-dialing – Once users are used to click-to-dial, it will be easy to move them on to using an autodialer. With an autodialer, the customers they want to call are automatically popped out to them, auto-dialed and any no-answers or callbacks are automatically handled by the autodialer. The efficiency gain is a guaranteed 50% increase in contacts per day.

Click-to-dial makes sense for any CRM user that makes 20 or more calls a day.

Telephony status via Busylight

Dynamics Telephony works with Busylight from Kuando to show your status to your colleagues and supervisors. This translates in to more efficiency for agents, and a faster response to traffic overloads in your call center.

busyLight_and_dt

When there are calls waiting, a supervisor can now quickly see and directly speak to agents that are LOGGED OUT or NOT READY. The busylight at the agents desk gives the supervisor all the information they need to see who might respond to the waiting customer.

For agent efficiency, remember, “”It can take 20 minutes to regain full focus after an interruption”. this is partticularily true in Outbound calling operations. Dynamics Telephony will keep interruptions away for the full duration of your call – preview, talk and wrap time.

Because Dynamics Telephony is compatible with any phone system, the Busylight integration we provide also works with any phone system, including Avaya, Cisco, Skype for business, Asterisk, SIP systems and any TAPI based system.

Busylight colors

RED   Agent making or on a call, or in preview/wrap time
YELLOW   Agent on Not Ready – NOT available for a call
GREEN   Agent Idle – available for a call
OFF   Agent logged-out.

For more, see www.busylight.com

Asterisk Queues

Dynamics Telephony brings Dynamics CRM and Asterisk Queues together, providing features such as:
– Login / logout
– Set your availability status – auto-join your queues
– Join / leave an Asterisk Queue from within Dynamics Telephony
– See real-time statistics for a queue in dynamics Telephony
– See number of calls waiting per queue
– Supports multiple Asterisk Queues
– Configure different queue visibility for different teams.

agent_asterisk_queues

Real-time statistics

The following can be shown to the agent, per queue:
<<Queue>> The queue number as configured in Asterisk
<<Name>> Name for the queue based on matching in setting file
<<Available>> Number of agents in the queue but not on a call
<<Callers>> Number of callers in the queue waiting for an agent
<<HoldTime>> Average hold (queueing) time for callers
<<LongestHoldTime>> Age of the oldest call in the queue still waiting for an agent
<<TalkTime>> Average talk time for this queue
<<LoggedIn>> Number of agents part of this queue

Use the <<placeholders>> shown when configuring the display. For example, in the display above, the configured string is: <<Name>>|  AGTs:<<LoggedIn>> CWT(s) <<Callers>>(<<LongestHoldTime>>)

How it works

Our integration of Dynamics CRM and Asterisk Queues uses a single connection to your Asterisk Server. This connection ensures minimal load on your asterisk while providing a reliable and auto-reconnecting link for the Dynamics Telephony clients.

This is an optional module for Dynamics Telephony. A Windows server is required for this proxied connection – VMs are supported. The real-time statistics are updated ever 10 seconds – configurable.

DT Clients can be running on local network, or remote through a firewall. Remote Desktop, Terminal Services and Citrix are also supported.