Category Archives: Telephony

Norstar BCM 50/450 TAPI

1. Check you have “LAN CTE” licences on your BCM.

Open the Business Element Manager from:
Start > Programs > Avaya ( or Nortel ) > Business Communication manager > Business Element Manager.

In Network Elements, select the IP address of your BCM, enter credentials and click Connect.

In the Task Navigation Panel, expand the System folder and select Keycodes. Check the LAN CTE feature is active and has sufficient seats (in the Data column)

bcm_keycodes

For more information on keycodes, see this document from Avaya.

2. Install & Configure LAN CTE

LAN CTE is the interface between your PC and your BCM Telephone system. LAN CTE includes a TAPI Driver that Dynamics Telephony uses to monitor and control your BCM telephone.

Follow the comprehensive instructions in this document from Avaya. These are for BCM R6, but should be similar for other versions.

Dynamics Telephony supports one TAPI DN (BCM extension phone number). Make a note of the DN for the next step.

3. Configure Dynamics Telepony for TAPI

Finally, in Dynamics Telephony
> Settings > General: set provider to TAPI
> Settings > Provider Account: Set the DN to your extension number


Cisco CUCM TAPI

This is an overview of the installation and testing of TAPI for Cisco Call Manager sites. This is required on each agent PC.

Detailed Instructions are in the Cisco TAPI Developer Guide here

See here to find out if your environment is supported by Cisco

btn_FreeTrial btn_MainSite

The list of supported Cisco devices is here

1. Download the software from CUCM Admin

tsp_install_1a

2. Run the installation. Here are some relevant screen shots

tsp_install_2


3. Once installed, access the configuration from Start Menu or the System Tray Icon shown below

tsp_install_3

4. Configure user on CUCM for CTI
a) Check the “Enable CTI Control” checkbox for the user.
b) Set the Access Control Group for the user to CTI Enabled etc. Read the CUCM help.

cucm_cti_user_config_1


NOTE: Check this config if you see (later):

tsp_install_7


5. Configure user and server per these screens

tsp_install_4


tsp_install_5


YOU MUST RESTART YOUR PC AFTER EVERY CHANGE ON THE CLIENT – e.g. even if you re-enter the password.

Log file: see: C:/Temp/cisco folders


6. To test, you can use Microsoft Dialer which is on every PC

Run > Dialer.exe

Menu: Tools > Connect using
– Choose Cisco from the list
– Make a call

7. For advanced debug you can use Julmar Phone from here

Run phone.exe from the download above and test per this screen and instructions below it

tsp_install_6

a. Pick your phone from the list
b. Pick your line
c. Click Start Session
d. Enter a phone number
e. Click Make Call

7. Configure Dynamics Telepony for TAPI

Finally, in Dynamics Telephony
> Settings >    – General: set provider to TAPI
> Provider Account: Set the DN to your extension number

Avaya IP Office and TAPI

Avaya IP Office connects to Dynamics Telephony using TAPI ( or CCT if you are using AACC). No extra licences needs to be purchased from Avaya for TAPI. Please see the document linked below for getting your Avaya IP Office TAPI installed and configured:
http://www.ipofficeinfo.com/pdf/CTI_Link_Installation_Manual.pdf
and
http://install.dynamicstelephony.com/Files/ip-office-tapi-link-installation-guide-12a.pdf

NOTES FOR THE INSTALLATION
 – You only need the licence-free  TAPILink Lite. It is the same installer as Pro, but you use “Single User Mode”, NOT “Third Party Mode”.
 – Dynamics Telephony uses TAPI2
 – It IS NOT necessary to install the WAV driver as well (see chapter 2 in above document)
 – The user and password is the username you use to logon to Avaya softphone.
 – DevLink is not required.
 – NOTE: Generally, you need to restart Windows for any TAPI configuration change, including simple password changes.
NOTE: you should configure all users that will be controlled as an off-hook station. This will cause the user’s phone to return to the idle state when a call is hung up using TAPI. Without this option set, the phone will remain in a disconnected state until the phone is hung up manually. The off-hook station check box can be found on the Telephony tab of the User’s setting in Manager.
You can configure the TAPI Driver in the Advanced tab of the Phone & Modem control panel.
avaya_ip_offic_tapi_1
To verify the installation, you can use the Dialer application that is part of Windows. Run > Dialer. In the Tools menu, select Connect Using.. and find your line
Finally, in Dynamics Telephony > Settings >
   – General: set provider to TAPI
   – Provider Account: Set the DN to your extension number. NOTE you can leave this blank if there is only one TAPI line available on your machine.

Vonage Settings

You need to add a Softphone Device to your Vonage Extension. Vonage allow up to 3 devices on an Extension. See here for details of how to do this.

The following table highlights the specific settings you should apply in Dynamics Telephony:

Dynamics Telephony Tab Dynamics Telephony Setting Value Comment
Provider
Configuration
DTMF Mode DM_Outband This is RFC 2833
Expires 1800
Provider
Account
Username e.g. VH123456 SIP/Authorization ID
Password SIP Password
Host Name E.g. sip-1234.accounts.vocalocity.com Registrar
Domain Name * A single asterisk ‘ * ‘
Transport Mode TM_UDP


Evolve IP Settings

The following table highlights the specific settings you should apply in Dynamics Telephony:

Dynamics Telephony Tab Dynamics Telephony Setting Value Comment
Provider
Configuration
DTMF Mode DM_Outband This is RFC 2833
Expires 1800
Provider
Account
Username e.g. 6107654321 SIP Authorization ID. You can arrange with Evolve IP for a “Shared Call Appearance” if you like
Password SIP Password
Host Name voip.evolveip.net Evolve IP Domain or Realm. If this does not work use the Evolve IP proxy Address (could be voip-b.evolveip.net)
Domain Name * A single asterisk ‘ * ‘
Proxy Address Blank.
Transport Mode TM_UDP

ShoreTel On Site Settings

The following table highlights the specific settings you should apply in Dynamics Telephony:

Dynamics Telephony Tab Dynamics Telephony Setting Value Comment
Provider
Configuration
DTMF Mode DM_Outband This is RFC 2833
Expires 1800
Provider
Account
Username e.g. 7788 Extension number on ShoreTel system.
Password SIP User Password
Host Name E.g.10.11.12.13 IP address of the SIP Domain or Realm.
Domain Name * A single asterisk ‘ * ‘
Proxy Address Leave blank
Transport Mode TM_UDP

RingCentral settings

The following table highlights the specific settings you should apply in Dynamics Telephony for RingCentral:

Go to RingCentral document on getting settings HERE

Dynamics Telephony Tab Dynamics Telephony Setting Value Comment
Provider
Configuration
DTMF Mode DM_Outband This is RFC 2833
Expires 3600
Provider
Account
Username e.g. 16147788991 Usually users phone number
Password SIP Password
Host Name sip.ringcentral.com SIP Domain from RingCentral
Domain Name * A single asterisk ‘ * ‘
Proxy Address  e.g. sip10.ringcentral.com:5090

or

199.255.120.176:5090

 Outbound Proxy from RingCentral. NOTE you might need to use the ip address for this instead – so PING it and get the ip address
Auth Username  e.g. 210987654321 Authorization ID from RingCentral
Transport Mode TM_UDP


If inbound calls are not working, try turning off ringing of the RingCentral Desktop and Mobile App, per this screenshot

ringCentralDesktopFwdOff

Avaya Aura Contact Center (AACC)

GET A TRIAL GOING IN 20 MINUTES !
– NO SERVER REQUIRED.

YOU ARE RISKING BEING FIRED, if you have Avaya Aura Contact Center and Dynamics 365, and you do not try out Dynamics Telephony.

Check it out on Microsoft AppSource HERE.

Dynamics Telephony for Avaya Aura Contact Center provides the perfect Unified Agent Desktop for Dynamics 365 and Avaya Aura Contact Center agents – out-of-the-box.

Related: Microsoft Omnichannel & Avaya AACC Blended

Dynamics Telephony provides real agent efficiencies, saving time on every inbound and outbound call. All through a beautifully simple and seamless integration between CRM and AACC.

All calls logged in CRM automatically. This means your customer records in CRM have a full trace of all inbound and outbound conversations.

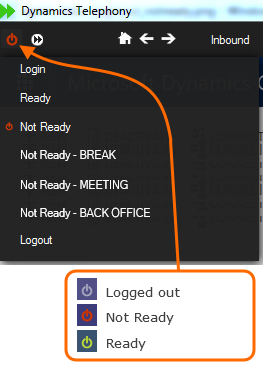
Agents have all the Contact Center controls they need: Login/ Logout, Ready / Not Ready, Not Ready Reasons, accept / reject calls, hold transfer and conference.

avaya_cct_nrdy

Inbound screen pop means the handling time of every call is reduced. Dynamics Telephony retrieves the callers number from Avaya Aura and uses it to find the callers record in CRM. This can be CRM lead, opportunity, case, contact or account

Skillset support means the skillset called is passed to your CRM page to be logged in CRM, and to influence the data displayed to the agent so they can deal with the call correctly.

Inbound Dialed Number or DNIS support means that agents can see which phone line, or DNIS, the call is coming in on. This can be via name and logo, like this..

incomingCallTabPopup

Also, the DNIS can cause the popped CRM page to be populated based on DNIS. For example, to select the Marketing Campaign or Source of the call.

IVR Data can be used for the screen pop (e.g. an order number), or to show IVR choices made (e.g. the caller wants to make a purchase), or to show the caller has been pre-authenticated by the IVR.

Avaya Outbound contacts can be processed by Dynamics Telephony. This means that contacts presented to an agent by Avaya Outbound will pop the related record in CRM and will be processed by the Dynamics Telephony progressive dialer algorithm. See HERE for more details

CRM Dashboards showing unified CRM & Telephony data are provided. You can adjust these for your own needs using standard CRM tools, as all data is stored in CRM. See HERE for more.

Dynamics Telephony is specifically designed to be flexible to meet many advanced need – out-of-the-box. But in addition, it is designed to be extensible to meet your specific needs easily. See the full list of Dynamics Telephony features HERE


Compatibility: CCT version 6 (Nortel) and greater. Knowledge worker or Contact Center Agent

Citrix: Yes, Dynamics Telephony is Citrix compliant

Hot Desking: Yes, Dynamics Telephony supports Avaya CCT based hot desking.

Avaya Aura Agent Desktop: Yes, Dynamics Telephony can work at the same time as AAAD on an agents PC.

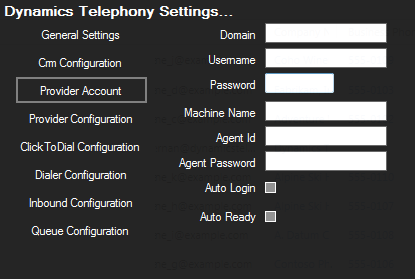
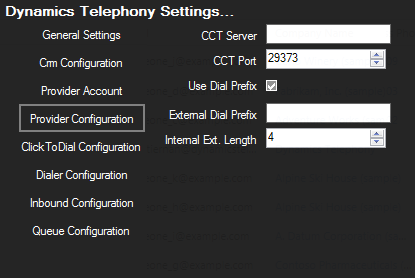
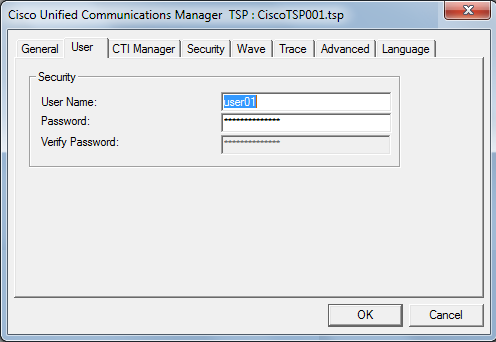
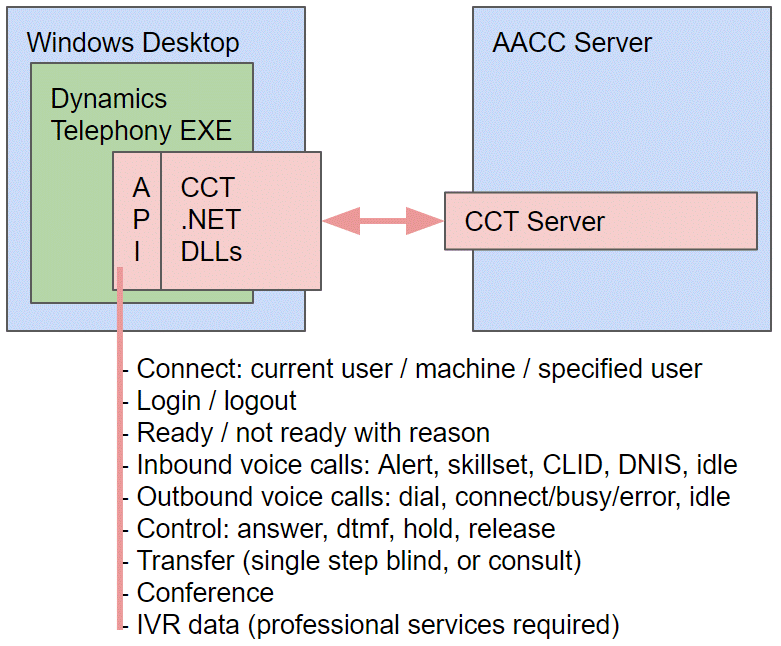
Settings: CCT User, password, CCT Server, port number. You can use one user for all or dedicated users. See these settings:

avaya_cct_settings_1

avaya_cct_settings_2

Single Sign On (SSO):  Yes Dynamics Telephony supports Windows single sign on. Simply leave the CCT username blank and DT will use the current windows user to sign on to CCT

Architecture Diagram: avaya_architecture

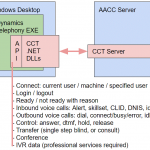
Please contact us for a personal demonstration of Dynamics Telephony for Avaya Aura Contact Center

GET A TRIAL GOING IN 20 MINUTES !
– NO SERVER REQUIRED.

btn_FreeTrial btn_MainSite

VOIP on Terminal Services

See also: TMCnet blog

VOIP is supported on a Terminal Services session. The audio (microphone and speaker) of the local PC is used via redirection from the remote session. You need Windows Server 2008 RDS or later.

However, you do need to make sure you have sufficient bandwith (especially from server to PC as this has to carry video and audio now) and that the Terminal Server itself can handle the load.

Bandwidth requirement for a Terminal Services session is around 30kbps and a VOIP session would usually be 16kbps or 24kbps, but could be as high as 64kbps if the G.711 codec is used. So check which codec you use for VOIP.

Fonality Settings

The following table highlights the specific setting you should apply in Dynamics Telephony

Dynamics Telephony
Tab
Dynamics Telephony
Setting
Value Comment
Provider
Configuration
DTMF Mode DM_Outband This is RFC 2833
Expires 1800
Provider
Account
Username SOFTPHONEXXX All CAPS
Password SIP Password
Host Name sNNNNNN.tribox.fonality.com
or
sNNNNNN.pbxtra.fonality.com
Where NNNNNN is the 6-digit system ID
Auth Username Leave blank when the same as username
Domain Name * A single asterisk ‘ * ‘
Transport Mode TM_UDP

See also: Fonality help