Category Archives: IT Guide

For IT to prepare, install and maintain Dynamics Telephony

IT planing for CRM impact

Dynamics Telephony policy is to have as little impact on your CRM as possible. Here are the impacts you need to consider.

As part of or submission to the Microsoft AppSource Store, install and basic tests were carried out by Microsoft Engineers. this led us to be a Preferred Solution on the AppSource

Admin Level User will be required during the install phase. This is to allow for the installation of the entities described later. This user needs to be allowed install a solution in your CRM.

Authentication. Dynamics Telephony supports all authentication methods supported by CRM online or on-premises. When users use Dynamics Telephony, they simply logon to CRM as normal.

HTTPS and HTTP are both supported. The certificate for HTTPS needs to be trusted by Internet Explorer.

Install procedure is described HERE

Entities Installed by Dynamics Telephony are listed HERE. The entities, fields and dashboards are all standalone with no impact on your standard entities on the Dynamics Telephony entities. They are installed as a solution that you can request to inspect. They can be uninstalled with no impact on your CRM.

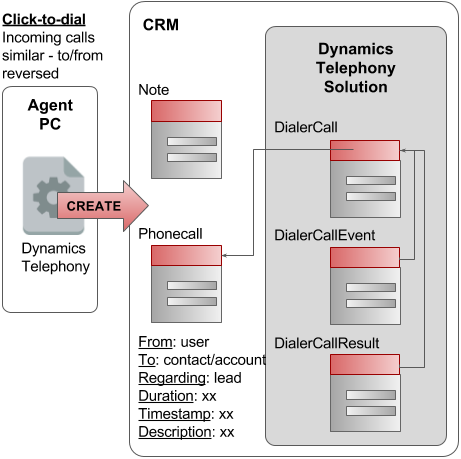
Entities written by dynamics Telephony during operation:
– Dynamics Telephony entity records.
Phonecall due to click-to-dial or incoming calls.
Note due to click-to-dial or incoming calls.
– (optional) create lead/contact for unknown caller.
These records are written using the logged-on user. See relationships below:

entities for click to dial

DT Entities installed in CRM

The following items are installed in your CRM by Dynamics Telephony for its own use. They are stand-alone entities that can be uninstalled without affecting your own data.

  1. DialerCall – data for every call made or received
  2. DialerCallEvent – every telephony event (dial, answer, etc.)
  3. DialerCallResult – every reported Outcome
  4. DialerCallOutcome – Outcome buttons configuration
  5. DialerDNIS – configure inbound lines
  6. DialerUser – realtime user status for RTD
  7. DialerKV – Global and per user settings
  8. DialerPhonebook – user extension numbers for easy transfers
  9. DialerQueue – callbacks for the progressive dialer
  10. DialerQueueEvent – Dynamics Telephony Phone system and Asterisk only. Event log of agent joining or leaving an inbound call queue.
  11. DialerQueueSettings – progressive dialer settings based on CRM queues
  12. dtThisWeek, month, day, year dashboards – Dashboards to display statistics
  13. dtRTD – web resource to display agent realtime status
  14. Phonecall fields – fields added to phonecall entity for telephony data and the call recording link
  15. Phonecall form – a simplified form for users to take notes on a call.
  16. Webresources, including our API and images for our dashboards.

How to disable click-to-dial phonecall popout

When you do a click-to-dial in Dynamics 365 CRM, a new phonecall activity is automatically opened in CRM for you. Your telephony connector (e.g. Dynamics Telephony) may also adds a phonecall activity, so you can end up with 2 for the one call. Follow this procedure to suppress the phonecall popout that Dynamics 365 CRM creates.

UPDATE: Dynamics Telephony now has a setting to disable this click-to-dial phonecall popout for all CRM Entity Forms, and for all versions of Dynamics 365 CRM up to and including 9.2. See Dynamics Telephony Menu > Settings > Click to dial Configuration: Block CRM Phonecall [ON/OFF]

WARNING: THIS IS AN UNSUPPORTED CUSTOMIZATION, but it can be easily removed.

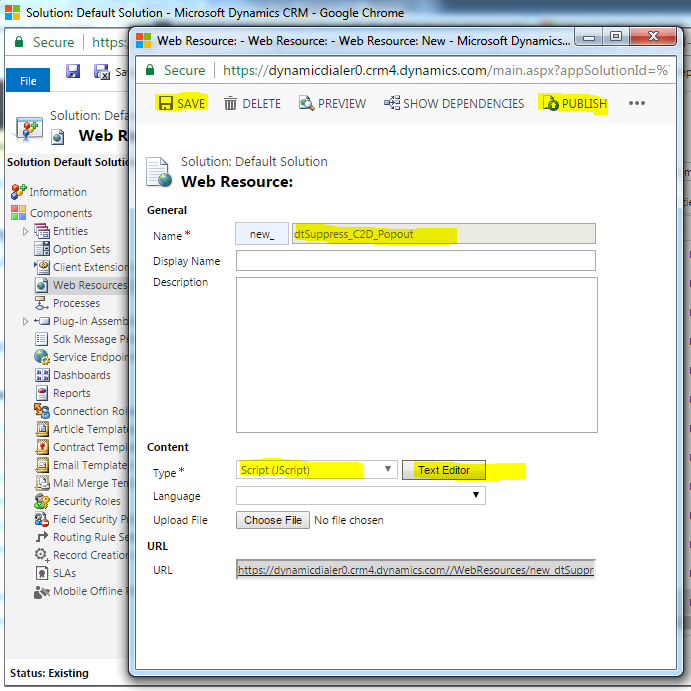
1. Create a JavaScript Webresource in CRM and paste in the following code into the Text Editor as shown in the screenshot belowsuppress_c2d_popout_webresource

function suppress_C2D_Popout() {
  parent.Mscrm.ReadFormUtilities.openPhoneClient = function(phoneNumber) {
    if (!IsNull(phoneNumber)) {
      parent.Mscrm.Shortcuts.openPhoneWindow(phoneNumber, window.PHONE_NUMBER_DEFAULT_COUNTRY_CODE,"True");
    }
  };
}

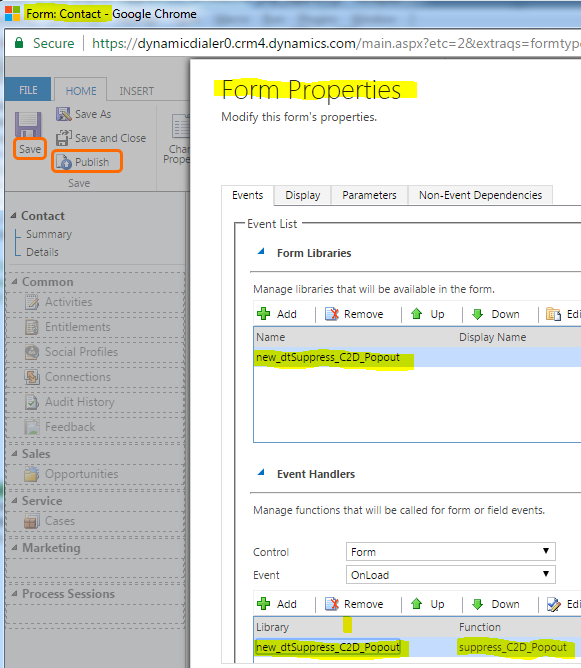
2. Add the webresource to the Form you want to be affected by this change. E.g. just the Contact form. Link the JavaScript function suppress_C2D_Popout, to the Form.OnLoad function. See screensnap below.

suppress_c2d_popout_form_properties

3CX Settings

You can use SIP (phonecalls are via PC headset) or TAPI (phonecalls are via deskphone) on 3CX with Dynamics Telephony inbound and outbound dialer on Microsoft Dynamics 365.

For TAPI, follow these steps

1. Get the 3CX plugins from here
https://www.3cx.com/blog/releases/crm-plugins/

2. Run the setup and pick TAPI from the list of components to install

3. Restart the PC

4. Start Dynamics Telephony and launch Settings from the menu
– Pick TAPI from the Telephony Provider list
– In Provider Account set TAPI Version to 2.1

You should now be controlling your desktop phone

Troubleshooting:
– Try running Dialer from Start Menu > Run
– Select menu “Connect Using” and make sure 3CX driver in list
– If you have more than one address controlled by TAPI, you will need to specify it in:
Dynamics Telephony Cog > Settings > Provider Account > DN

Pop and Auto-Dial CRM Opportunities

Dynamics Telephony is perfect if you use CRM Opportunities, where it can pop Opportunities (if there are any open for the caller) or pop the callers Contact record. Furthermore, the phonecall activities are logged against the Opportunities as appropriate.

Even better, you can use the Dynamics Telephony Queues Dialer feature to auto-feed Opportunities to users for processing, including calling the customer. Opportunities can be added to the Dynamics Telephony Dialer Queue just like any other entity.

How to get Dynamics Telephony to pop an Opportunity based on the callers phone number

In Dynamics 365, Opportunities have no phone numbers by default. So you need to add one, or more, for Dynamics Telephony to search for. It does not need to be put on the opportunity form itself. Add a custom field to the Opportunity entity. Set it as a “Single Line of Text” (format: phone) field that is calculated based on the related contact phone number. You can add multiple phone-number fields if you like. See here for how to add the field.

TIP: Set a condition that the opportunity must be open (status=active) for the phone number to be populated. In this way, only open opportunities will match and pop.

In the custom entity dialerKVtable, add an entry for each custom field created above..
type: phone
Value: new_telephone1 – the name of custom field
scope: global
Parent: <blank>
Name: incomingLookup_opportunity
Key: 1 – the order of lookup in this entity. If you add multiple phone numbers in the opportunity, be sure to increment this for each entry.

Also in dialerKVtable entity, add another two entries as follows for the primary text to display
Key: opportunity
Name: entityPrimaryNames
Parent: AppSettings
Scope: global
Type: string
Value: name *

Key: name *
Name: incomingLookup_opportunity
Parent: <blank>
Scope: global
Type: name
Value: name *

NOTE: The above will display the Title of the opportunity. You might prefer to create another custom field on the Opportunity that combines customer name and Title. This will be useful for multi-match. It must be a string custom field. Replace “name” above with your custom field name (3 places marked *)

In Dynamics Telephony settings > Inbound set..
Lookup entities: opportunity

TIP: If you set above to “opportunity,contact” then Dynamics Telephony will pop the contact if there are no open opportunities. However, if there is one open opportunity you will get a multi-match to choose between the opportunity and the contact.

Dynamics Telephony for Service Cases

Dynamics Telephony is perfect for a Service environment, where it can pop Cases (if there are any open for the caller) or pop the callers Contact record. Furthermore, the phonecall activities are logged against the cases as appropriate.

Even better, you can use the Dynamics Telephony Queues feature to auto-feed cases to users for processing, including calling the customer.

How to get Dynamics Telephony to pop a case (incident) based on the callers phone number

  1. In Dynamics 365, Cases have no phone numbers by default. So you need to add one for Dynamics Telephony to search for. It doe not need to be put on the cases form itself.

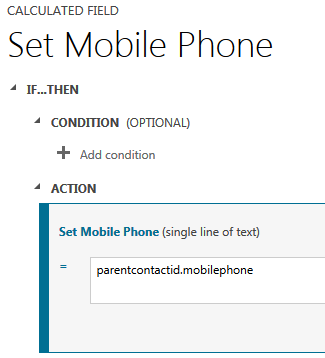
    Add a custom field to the Case entity. Set it as a calculated field based on the related contact phone number

    TIP: Set a condition that the Case must be open (status=active) for the phone number to be populated. In this way, only open cases will match and pop.

  2. In the custom entity dialerKVtable, add an entry for each custom field created above..

    type: phone
    Value: cts_businessphone name of custom field
    scope: global
    Parent: <blank>
    Name: incomingLookup_incident
    Key: 1 the order of lookup in this entity

  3. Also in dialerKVtable entity, add another two entries as follows for the primary text to display

    Key: incident
    Name: entityPrimaryNames
    Parent: AppSettings
    Scope: global
    Type: string
    Value: title

    Key: title
    Name: incomingLookup_incident
    Parent: <blank>
    Scope: global
    Type: name
    Value: title

    NOTE: The above will display the Title of the case. You might prefer to create another custom field on the case that combines customer name and Title. This will be useful for multi-match. It must be a string custom field. Replace title above with your custom field name (3 places)

  4. In Dynamics Telephony settings > Inbound set..

    Lookup entities: incident

    TIP: If you set above to “incident,contact” then Dynamics Telephony will pop the contact if there are no open incidents. However, if there is one open incident you will get a multi-match to choose between the incident and the contact.

How to add phone number fields to Opportunity

To call a customer from an Opportunity Form means you have to open the associated Contact and make the call from there. This also means that the phonecall record created in CRM is associated with the Contact in general, rather than the specific Opportunity.

Follow this procedure to add Phone Number fields to your Opportunity form.

In summary, the process is to add a calculated, custom field (of format “Phone”) to the Opportunity form.

  1. Go to Settings > Customizations > Customize the system
  2. Go to Entities > Opportunity > Fields and click NEW
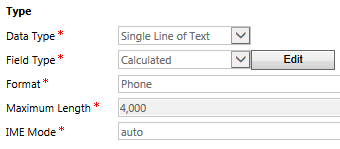
  3. Set the field properties per this snap
    cust_ph_nr_field
  4. Click EDIT to set the calculated field properties per this snapcalc_ph_nr_field
  5. Close and save everything and Publish All Customizations

Now you just have to add the above created field to your Opportunity Form. It will be a clickable phone number that you can use with Dynamics Telephony click-to-dial, or Skype/Lync click-to-dial

Publish all customizations again.

10 ways to add phonecalls to Dynamics Telephony Progressive Dialer

Well, might not be 10 yet, but will be as soon as I can get around to completing this post.

You can add for one agent to process (Personal CRM Queues) or(for multiple agents to process (Shared or Team CRM Queues).

Source Description
1 Scheduled callback from website Allow customers to request a scheduled callback on your website. A phonecall is sent to a CRM Queue and Dynamics Telephony pops it to an agent for Progressive Dialing. MORE
2 General Enquiry from website Allow a customer to make a general enquiry on your website. It gets added as a phonecall in a CRM Queue and Dynamics Telephony pops it to an agent for Progressive Dialing. MORE
3 Support request from website Customers can submit a Support request on your website. It gets sent to a CRM Queue as a phonecall and related Case. Dynamics Telephony pops it to an agent for Progressive Dialing. MORE
4 Advanced Find Use Advanced Find in CRM to generate a list of contacts, accounts, leads etc. Then related phonecalls are added to CRM Queues for Dynamics Telephony Progressive Dialer. MORE
5 CSV File Start with a CSV file and have a phonecall added to CRM Queue for each record in the file. Then Dynamics Telephony pops the records to agents for Progressive Dialing. MORE
6 View Select Contacts, Accounts or Leads from a view and have them added to a Queue. then Dynamics Telephony pops them to the agent for Progressive Dialer processing. MORE
7 Outcome based Depending on the Outcome an agent chooses in Dynamics Telephony, the item can be sent to another CRM Queue for a different agent or team to process using Dynamice Telephony Progressive Dialer. MORE
8 Marketing Automation tools like Click Dimensions  Marketing Automation tools like Click Dimensions can pass leads into different CRM Queues. then Dynamics Telephony pops them to agents or teams to process them using Progressive Dialer. MORE
9  Reload an old campaign
10 Filter on old campaign

CRM Advanced Find can add items to Dynamics Telephony Progressive Dialer

Our Progressive Dialer will allow you to process a large amount of phone-calls in the most efficient way. The calls can be processed by one or multiple agents, using Dynamics Telephony queues-based Progressive Dialer

This is the procedure for starting with a CRM Advanced Find, of contacts, accounts or leads, and adding them to a CRM Queue which Dynamics Telephony is monitoring and feeding to agents, for them to process and dial using Progressive Dialer

A. Create a new queue in CRM
1. CRM: Settings > Business Management > Queues
2. NEW Queue
– Give it a name
– Choose “Public” (any user can see), or Private (only assigned users can see it)
– Save and Close

B. Configure Dynamics Telephony to monitor the queue
1. DT: Cog > Queue Settings
2. Add a new queue using the ” + ” at the bottom
3. Select the queue you made in A above.

C. Add items to the queue ( repeat this section as often as you like )
1. Run Advanced Find to find your required Contacts, Accounts or Leads
2. Select All and, on the ribbon, click “Quick Campaign” > “For all records on all pages
– Give the Quick Campaign a name. Click NEXT
– Set “Phone Call” as activity type
– Checkbox “Add the created activities to a queue”
– Select the queue. Click NEXT
– You just need to fill in “Subject”.
NOTE This “subject” is reported in the Dynamics Telephony statistics. I usually use something like “Widget A renewals Jan 2016”

Now go “Ready” in DT and the items should come through. Of course, there may well be other items in other queues first so test with care.

Troubleshooting Client Install

For troubleshooting, you may need to access the log file. It is on the DT Menu in the DT Client. Alternatively, the last 30 days of logs are in folder: C:\Users\Aidan\AppData\Roaming\CT Solutions\DynamicsTelephony

1. Getting message “Cannot connect to CRM…” AND logfile has “..An unsecured or incorrectly secured fault was received from the other party..”
Solution 1: Check client PC and server properly synced to a time server. Check Microsoft KBs for updates related to time / DST for your country.
Solution 2: The Service User (background user) must not use 2-factor authentication. Make a special Service User, with a very strong password,  for Dynamics Telephony to use, that does not use 2-factor authentication. See here.


2. Application won’t start
Solution 1: Check .NET 4.6.2 is installed. If not, you can use this link to install it: https://www.microsoft.com/en-ie/download/details.aspx?id=42642

Solution 2: Check Visual C Runtime 2015 installed. If not, install the 32-Bit (X86) version from https://learn.microsoft.com/en-US/cpp/windows/latest-supported-vc-redist


3. Application won’t start
Solution: Full reinstall client, including deleting folder CONTENTS of C:\Users\user_name\AppData\Local\Apps\2.0  and  C:\Users\user_name\AppData\Roaming\CT Solutions


4. Error message “..entry point ucrtbase.terminate …not be located …api-ms-win-crt-runtime…”
Solution: Try installing the X86 Visual C++ runtime from https://learn.microsoft.com/en-US/cpp/windows/latest-supported-vc-redist
IMPORTANT: For both 64-bit and 32-bit systems, you need the 32-bit (X86) version of the install.


5. SIP settings not saving and Log file says: “Unable to load DLL ‘pjsipDll.dll‘: The specified module could not be found.”
Solution: Try installing VC 2015 Redistributables: https://learn.microsoft.com/en-US/cpp/windows/latest-supported-vc-redist
IMPORTANT: For both 64-bit and 32-bit systems, you need the 32-bit (X86) version of the install.


6. There is no log file in same directory as DynamicsTelephony.exe
Solution: Make the parent folder read-write for All Users


7. Cannot logon. Logfile has “…a reference that cannot be resolved: ‘https:…” when connecting to a CRM with Certificate issues.
Solution: Fix the certificate issue. Temporarily try entering the “Organization Url” in settings. You get this from CRM at Settings > Customization > Developer Resources – Organization Service.


8. Getting message “Invalid URL
Solution: Append main.aspx to the URL. e.g. https://mycrmfullurl/main.aspx


9. Getting message “User is not a System Administrator” on non-English CRM
Solution: Make sure the role the user is assigned is exactly named System Administrator


10. Getting message “Cannot connect to CRM…”.
Solution: Check CRM connection in a browser. If it is OK, then run DynamicsTelephony.exe /admin and re-enter the Service User credentials..see here
IMPORTANT: ONLY do this if ALL users are having this EXACT issue. Otherwise, Dynamics Telephony may stop for ALL USERS. This issue usually only arises during first client installs.

11. Log file has message “The located assembly’s manifest definition does not match the assembly reference“. This problem is found with MSI based installations.
Solution Make sure the file DynamicsTelephony.exe.config in the application folder has these lines near the bottom.
<dependentAssembly>
<assemblyIdentity name=”Newtonsoft.Json” publicKeyToken=”30ad4fe6b2a6aeed” culture=”neutral” />
<bindingRedirect oldVersion=”0.0.0.0-12.0.0.0″ newVersion=”12.0.0.0″ />
</dependentAssembly>
<dependentAssembly>
<assemblyIdentity name=”Microsoft.Xrm.Sdk” publicKeyToken=”31bf3856ad364e35″ culture=”neutral” />
<bindingRedirect oldVersion=”0.0.0.0-9.0.0.0″ newVersion=”9.0.0.0″ />
</dependentAssembly>