Category Archives: IT Guide

For IT to prepare, install and maintain Dynamics Telephony

How to move items from one queue to another

You can move items from one CRM Queue to another. You might want to do this to have a different user or team work on the items. In Dynamics CRM this is called “Routing” an item to another queue.

Steps

1. Run an Advanced Find to locate the queue items you want to move.

2. Select all the items

3. On the Ribbon, click “Route”

4. Select the queue you want to route the items to and click “Route”

crm_queueitems_routing

How to add a queue to CRM

Queues are a standard feature in CRM. Dynamics Telephony can monitor a CRM queue, or queues, and pop any “Queue Items” out for a user to autodial.

Follow these steps to set up a Dynamics CRM Queue

1. Go to CRM > Settings > Business Management > Queues

crm_queues

2. Click the ” + New ” button

3. Enter the new queue Name.

crm_queue_settings

4. Set the queue as Private (where you can control who is a member), or Public (where everyone has access)

5. Save.

Now you can set the membership per this article


Asterisk Queue-names Integration

Dynamics Telephony can get and use the name of the Asterisk Queue that an inbound call came in on. Example use cases are:

  • You want to pop a particular form based on the Queue-name
  • You want to auto-populate the Queue-name into a custom field – e.g. in a phonecall, lead or case (incident)
  • You want per-queue statistics in CRM
  • You want to filter the customer search using Queue-name (e.g., if you have a queue per “brand”)
  • You want to search one of multiple CRM instances based on queue name.

Setting up Asterisk to pass queue-name

You have to set up Asterisk so that the queue-name is passed to Dynamics Telephony. You do this by pre-pending the queue-name to the callers name. You do this with a pattern so that Dynamics Telephony can parse out the queue-name. The standard pattern Dynamics Telephony accepts from Asterisk is D:queuename:number, for example

D:Support:070989887889

However, you can use another pattern if you wish by changing the RegEx in Dynamics Telephony Settings > Provider Configuration: DNIS RegEx. For the above pattern, use DNIS RegEX   D:(.+?):

For example, in freePbx, you set the prefix in Applications > Queues > [pick a queue] >General > CID Name Prefix = D:My Test Queue:
asterisk_queue_CID_prefix

Setting up Dynamics Telephony to accept Queue-name

Dynamics Telephony will parse the queue-name, set up in above section, to a DNIS in Dynamics Telephony. DNIS stands for Dialed Number Identification Service. So it identifies the destination the caller reached. The queue in this case.

Set up a DNIS in Dynamics Telephony with the same DNIS and Label as the queue-name (case sensitive), as shown below.

NOTE: If the incoming queue-name does not have a matching DNIS definition, the incoming queue-name will still be saved in the DNIS field of the phonecall.
dnis_setup

Now what can you do?

Some of these require use of the Dynamics Telephony API – See here for more

– The inbound call dialog will show the DNIS name when a call arrives via that queue. You can also have a per-DNIS color and logo.

– To pop a particular form, your JavaScript running in the originally popped form can query Dynamics Telephony via the API to get the DNIS and change the form.

– You can show a different script in the Dynamics Telephony Scripting Pane depending on the DNIS.

– To auto-populate a custom field, your JavaScript running in the originally popped form can query Dynamics Telephony via the API to get the DNIS and populate the field

– The Dynamics Telephony Entity for statistics (dialerCall) will now have the DNIS as a field

– You can auto-populate the phonecall Description field, or the auto-added Note, by using the placeholder <<dnis>> in Dynamics Telephony Settings > General : Phonecall Description or Other Party Note

– You can direct the CRM search on inbound call to a particular CRM by picking from the list in the DNIS configuration.

– You can filter inbound call search results to only those where queue-name matches any field in the entity. You set this in Dynamics Telephony Settings > Inbound > DNIS Filter, with a value something like {“entity”:”contact”, “attribute”:”new_brand_name”, “type”:”string”}

Dynamic Dial Prefix

Dynamics Telephony can apply a special prefix on a per call basis to dialed calls. This helps solve the following use cases:

  • You want to make calls to customers using a special Callers Number (CLID) – e.g. to reflect your various Brands or Programs
  • You want to make calls to customers using a Callers Number (CLID) that is local to the customer – so they see it as a call from their region.
  • You want to make sure that if customers miss your call, they can return your call to the right number.
  • You want to make certain calls withholding your Callers Number (CLID)
  • You need to prefix calls so they are billed to a specific department, project or customer.

Setting it up

  1. Have your PBX or Phone Company set the CLID based on a dial prefix. This is available from most PBXs and phone companies. Essentially it involves setting up an outbound route for each CLID you want, and the route has it’s own prefix or access code.  This can include a special prefix or access code for a route that will withhold your Callers Number.
  2. Set up Dynamics Telephony to dynamically assign a dial prefix. this is covered in the following notes.

Default Dial Prefix
The Dynamics Telephony setting “Provider Configuration > External Dial Prefix” is used as the default dial prefix. This will be used if a prefix has not been determined by the rules set out below.

Per Customer Dial Prefix
This is achieved by setting a value in the customer record that can be mapped to a prefix to use.
For example, you might have a optionset that you set (perhaps using a workflow) to a value like North, South, East or West. Then, in Dynamics Telephony, you configure North to use prefix “60”, South to use “61”, etc.

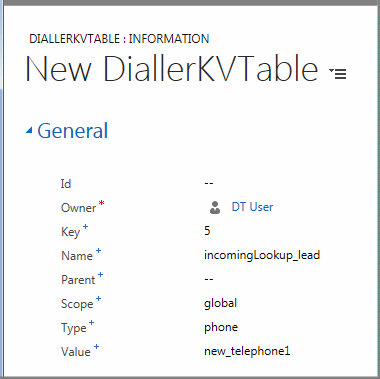
Prefix Map in DialerKV table
You set up the prefix mappings in Dynamics Telephony CRM entity, DialerKVTable. You can setup as many as you need, as follows:

name: Dynamic_Prefix

key: entity_name.field_name=value, e.g. contact.new_region=north. You can also specify to use a fixed prefix for an entity like this: incident.fixedprefix=fixedprefix.
Supported fields are text, numbers and optionsets. For optionsets, the value is the numeric value of the chosen item, not the item text.

type: <leave blank>

value: the_prefix_to_use, e.g. 63. You can also use a single lowercase p to specify the user should be prompted to pick the prefix from a list (see below)

scope: global

TIP: If you are using click-to-dial on a phone number that is displayed in a lead or case, but defined in some other entity (like account or contact), then the field to map the prefix is in the displayed entity (i.e. lead or case)

TIP: For outbound dialer campaigns, the entity is always a phonecall. Prompting is not supported on outbound dialer campaigns. So make sure you have a field on the phonecall that maps to a prefix.
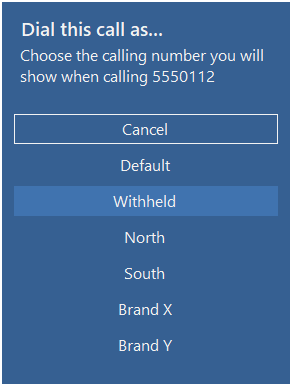
Prefix prompt list
If the value specified above is p, or if there is a key defined for an entity but the current record does not match, then the user is prompted to pick the prefix from a list. The list is defined as a comma separated list of pairs, e.g. North:97,South:96. You define this list in settings > Provider Configuration : Dial Prefix Prompts.

Dynamic Dial Prefix

Phone Book & Prefixes
Generally, the default prefix will be added automatically when dialing a number from Phonebook. To prevent this and apply a different prefix, use the following notation: “69;6125551212”. This notation is to tell Dynamics Telephony that a prefix has already been applied and not to apply the default one.

Operation

For calling in anonymous mode, you would probably use a phonebook entry

For calling customers using the prefix, you must use click-to-dial in the entity configured in DialerKVTable.key above

Dialing from the dialbox, and normal phonebook entries, will use the default Dial Prefix. You can dial from the dialbox, or phonebook entries, with prefix if the number includes the prefix in semi-colon format discussed above – e.g. “69;6125551212”.

Role secured features

You probably want to restrict what settings and controls normal users can see in Dynamics Telephony.

To do this, you must add some security roles in CRM as detailed below. If you do not add these roles and assign them to certain users, then all users will have full access.

Dynamics Telephony uses 2 CRM roles to enable security features.

roles_for_dt

NOTE: These roles just need to exist. They do not need any permissions assigned.

ROLE: Dynamics Telephony Admin, when assigned to a CRM user will enable the “Admin Only Access” settings area for that user. Use this area to restrict other CRM users from seeing various settings.

settings_access


For full lockdown you might restrict all but Log File and  Provider Account (to allow telephony re-configuration)

This Role also enables Developer Tools on Dynamics Telephony windows to give you access to JavaScript Developer Tools. Note, this menu item is not available on the first Dynamics Telephony window to open.

developer_tools


ROLE:Dynamics Telephony Uninstall, when assigned to a CRM user will enable the “Uninstall” button in Dynamics Telephony for that user. “Uninstall” will completely remove the Dynamics Telephony Solution from CRM.

The best is not to assign this role to any user until you need it.

Jive Settings

You need to get your username and password for Jive. The username is a long cryptic string like 4rty56wedkjfh74kf47ASdffd65855QER

The following table highlights the specific settings you should apply in Dynamics Telephony:

Dynamics Telephony Tab Dynamics Telephony Setting Value Comment
Provider
Configuration
DTMF Mode DM_Inband
Expires 180
Stun Server e.g. stun.soho66.com A public STUN server
Provider
Account
Username e.g. 4rty56wedkjfh74kf47ASdffd65855QER SIP/Authorization ID
Password SIP Password
Host Name E.g. reg.jiveip.net SIP Registrar
Auth Username e.g.
4rty56wedkjfh74kf47ASdffd65855QER
Same as username above
Domain Name * A single
asterisk ‘ * ‘
Proxy address e.g.
your_domain.jive.rtcfront.net
Proxy for outbound on Jive. Your domain is the domain your company registered with Jive
Transport Mode TM_UDP


Custom Phone Number Fields

Dynamics Telephony can search your custom phone number fields for a match, and screen pop,  when your customers call you. This also applies if you add a phone number to an entity that does not normally have a phone number – e.g. a case or opportunity. See here for more on these.

To add a custom field to Dynamics Telephony settings for searching, add a diallerKVTable record as shown:


custom_phone_number_search_kv

name: refers to the entity being searched. Use one of incomingLookup_lead,
incomingLookup_contact,
incomingLookup_account,
incomingLookup_incident or
incomingLookup_opportunity.

type: phone

key: refers to the search order. So use 1, 2, 3, 4, etc. All matches are returned so just make sure it is unique for the entity

value: the name of the field to search. Standard fields might be telephone1, telephone2 etc. A custom field might be new_ph_number

scope: global

parent: leave empty


Gamma Horizon Hosted Phone System

Dynamics Telephony is verified as compatible with Gamma Horizon Hosted Phone System.

logo_gamma_horizon

Dynamics Telephony interfaces to Gamma Horizon using their TAPI interface. You need to contact your Gamma Horizon provider to send you the TAPI Driver for your system. You can preview the installation guide HERE

Notes

  • You will need to log onto the PC as Administrator to do the install
  • You will need the Horizon Client username and password for each PC. You may get these in your email with the install link.
  • If you use network port blocking, other than Windows Firewall, you may have to open 127.0.0.1 over port 21050
  • You can skip “Step 1 – Options” in the install guide above and go to Step 2 – Username and password.

You can test the install using the Windows Dialer application that is on every PC. More details in the install guide referenced above.

Asterisk Queues

Dynamics Telephony brings Dynamics CRM and Asterisk Queues together, providing features such as:
– Login / logout
– Set your availability status – auto-join your queues
– Join / leave an Asterisk Queue from within Dynamics Telephony
– See real-time statistics for a queue in dynamics Telephony
– See number of calls waiting per queue
– Supports multiple Asterisk Queues
– Configure different queue visibility for different teams.

agent_asterisk_queues

Real-time statistics

The following can be shown to the agent, per queue:
<<Queue>> The queue number as configured in Asterisk
<<Name>> Name for the queue based on matching in setting file
<<Available>> Number of agents in the queue but not on a call
<<Callers>> Number of callers in the queue waiting for an agent
<<HoldTime>> Average hold (queueing) time for callers
<<LongestHoldTime>> Age of the oldest call in the queue still waiting for an agent
<<TalkTime>> Average talk time for this queue
<<LoggedIn>> Number of agents part of this queue

Use the <<placeholders>> shown when configuring the display. For example, in the display above, the configured string is: <<Name>>|  AGTs:<<LoggedIn>> CWT(s) <<Callers>>(<<LongestHoldTime>>)

How it works

Our integration of Dynamics CRM and Asterisk Queues uses a single connection to your Asterisk Server. This connection ensures minimal load on your asterisk while providing a reliable and auto-reconnecting link for the Dynamics Telephony clients.

This is an optional module for Dynamics Telephony. A Windows server is required for this proxied connection – VMs are supported. The real-time statistics are updated ever 10 seconds – configurable.

DT Clients can be running on local network, or remote through a firewall. Remote Desktop, Terminal Services and Citrix are also supported.

Display actual start with time

The default phonecall entity view on your Dynamics 365 CRM may be showing Actual Start and Actual End with only date, not with time. Here is how to get time to be displayed too.

1. CRM > Settings > Customizations

2. Click “Customize the system”

3.  Expand “Entities” and then “Phonecall” and click on “Fields”

4. In the Fields, double-click on Actual End

5. Near the bottom of the field settings from, you will see “Format” – change this to “Date and Time”

6. “Save & Close”

7. Repeat steps 4-6 for “Actual Start”

8. Publish All Customizations

phonecall_actualEnd_time