Category Archives: CRM

Dynamic Dial Prefix

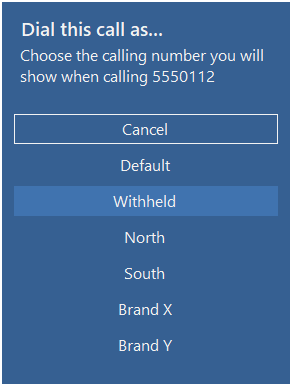
Dynamics Telephony can apply a special prefix on a per call basis to dialed calls. This helps solve the following use cases:

  • You want to make calls to customers using a special Callers Number (CLID) – e.g. to reflect your various Brands or Programs
  • You want to make calls to customers using a Callers Number (CLID) that is local to the customer – so they see it as a call from their region.
  • You want to make sure that if customers miss your call, they can return your call to the right number.
  • You want to make certain calls withholding your Callers Number (CLID)
  • You need to prefix calls so they are billed to a specific department, project or customer.

Setting it up

  1. Have your PBX or Phone Company set the CLID based on a dial prefix. This is available from most PBXs and phone companies. Essentially it involves setting up an outbound route for each CLID you want, and the route has it’s own prefix or access code.  This can include a special prefix or access code for a route that will withhold your Callers Number.
  2. Set up Dynamics Telephony to dynamically assign a dial prefix. this is covered in the following notes.

Default Dial Prefix
The Dynamics Telephony setting “Provider Configuration > External Dial Prefix” is used as the default dial prefix. This will be used if a prefix has not been determined by the rules set out below.

Per Customer Dial Prefix
This is achieved by setting a value in the customer record that can be mapped to a prefix to use.
For example, you might have a optionset that you set (perhaps using a workflow) to a value like North, South, East or West. Then, in Dynamics Telephony, you configure North to use prefix “60”, South to use “61”, etc.

Prefix Map in DialerKV table
You set up the prefix mappings in Dynamics Telephony CRM entity, DialerKVTable. You can setup as many as you need, as follows:

name: Dynamic_Prefix

key: entity_name.field_name=value, e.g. contact.new_region=north. You can also specify to use a fixed prefix for an entity like this: incident.fixedprefix=fixedprefix.
Supported fields are text, numbers and optionsets. For optionsets, the value is the numeric value of the chosen item, not the item text.

type: <leave blank>

value: the_prefix_to_use, e.g. 63. You can also use a single lowercase p to specify the user should be prompted to pick the prefix from a list (see below)

scope: global

TIP: If you are using click-to-dial on a phone number that is displayed in a lead or case, but defined in some other entity (like account or contact), then the field to map the prefix is in the displayed entity (i.e. lead or case)

TIP: For outbound dialer campaigns, the entity is always a phonecall. Prompting is not supported on outbound dialer campaigns. So make sure you have a field on the phonecall that maps to a prefix.

Prefix prompt list
If the value specified above is p, or if there is a key defined for an entity but the current record does not match, then the user is prompted to pick the prefix from a list. The list is defined as a comma separated list of pairs, e.g. North:97,South:96. You define this list in settings > Provider Configuration : Dial Prefix Prompts.

Dynamic Dial Prefix

Phone Book & Prefixes
Generally, the default prefix will be added automatically when dialing a number from Phonebook. To prevent this and apply a different prefix, use the following notation: “69;6125551212”. This notation is to tell Dynamics Telephony that a prefix has already been applied and not to apply the default one.

Operation

For calling in anonymous mode, you would probably use a phonebook entry

For calling customers using the prefix, you must use click-to-dial in the entity configured in DialerKVTable.key above

Dialing from the dialbox, and normal phonebook entries, will use the default Dial Prefix. You can dial from the dialbox, or phonebook entries, with prefix if the number includes the prefix in semi-colon format discussed above – e.g. “69;6125551212”.
Custom Phone Number Fields

Dynamics Telephony can search your custom phone number fields for a match, and screen pop,  when your customers call you. This also applies if you add a phone number to an entity that does not normally have a phone number – e.g. a case or opportunity. See here for more on these.

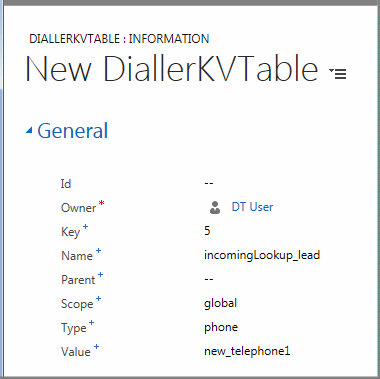
To add a custom field to Dynamics Telephony settings for searching, add a diallerKVTable record as shown:


custom_phone_number_search_kv

name: refers to the entity being searched. Use one of incomingLookup_lead,
incomingLookup_contact,
incomingLookup_account,
incomingLookup_incident or
incomingLookup_opportunity.

type: phone

key: refers to the search order. So use 1, 2, 3, 4, etc. All matches are returned so just make sure it is unique for the entity

value: the name of the field to search. Standard fields might be telephone1, telephone2 etc. A custom field might be new_ph_number

scope: global

parent: leave empty


Display actual start with time

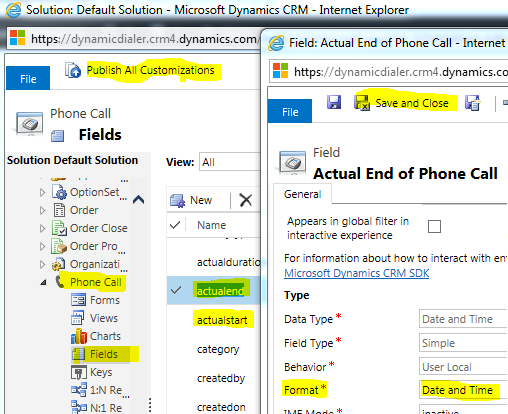
The default phonecall entity view on your Dynamics 365 CRM may be showing Actual Start and Actual End with only date, not with time. Here is how to get time to be displayed too.

1. CRM > Settings > Customizations

2. Click “Customize the system”

3.  Expand “Entities” and then “Phonecall” and click on “Fields”

4. In the Fields, double-click on Actual End

5. Near the bottom of the field settings from, you will see “Format” – change this to “Date and Time”

6. “Save & Close”

7. Repeat steps 4-6 for “Actual Start”

8. Publish All Customizations

phonecall_actualEnd_time

How to disable click-to-dial phonecall popout

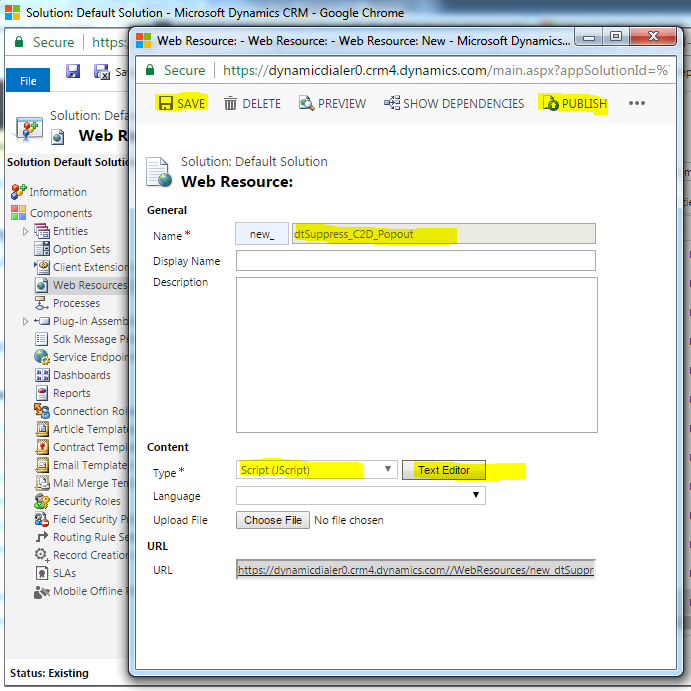
When you do a click-to-dial in Dynamics 365 CRM, a new phonecall activity is automatically opened in CRM for you. Your telephony connector (e.g. Dynamics Telephony) may also adds a phonecall activity, so you can end up with 2 for the one call. Follow this procedure to suppress the phonecall popout that Dynamics 365 CRM creates.

UPDATE: Dynamics Telephony now has a setting to disable this click-to-dial phonecall popout for all CRM Entity Forms, and for all versions of Dynamics 365 CRM up to and including 9.2. See Dynamics Telephony Menu > Settings > Click to dial Configuration: Block CRM Phonecall [ON/OFF]

WARNING: THIS IS AN UNSUPPORTED CUSTOMIZATION, but it can be easily removed.

1. Create a JavaScript Webresource in CRM and paste in the following code into the Text Editor as shown in the screenshot belowsuppress_c2d_popout_webresource

function suppress_C2D_Popout() {
  parent.Mscrm.ReadFormUtilities.openPhoneClient = function(phoneNumber) {
    if (!IsNull(phoneNumber)) {
      parent.Mscrm.Shortcuts.openPhoneWindow(phoneNumber, window.PHONE_NUMBER_DEFAULT_COUNTRY_CODE,"True");
    }
  };
}

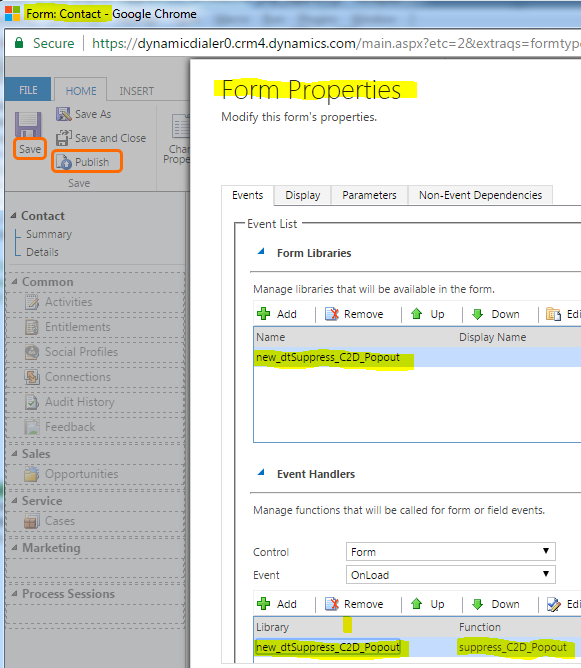
2. Add the webresource to the Form you want to be affected by this change. E.g. just the Contact form. Link the JavaScript function suppress_C2D_Popout, to the Form.OnLoad function. See screensnap below.

suppress_c2d_popout_form_properties

Pop and Auto-Dial CRM Opportunities

Dynamics Telephony is perfect if you use CRM Opportunities, where it can pop Opportunities (if there are any open for the caller) or pop the callers Contact record. Furthermore, the phonecall activities are logged against the Opportunities as appropriate.

Even better, you can use the Dynamics Telephony Queues Dialer feature to auto-feed Opportunities to users for processing, including calling the customer. Opportunities can be added to the Dynamics Telephony Dialer Queue just like any other entity.

How to get Dynamics Telephony to pop an Opportunity based on the callers phone number

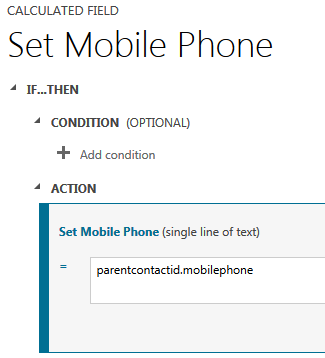
In Dynamics 365, Opportunities have no phone numbers by default. So you need to add one, or more, for Dynamics Telephony to search for. It does not need to be put on the opportunity form itself. Add a custom field to the Opportunity entity. Set it as a “Single Line of Text” (format: phone) field that is calculated based on the related contact phone number. You can add multiple phone-number fields if you like. See here for how to add the field.

TIP: Set a condition that the opportunity must be open (status=active) for the phone number to be populated. In this way, only open opportunities will match and pop.

In the custom entity dialerKVtable, add an entry for each custom field created above..
type: phone
Value: new_telephone1 – the name of custom field
scope: global
Parent: <blank>
Name: incomingLookup_opportunity
Key: 1 – the order of lookup in this entity. If you add multiple phone numbers in the opportunity, be sure to increment this for each entry.

Also in dialerKVtable entity, add another two entries as follows for the primary text to display
Key: opportunity
Name: entityPrimaryNames
Parent: AppSettings
Scope: global
Type: string
Value: name *

Key: name *
Name: incomingLookup_opportunity
Parent: <blank>
Scope: global
Type: name
Value: name *

NOTE: The above will display the Title of the opportunity. You might prefer to create another custom field on the Opportunity that combines customer name and Title. This will be useful for multi-match. It must be a string custom field. Replace “name” above with your custom field name (3 places marked *)

In Dynamics Telephony settings > Inbound set..
Lookup entities: opportunity

TIP: If you set above to “opportunity,contact” then Dynamics Telephony will pop the contact if there are no open opportunities. However, if there is one open opportunity you will get a multi-match to choose between the opportunity and the contact.

Dynamics Telephony for Service Cases

Dynamics Telephony is perfect for a Service environment, where it can pop Cases (if there are any open for the caller) or pop the callers Contact record. Furthermore, the phonecall activities are logged against the cases as appropriate.

Even better, you can use the Dynamics Telephony Queues feature to auto-feed cases to users for processing, including calling the customer.

How to get Dynamics Telephony to pop a case (incident) based on the callers phone number

  1. In Dynamics 365, Cases have no phone numbers by default. So you need to add one for Dynamics Telephony to search for. It doe not need to be put on the cases form itself.

    Add a custom field to the Case entity. Set it as a calculated field based on the related contact phone number

    TIP: Set a condition that the Case must be open (status=active) for the phone number to be populated. In this way, only open cases will match and pop.

  2. In the custom entity dialerKVtable, add an entry for each custom field created above..

    type: phone
    Value: cts_businessphone name of custom field
    scope: global
    Parent: <blank>
    Name: incomingLookup_incident
    Key: 1 the order of lookup in this entity

  3. Also in dialerKVtable entity, add another two entries as follows for the primary text to display

    Key: incident
    Name: entityPrimaryNames
    Parent: AppSettings
    Scope: global
    Type: string
    Value: title

    Key: title
    Name: incomingLookup_incident
    Parent: <blank>
    Scope: global
    Type: name
    Value: title

    NOTE: The above will display the Title of the case. You might prefer to create another custom field on the case that combines customer name and Title. This will be useful for multi-match. It must be a string custom field. Replace title above with your custom field name (3 places)

  4. In Dynamics Telephony settings > Inbound set..

    Lookup entities: incident

    TIP: If you set above to “incident,contact” then Dynamics Telephony will pop the contact if there are no open incidents. However, if there is one open incident you will get a multi-match to choose between the incident and the contact.

How to add phone number fields to Opportunity

To call a customer from an Opportunity Form means you have to open the associated Contact and make the call from there. This also means that the phonecall record created in CRM is associated with the Contact in general, rather than the specific Opportunity.

Follow this procedure to add Phone Number fields to your Opportunity form.

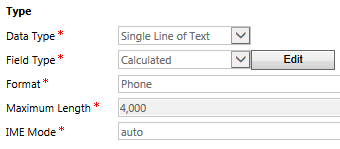
In summary, the process is to add a calculated, custom field (of format “Phone”) to the Opportunity form.

  1. Go to Settings > Customizations > Customize the system
  2. Go to Entities > Opportunity > Fields and click NEW
  3. Set the field properties per this snap
    cust_ph_nr_field
  4. Click EDIT to set the calculated field properties per this snapcalc_ph_nr_field
  5. Close and save everything and Publish All Customizations

Now you just have to add the above created field to your Opportunity Form. It will be a clickable phone number that you can use with Dynamics Telephony click-to-dial, or Skype/Lync click-to-dial

Publish all customizations again.

10 ways to add phonecalls to Dynamics Telephony Progressive Dialer

Well, might not be 10 yet, but will be as soon as I can get around to completing this post.

You can add for one agent to process (Personal CRM Queues) or(for multiple agents to process (Shared or Team CRM Queues).

Source Description
1 Scheduled callback from website Allow customers to request a scheduled callback on your website. A phonecall is sent to a CRM Queue and Dynamics Telephony pops it to an agent for Progressive Dialing. MORE
2 General Enquiry from website Allow a customer to make a general enquiry on your website. It gets added as a phonecall in a CRM Queue and Dynamics Telephony pops it to an agent for Progressive Dialing. MORE
3 Support request from website Customers can submit a Support request on your website. It gets sent to a CRM Queue as a phonecall and related Case. Dynamics Telephony pops it to an agent for Progressive Dialing. MORE
4 Advanced Find Use Advanced Find in CRM to generate a list of contacts, accounts, leads etc. Then related phonecalls are added to CRM Queues for Dynamics Telephony Progressive Dialer. MORE
5 CSV File Start with a CSV file and have a phonecall added to CRM Queue for each record in the file. Then Dynamics Telephony pops the records to agents for Progressive Dialing. MORE
6 View Select Contacts, Accounts or Leads from a view and have them added to a Queue. then Dynamics Telephony pops them to the agent for Progressive Dialer processing. MORE
7 Outcome based Depending on the Outcome an agent chooses in Dynamics Telephony, the item can be sent to another CRM Queue for a different agent or team to process using Dynamice Telephony Progressive Dialer. MORE
8 Marketing Automation tools like Click Dimensions  Marketing Automation tools like Click Dimensions can pass leads into different CRM Queues. then Dynamics Telephony pops them to agents or teams to process them using Progressive Dialer. MORE
9  Reload an old campaign
10 Filter on old campaign

CRM Advanced Find can add items to Dynamics Telephony Progressive Dialer

Our Progressive Dialer will allow you to process a large amount of phone-calls in the most efficient way. The calls can be processed by one or multiple agents, using Dynamics Telephony queues-based Progressive Dialer

This is the procedure for starting with a CRM Advanced Find, of contacts, accounts or leads, and adding them to a CRM Queue which Dynamics Telephony is monitoring and feeding to agents, for them to process and dial using Progressive Dialer

A. Create a new queue in CRM
1. CRM: Settings > Business Management > Queues
2. NEW Queue
– Give it a name
– Choose “Public” (any user can see), or Private (only assigned users can see it)
– Save and Close

B. Configure Dynamics Telephony to monitor the queue
1. DT: Cog > Queue Settings
2. Add a new queue using the ” + ” at the bottom
3. Select the queue you made in A above.

C. Add items to the queue ( repeat this section as often as you like )
1. Run Advanced Find to find your required Contacts, Accounts or Leads
2. Select All and, on the ribbon, click “Quick Campaign” > “For all records on all pages
– Give the Quick Campaign a name. Click NEXT
– Set “Phone Call” as activity type
– Checkbox “Add the created activities to a queue”
– Select the queue. Click NEXT
– You just need to fill in “Subject”.
NOTE This “subject” is reported in the Dynamics Telephony statistics. I usually use something like “Widget A renewals Jan 2016”

Now go “Ready” in DT and the items should come through. Of course, there may well be other items in other queues first so test with care.

Workflow to add phonecall for contacts to a specific queue

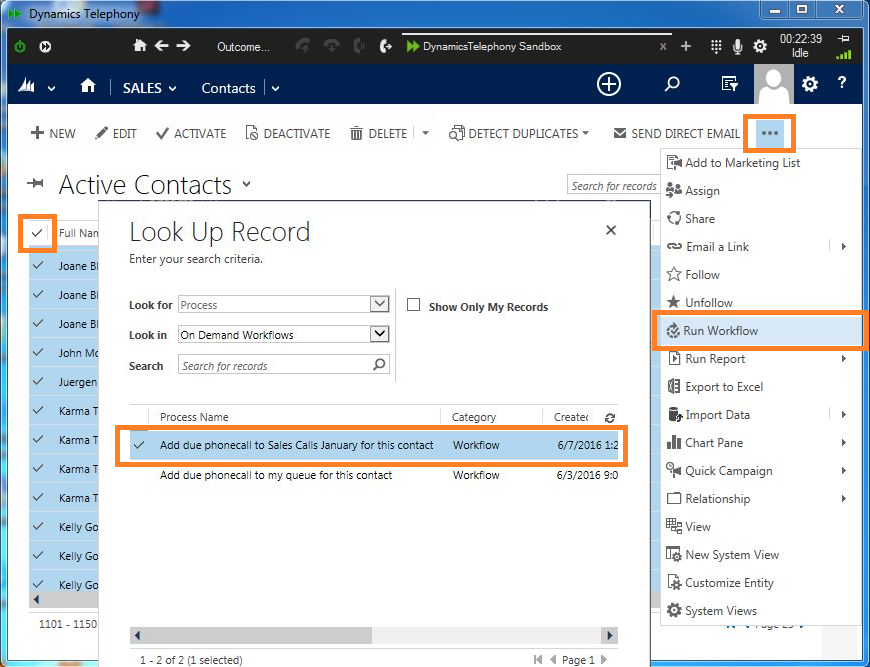
This workflow will be available to a contact, or a set of selected contacts. It will create a phonecall for each contact and put it in a queue of your choice. Now, with Dynamics Telephony Queues enabled, you can process each contact using the progressive dialer.

How it is used

Filter down to the contacts you want to add to progressive dialing. Select all and run the workflow per the screenshot below.
Run workflow with lookup record

A more specific search can also be done using Advanced Find to get the leads that you need. Start by opening the Advanced Find window.

Advanced Find button

Next, make the selections needed in order to get the desired results. In this case, the search is for Contacts that have an Full Name which Equals the text Mary.

Advanced Find make selection Contacts

Click Results to bring back all the contacts which fit the search, then run the workflow.

How to make the workflow

Two workflows are required for this to work correctly. An on-demand workflow as well as a child workflow must be created. The reason for this is to access the current user.

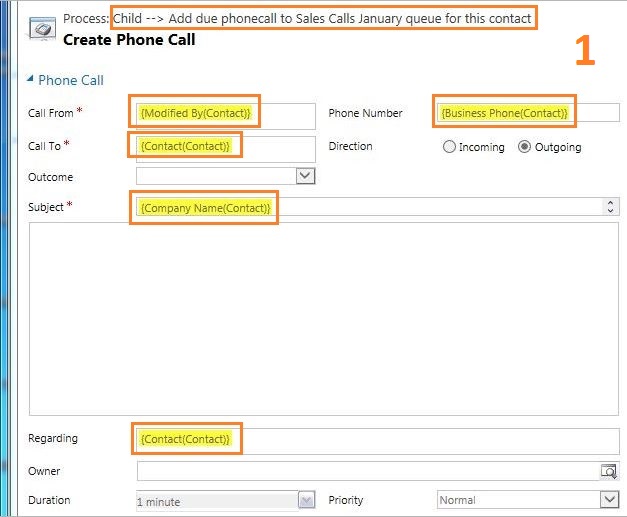
First, create the child workflow as per the screenshot below.

Capture


Step 1 is to click Add Step and select Create Record. Enter a short description of the step and select Phone Call from the dropdown menu. Click Set Properties and enter the fields as per the screenshot below.

Phone call set properties child workflow

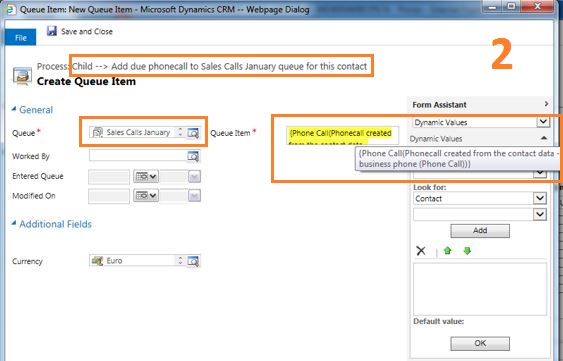
Step 2 is to create another record. Enter a description again and select Queue Item from the dropdown. Click Set Properties and enter the fields as per the screenshot below.

In the queue field, lookup and select the name of the queue where you want the queue item to go.

Queue item set properties child workflow

Now that the child workflow has been created and saved, the next task is to create the on-demand process which will call the child process.

Create a new workflow as per the screenshot below. This workflow is on-demand and uses entity contact.

Main workflow sales calls january

Step 1 is to update the contact so the “Modified By” user gets set to the current user. In this way, the next step can get the current user. This is a well known trick to access the current user.

Main workflow update contact

Step 2 is Start Child Workflow. Select Contact from the dropdown to see the child processes on a contact entity. Then select the child process for the next selection by clicking the lookup.

See the screenshot below.

Main workflow start child workflow

Once complete, ensure to activate both workflows.