All posts by dtAdmin

Add fields to multi-match dialog

Sometimes you need more information on the multi-match dialog to help with associating the phonecall with the right entity. This might be extra information on cases, or more fields from contacts or accounts.

You can specify the field from the entity that Dynamics Telephony will display in the case of multi-match. So, you make this field a custom field that is a concatenation of other fields with the information you need.

1. Create a custom field on the entity you pop for incoming calls. Make this field a concatenation of the other fields in the entity that you want to display on the multi-match dialog.

2. Say the entity you pop is contact, and the custom field from step 1 is new_custom1. Then you need to locate the diallerKVTable record in the CRM where
Name=incomingLookup_contact AND Type=name.
Change the Key and Value fields to new_custom1

3. If you pop more than one entity for incoming calls, you may want to repeat steps 1 and 2 above for each one.


Phonebook Contacts CRM Entity

Dynamics Telephony can retrieve its phonebook contacts from CRM or from an XML file. This article explains how to have Dynamics Telephony retrieve its phonebook contacts from CRM.

The contacts are stored in entity Dialler Phonebook Contacts (cts_phonebook). The main fields are:

  • Full Name: Mandatory. A good idea to format like Lastname, Firstname for sorting purposes. The phonebook will be sorted using this field.
  • Phone Number: Mandatory.
  • Phone Book Team: Mandatory. This is used to allow different groups of users have a different set of contacts in their phonebook.

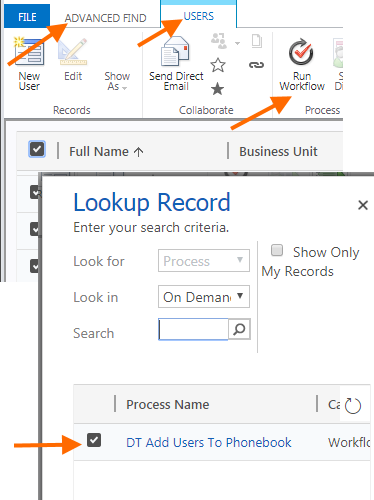
An on-demand workflow is included to copy data from existing Users to Dialler Phonebook Contacts. It copies the phone number from the user “Other Phone” field, and the Team Name from the users Business Unit name.

phonebook_add_users_workflow

Then, in Dynamics Telephony Settings, General, fill in the team name for each user.

phonebook_team_setting


TIP: You could have a workflow trigger on a user’s “Other Phone” change event, and use that to keep the phonebook synchronized.


Release Notes – Nov 2019

Version 3.0.7332

As always, updates have always been applied to support the latest version of Dynamics 365 CRM, online and on premises.

The Search Algorithm has been further improved for speed and accuracy

For the Avaya CCT connector, we have added support for Not Ready Reasons. So now your agents can choose Not Ready reasons like BREAK, MEETING etc right in Dynamics Telephony. More here.

A Scripting Pane has been added to the product. This gives the user an area for displaying a call script, displaying a related CRM record or displaying related info from some other browser based system. More here.

A Custom URL to pop for inbound or outbound calls can be defined. This allows you to display a completely customized page for your users. the page can be uniquely defined per DNIS and outbound queue. More here.

You can now optionally log Missed Calls. these can be logged in the CRM record of the caller as well as the agents own call history of recent calls in the Dynamics Telephony client.

An outbound outcome can be marked as Require Connect. This prevents users from selecting it before the customer answers the call. This is an aid to prevent “Cherry Picking” and preserve outcome accuracy.

Enhanced Callback Request Form allows users to set a callback for another user, change the callback number and change the Regarding reference.

There are now additional outbound queue item selection criteria that mean you can now have full control over how the next item in the queue it selected for popping to an agent to dial. Criteria include queue priority, item priority, outcome priority, due date, and order of arrival into CRM.

You can separately define a Wrap Time value for inbound an outbound calls.

For click-to-dial calls you can set to deal with them in a new window or remain on the current window

The Report Issue functionality allows users to quickly report an issue to your IT department, complete with issue description, a screen snap and the necessary log files.

There is now an option to bring Dynamics Telephony to the front on idle. this is useful to remind the user to complete any notes in CRM at the end of the call.


Lookup other phonenumber fields

Dynamics Telephony can search other phone-number fields; custom fields or built-in fields. To have Dynamics Telephony search another phone-number field…

Add 1 diallerKVTable entry as follows

name: incomingLookup_x, where x is contact, lead, contact etc.
scope: global
key: N, – Where N is one more than the current largest Key value on others with name=incomingLookup_x
type: phone
value: y, – where y is the name of the field, e.g. new_fieldname
parent: leave blank

NOTE: The fields Dynamics Telephone searches out-of-the-box are
Lead; telephone1, telephone2, telephone3, mobilephone
Contact: telephone1, telephone2, telephone3, mobilephone
Account: telephone1, telephone2, telephone3

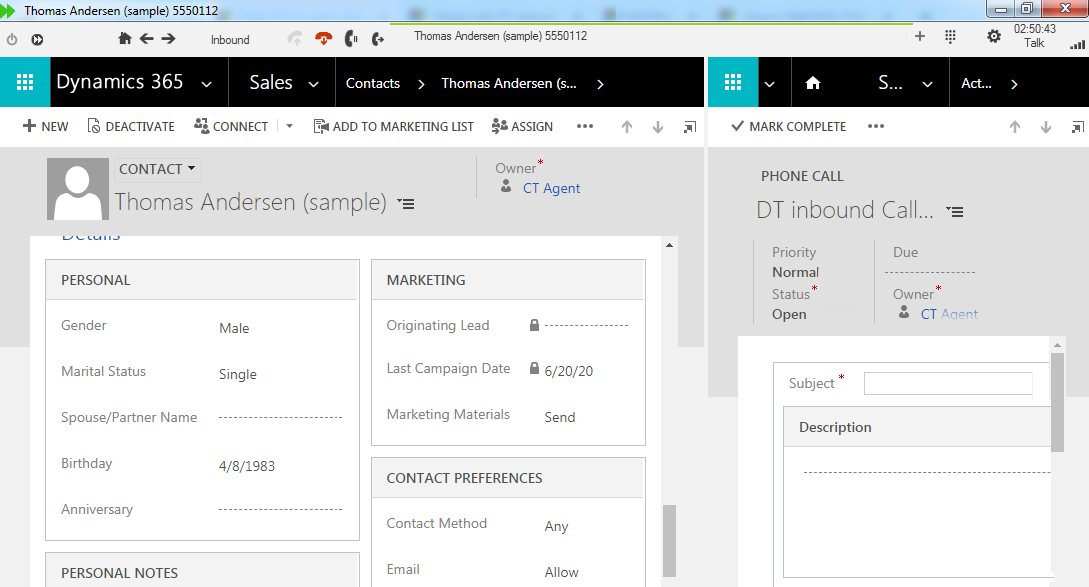
Scripting Pane: Display Phonecall

You can display the current phonecall activity in the Scripting Pane. This is useful to be able to enter phonecall notes and result without having to switch away from the main customer record in CRM.

scriptingPanePhonecall

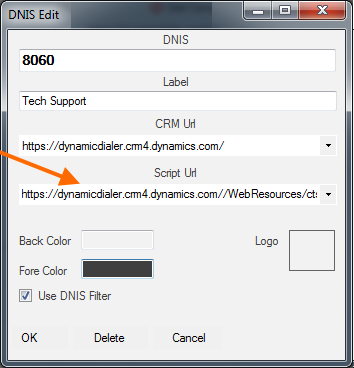
You do this by defining the script URL as a custom HTML page that will receive all phonecall ID and then redirect to the phonecall itself. There is a sample of that initial custom page code here (view page source when it opens): dtAssociatedPhonecall. Also, this is included in the CRM Solution now so you can simply use https://yourcrmdomain.crmXX.dynamics.com//WebResources/cts_dtAssociatedPhonecall

TIP: If you want to display some other entity, for example the regarding entity, then you can use the parameters passed to the splitscreen page to re-direct to it. the full list of parameters passed to the splitscreen page is HERE

The script URL is defined on a per DNIS (inbound) or queue (dialer outbound) basis, as shown below

scriptingPansDnisUrl

NOTES

  • You will want to customise the phonecall form to improve legibility as the Scripting Pane is fixed at 33% of the parent window width.
  • Alternatively, you could make a special phonecall form and specify the formid in the extraqs parameter of the URL you redirect to. You might also consider adding navbar=off&cmdbar=false to the URL to hide the navigation and command bars to give you more space.
  • Test with your users to make sure autosave is working correctly, or they are happy to use a SAVE button.
  • Using the Dynamics Telephony Client API, it is possible to make a Save & Close button that would save the phonecall and close the DT window.
  • If users will enter notes, then define the default Phonecall Description as blank ( DT Menu > Settings > Advanced Configuration : Phonecall Description )
  • Similarily the Phonecall Subject. ( DT Menu > Settings > Advanced Configuration : Phonecall Subject )

Screen Transfer

Dynamics Telephony has a unique Screen Transfer feature. Imagine user_1 transfers a caller to user_2. With this feature, as soon as user_2’s phone rings, even if user_1 is still on the line doing a Consult Transfer, user_2 will get a screen pop of the caller’s record in CRM that user_1 is looking at.

The unique thing about our implementation of Screen Transfer is that it works across phone systems. So, in the above example, even if user_1 and user_2 are on completely different phone systems, the Screen Transfer will still work. This is because the necessary data transfer is done via CRM, not the phone system.

NOTE, if the transfer is a Blind Transfer, then the normal screen pop feature will apply and pop a CRM record based on the callers number.

Requirements
  1. The callers number presented to an user when a call is transferred to them by another user must be the internal extension number
  2. Each users internal extension number must be configured in their System User settings as either Main Phone, Other Phone or Pager.
Technical details

The feature is triggered when a user receives a call from a number that is the same length or shorter than the number of digits configured as the Internal Extension Length. This triggers a search in CRM systemuser for an exact match on one of:

  • Main Phone (address1_telephone1)
  • Other Phone (address1_telephone2)
  • Pager (address1_telephone3)

To check on the feature, you can check the value of UrlDisplayed (cts_urldisplayed) in entity dialerCall for the transferred call.

Agent RTD States Guide

The RTD has two state fields: the state of the agent and the state of the call.

These states are logged in

  1. The diallerCallEvent table at the end of each call, with duration.
  2. The diallerUser table (fields: cts_agentstate and cts_callstate respectively) as soon as they happen.

Agent States

The agent states refer to the state chosen in the top left agent state selector in Dynamics Telephony. The names of the states under the selector depend on the Telephony Provider. However, the underlying state for the RTD is always one of these five:

LoggedIn: Light Gray

Ready:  Green

Away: Yellow

NotReady: Red

LoggedOut: Dark Gray

Call States

The call state is shown in Dynamics Telephony on the top right as the state in text. Here are the possible values.

Idle – No call in progress. (sometimes labeled “startup” if it is the first idle period after the DT Client starts.

Incoming – an inbound call is ringing on the user phone.

Start – Auto-dialer calls only. The users has started a personal “Queue Loader” campaign.

Offering – Auto-dialer calls only. The outbound call is being offered to the user to accept for auto-dial, or reject to put back in the queue.

Preview – this applies only to auto-dialer calls. It is a period of some seconds before a call is auto-dialed. It is designed to allow the user time to review a customer record before the customer is auto-dialled.

Ring – An outbound call is ringing. It has not been answered yet.

Talk – Talking on an inbound or outbound call

Hold – An inbound or outbound call has been placed on hold

Pause – Preview or Wrap time has been paused by the user. The user can also be put into Pause automatically if no outcome has been chosen (and there is no default outcome) when Wrap time ends.

Wrap – An inbound or outbound call is in the Wrap state. This is an after-call state designed to allow the user make notes and prevent another call arriving during the Wrap time countdown.

End – No call in progress. The same as Idle

Stop – No call in progress. The same as Idle


RTD Config Guide

You can easily add columns to the Agent RTD. This guide leads on from  here which deals with the attribute type. The steps below show you how to add columns of other types. Unless specifically mentioned, all

Type – Entity

The key specifies which table the data will be sourced from
Order and Value can be blank


Type – Filter

The key set which value to filter by e.g. Cts_Team==’ALL’
Order is 0
Value can be blank


Type – Calculated

The key is the formula used to calculate the result e.g. parseDate(rowData[‘Cts_Time’]).toHHMMSS() which would
write out the field Cts_Time in the format HHMMSS
Order is order
Value is column width


Type – Livestate

Similar to attribute except that livestate must be used when for times that update i.e. other than State Time


Type – Hidden

This is used so that you can cite this field in future fields or calculations.


Type – Link

Similar to attribute except it is a link. E.g. to link to the user’s profile you would use the key 
‘Xrm.Utility.openEntityForm(“systemuser”,”‘+rowData[“Cts_SystemUserId”]+'”)’


Type – Order

Is used to order the rows.
Key gives the field by which it will be ordered
Value defines whether the data is in ascending or descending order with the value ASC or DSC


Type – Rule

This defines appearance changes to be made in certain situations           e.g. make the call hold time blink red if it goes
over 1 minute
Key defines the situation e.g.
rowData.Cts_call_time_Hold >= ’00:01:00′
Value defines the changes to be made                                                                          e.g. background|#f4c212;effect|blink;


Note –

To be able to add or create a new report of the corresponding record from the DiallerReports, it must contain ‘entity’
as its type attribute value.

Use Custom Forms

Dynamics Telephony allows you to specify a Custom URL to use for your outbound or inbound calls. So, if you have designed a custom form for users to process inbound or outbound calls, then you can have Dynamics Telephony pop that form for the user.

You can specify different Custom URLs for inbound and outbound. And you can also specify a set of conditions for when to use the Custom URL, such as only when no match for the caller is found in CRM, or only when the caller is a contact, etc.  You can specify multiple Custom URLs, each with a different set of conditions attached.

In addition, Dynamics Telephony will pass a set of parameters to your page at the Custom URL. These are described below.

How to set up a custom URL

You configure the URL to pop, along with the conditions for the pop, as a dialerKVTable entry, with these values:

Owner. This can be any owner.
Scope. Only “global” has been tested. This means it applies to all users. In future, we may support putting a users name here to make it specific only to that user.
Parent. Leave blank always
Name. Always customURL_Rule. It is case sensitive so type as shown.
Key. A number. Start at 1 for the first rule, 2 for the second etc. The rule with the lowest Key number that the condition (next section) yields TRUE will determine the pop. If no rule yields TRUE, then the default contact, lead etc. is popped. NOTE: the sorting is text based so you should use 2 digits for all numbers, like 01 or 12 etc.
Value. Format condition=>url-to-pop
url-to-pop can be any valid URL. Only webresources served by the CRM have been thoroughly tested. The keyword default can be used instead of a URL to pop the default CRM form for the matched entity.
condition is one or more conditions where you specify such things as applicable entity (fromParty.Key=contact, lead, account.), number of matches (lookupCount=0 or 1), DNIS (dnis=1234), and direction (inbound or queue)

See next section for examples of Value

Some examples of Value

direction=queue=>file:///C:/_cts/Fast%20n%20Lite/page.html

direction=inbound&&fromParty.Key=contact&&lookupCount=1=>https://yourCrm.crm.dynamics.com//WebResources/dot_/CPO/CP.html

direction=inbound&&lookupCount=0=>https://yourCrm.crm.dynamics.com//WebResources/dot_/CPO/CP.html

direction=inbound&&fromParty.Key=account&&lookupCount=1=>https://kotsovolosdev.crm4.dynamics.com//WebResources/dot_/CPO/CP.html

direction=inbound&&dnis=1234=>default

Parameters passed to the Custom URL

TIP: When you run a test call, check the Dynamics Telephony log file (DT Menu > Log File) to see the URL and it’s parameters. Search in the log file for oCustomUrlRules and you will see the URL a line or two after that.

Parameters
Data=
state, e.g. incoming
type, e.g. phonecall. Only phonecall supported
phoneCallID, e.g. 7e2a5311-be86-e911-a84d-000d3ab0d976
direction, e.g. inbound, or queue (outbound)
telephoneNo, e.g. 00353868561713
dnis, e.g. 1234
dnisName, e.g. DEV
agentType, e.g. systemuser
agentId, e.g. dbe7f238-1d8d-e911-a819-000d3aba212d
customerType, e.g. contact
customerID, e.g. dbe7f238-1d8d-e911-a819-000d3aba212d
ReType, e.g. contact
ReId, e.g. dbe7f238-1d8d-e911-a819-000d3aba212d
dtCallId, e.g. e8393a0f-be86-e911-a847-000d3ab0d281
agent, e.g. Test+Agent06
fullName, e.g. My full name
description, e.g. description+text+from+phonecall
customText, e.g. text from a phonecall custom field called new_customtext
subject, e.g. inbound+call+with+DNIS+DEV

Sample URL popped with parameters
CP.html?Data=state%3Dstart%26type%3Dphonecall%26phoneCallID%3D30240805-03be-e911-a82f-000d3ab71acc%26direction%3Dqueue%26telephoneNo%3D6946186715%26dnis%3D%26dnisName%3D%26agentType%3Dsystemuser%26agentId%3Da661cc8a-eb7a-e911-a824-000d3ab70af3%26customerType%3Dcontact%26customerID%3De79beb12-998b-e911-a825-000d3ab70627%26ReType%3Dcontact%26ReId%3De79beb12-998b-e911-a825-000d3ab70627%26dtCallId%3D7f22a4f1-7fe6-e911-a838-000d3ab713ee%26agent%3DDyn+Crm06%26fullName%3D%CE%9D%CE%95%CE%9A%CE%A4%CE%91%CE%A1%CE%99%CE%91+%CE%9A%CE%95%CE%A6%CE%91%CE%9B%CE%9F%CE%9D%CE%99%CE%9A%CE%91%26description%3D%26  %3D%26subject%3D%CE%95%CE%9A%CE%A3-06441+-+MRKT-0010324


Moving to a new CRM

This post gives you guide on how to move your Dynamics Telephony configuration from one CRM to another.

The example is for porting from CRM1 (where you have tested everything to your satisfaction) to CRM2 (where you want to replicate the tested settings)

FIRST install the solution on CRM2. Use the link provided by your support engineer.

NEXT run Dynamics Telephony on CRM2. You do this by clearing the cache ( see here ) and starting Dynamics Telephony again. You will be prompted for the URL of CRM2. IMPORTANT, once up and running, manually set items in Menu > Settings > Crm Configuration, as these cannot be ported over in the “Port Data” described below. Quit that instance of Dynamics Telephony.

THEN, Port Data between the Dynamis Telephony entities in CRM as follows…

CRM entity dialerKvTable – Delete all rows from CRM2 where scope equals global. Export all rows from CRM1 where scope equals global and import into CRM2

CRM entity dialerCallOutcome – Delete all rows from CRM2. Export all rows from CRM1  and import to CRM2.

CRM entity dialerDnis – You will have to manually re-create all DNIS Settings in CRM2. This is because the CRM URL is part of the DNIS definition. Also, the images for the DNIS are stored as webresources in CRM – which have the same name as the DNIS. Advanced users could manually fix the URL in the DNIS definition and port over the image webresources in a solution.

CRM entity dialerQueueSettings – You will have to manually re-create the Queue Settings on CRM2. This is because the CRM URL and the queue GUID is part of the Queue Settings.

CRM entity dialerReports –  If you have made any custom report definitions for the Dynamics Telephony RTD, then you can port these to CRM2. Delete all rows from CRM2. Exports all rows from CRM1 and import to CRM2